WhatsApp for Bitrix24.com
- How to Hide agent information on Bitrix24
- WhatsApp Business API for Bitrix24: Installation and sending the first message.
- Creating robots and sending template messages through them to Bitrix24
- Simple Bitrix24 automation based on client message
- Instructions for sending templates in Bitrix24 via our WhatsApp Business API integration entity
- Instructions for sending a template from the client card in Bitrix24
- How to create a template for WhatsApp Business API
- How to improve your mailling
- How to run a marketing campaign in Bitrix24.
How to Hide agent information on Bitrix24
Bitrix24 automatically adds agent's name to your message when answering via "Open Channel", disrupting the correct functioning of templates.
To disable this feature, you have to:
1. Open the "contact center" section.
Go to the "CRM" -> "Customers" -> "Contact Center"
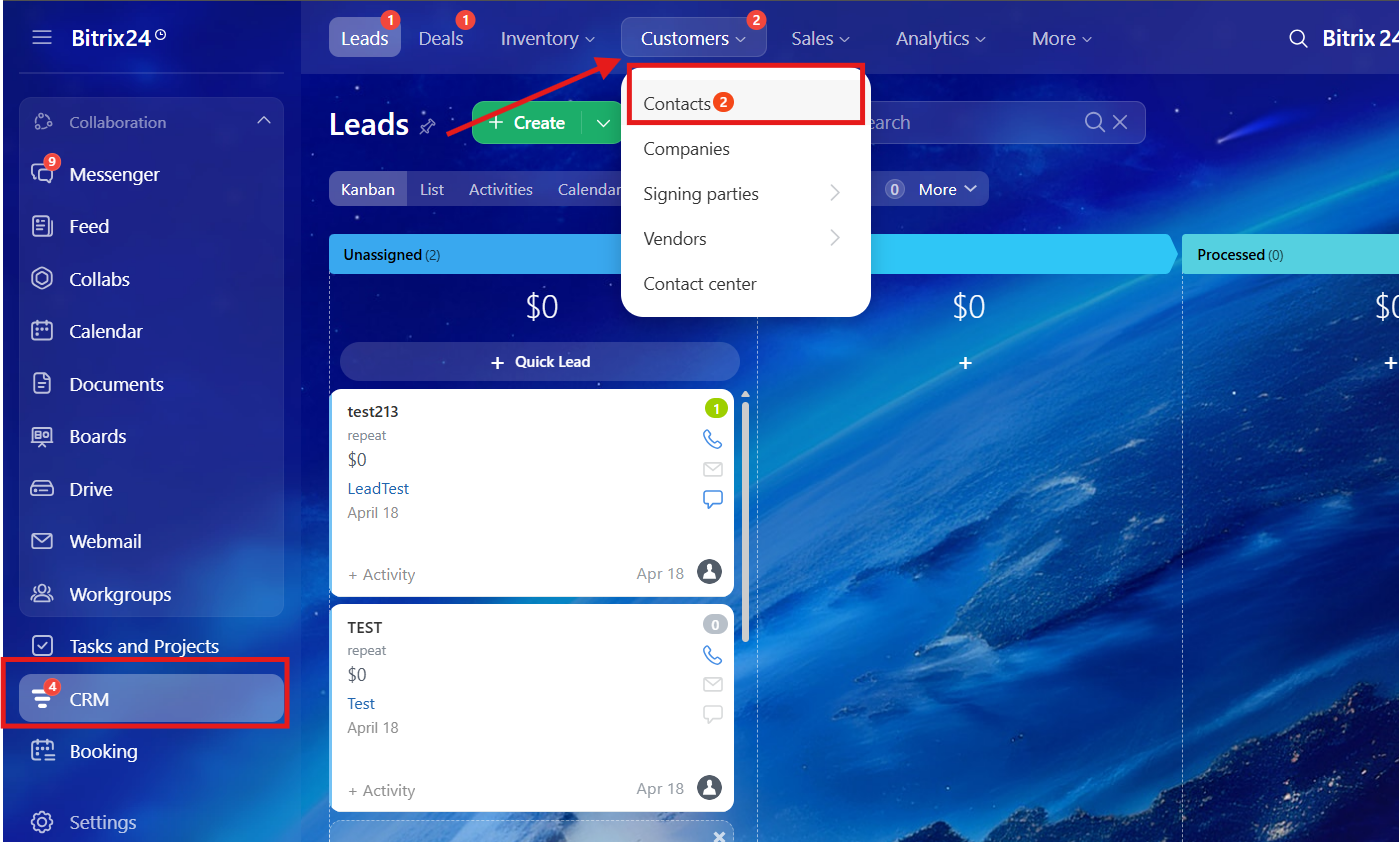
2. In the contact center, you need to find our app and click on it
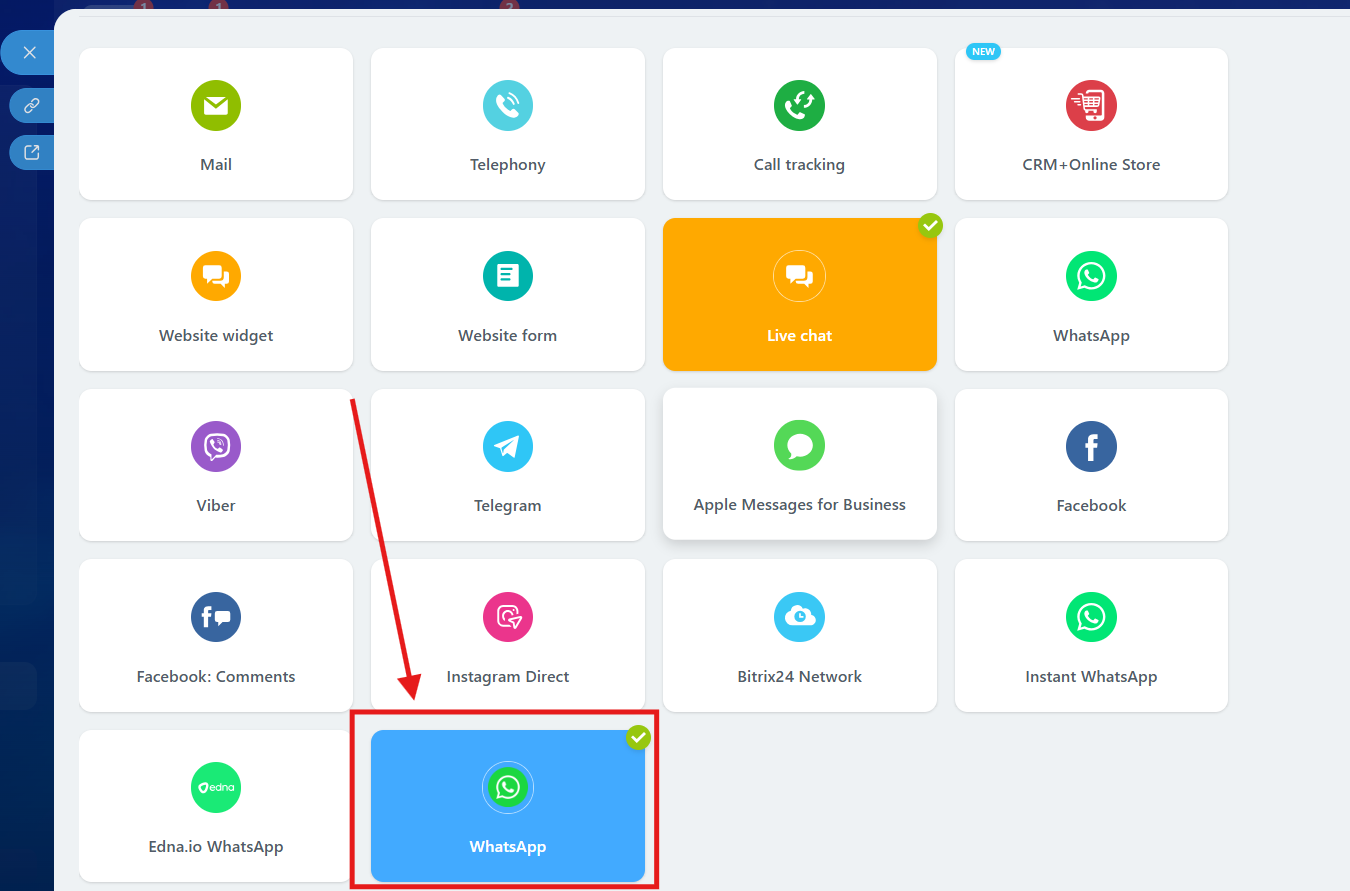
3. After clicking on our app, you need to select "Open Channel".
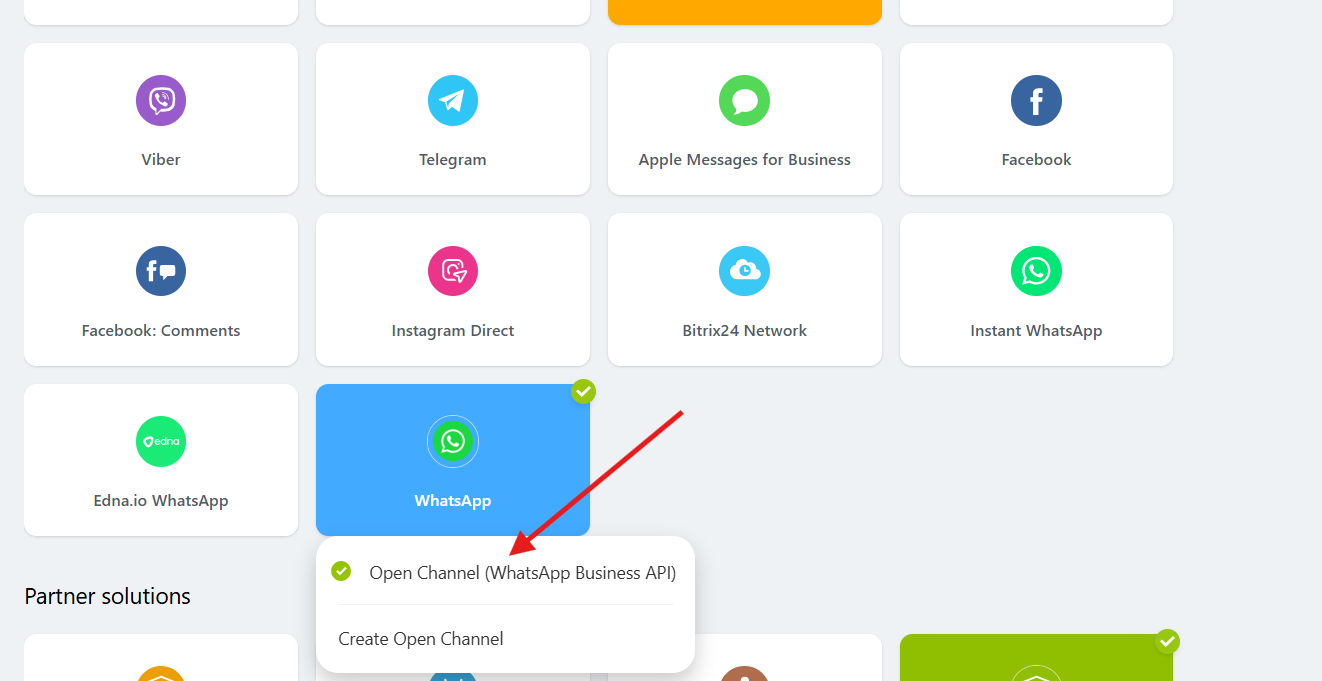
4. Click on the "Configure" button.
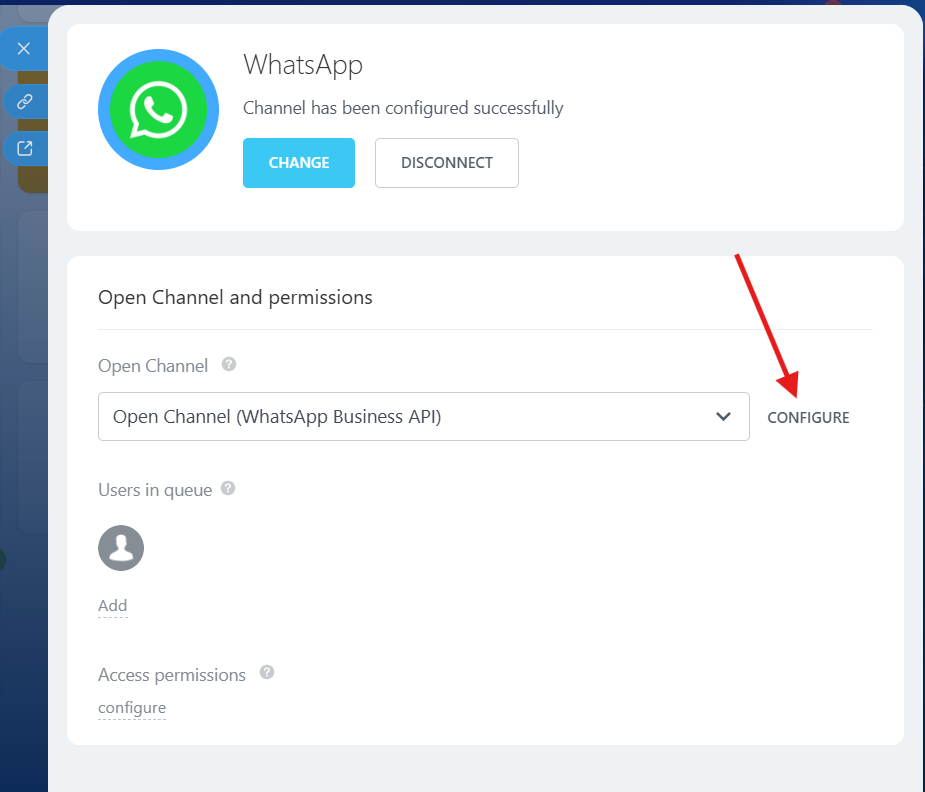
5. In the configure menu, go to the "Queue" and in the "Agent information" section, select
"Hide agent information" and press "Save" button
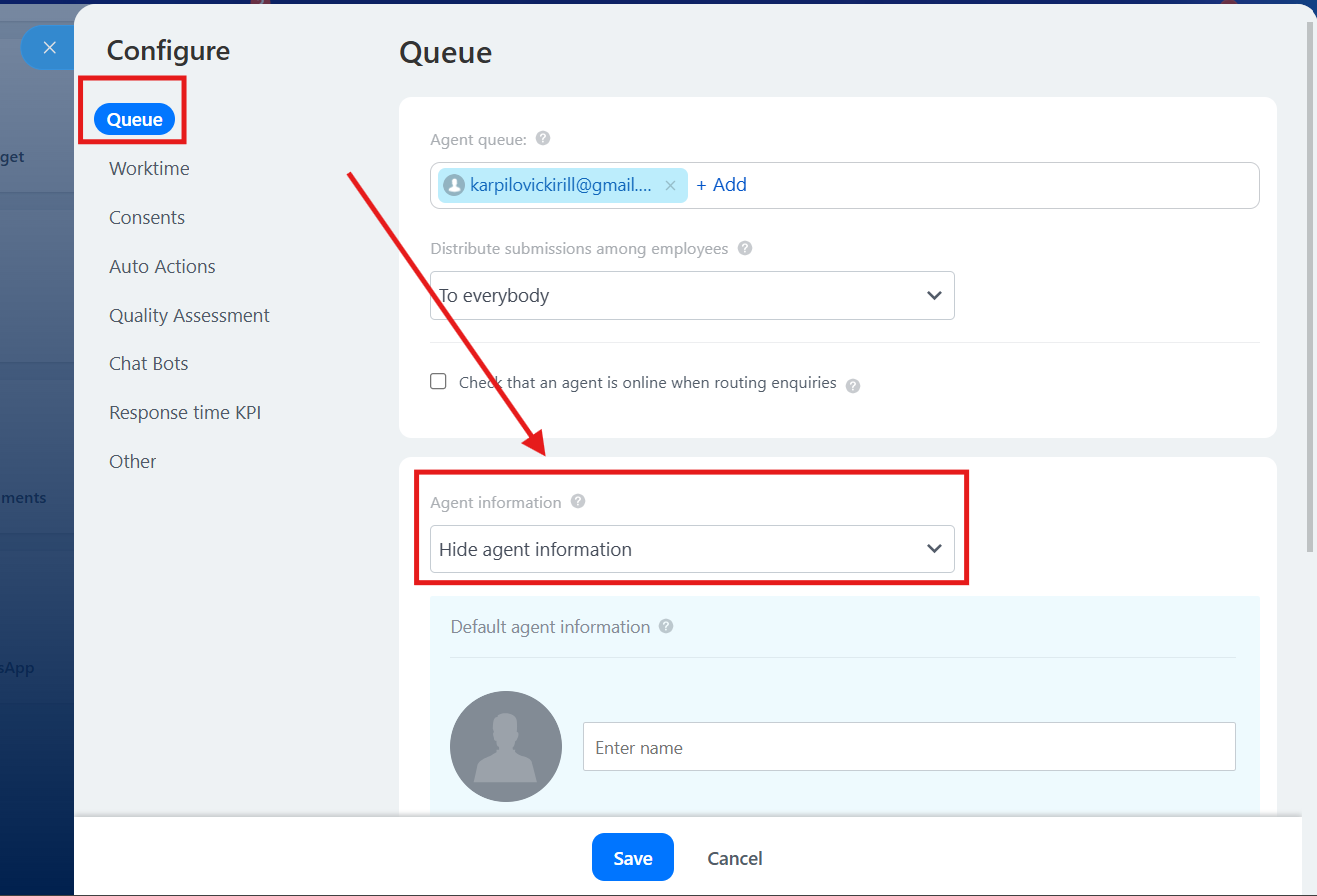
Done. Now you can easily send templates from Open Lines without any issues.
WhatsApp Business API for Bitrix24: Installation and sending the first message.
Step by step instruction
1. Go to Bitrix24 Market (1)

2. Click on the “Search” field and type “whatsapp” (1). Find our app “WhatsApp Business API” (2) and click on it.

3. In the appeared window check the correct developer - ChatArchitect.com (1) and click the “Install” button

4. Follow the instructions (1) to get your App ID and App Secret keys. When done press the button (2)

5. Press the “Connect” button (1)
NOTE: In very rare cases you wouldn’t see this window. If you face this situation please go to step 6 and then return to step 5

5.1 Enter your “App ID” (1) then enter your “App Secret” (2), and press the “Save” button (3)
NOTE: To get these keys write to our "Customer's Support WhatsApp chat": https://wa.me/421233221242 ;

5.2 Congratulations! You can write your first message from WhatsApp to your WhatsApp Business API number

6. Optional: If you somehow managed to skip steps 5-5.2 or can’t find “Contact center” in your menu to complete app connection then follow the next steps:
6.1 Find the “Search” field in the header (1) type “contact” then choose “Contact center” in the search results (2)
NOTE: Step 6.1 is an optional Step and must be skipped if steps 5-5.2 are done!

6.2 In the “Contact center” section click on the WhatsApp tile (1) IMPORTANT: Green icon with the blue stroke!
NOTE: Step 6.2 is an optional Step and must be skipped if steps 5-5.2 are done!

7. Write your first message from WhatsApp to your WhatsApp Business API number. When you do it Bitrix24 should show you a popup with the message (1). To go into chats you can click this popup or press the “View open channel chat” button (2)

7.1 In the opened chat window click the “Reply” button (1) and write your answer

Creating robots and sending template messages through them to Bitrix24
Video manual: https://www.youtube.com/watch?v=fY_vqW-Ijb8
1. Go to the "Deals", then "Automation rules"

2. Press "Create"

3. Choose stage, then Customer communication => Send SMS to customer

4. Find our bot, click "Change". In the list of providers, select our integration, in the text field, enter the text of the template

Simple Bitrix24 automation based on client message
In this guide, we will implement the next scenario: On incoming client message, the trigger moves the lead to the "Ask client" stage -> CRM automatically sends a message template to the client (lead) with text and two buttons (Invoice and Support) -> If a client presses the "Invoice" button, he moves to the Bitrix24 "Invoice" stage and receives an invoice link -> In case if client presses "Support" button he moves to the Bitrix24 "Tech support" stage and receives contact information of tech support.
NOTE: This instruction assumes that you have already completed the "WhatsApp Business API for Bitrix24: Installation and sending the first message" guide [Bitrix24 (chatarchitect.com)]
Step by step instruction
1. Go to "Deals" (1). Press the "+" button (2) on the first stage and create two new stages in "Ask client" (3) and "Tech support" (4). Then press the "Automations" button (6)
NOTE: "Invoice" stage (5) is a standard Bitrix24 stage, and we are assuming that you already have it.

2. In the opened window (1) you need to create three triggers (2)(3)(4) that will listen to all incoming client messages and react to keywords in those messages.


2.2 In the appeared window give a name to the trigger (1). Select which channel it will listen (2)*. "Message text contains" (3) leave empty**. Press the "Save" button (4)
NOTE: * By default, Bitrix24 gives the name to the Whatsapp channel - "Open channel"
** Empty "Message text contains" means that the trigger will react on any "Lead" message.
IMPORTANT! Don't check "Allow moving back to previous status"

2.4 In the appeared window give a name to the trigger (1). Select which channel it will listen (2)*. "Message text contains" (3) write 'Tech support'. Check "Allow moving back to previous status" (4). Press the "Save" button (5)

2.6 In the appeared window give a name to the trigger (1). Select which channel it will listen (2)*. "Message text contains" (3) write 'Invoice'. Check "Allow moving back to previous status" (4). Press the "Save" button (5)

Now you need to create and approve the message template on the https://app.chatarchitect.com website. Make selections (1) and (2). Write template text (3). Repeat template text (4). Write 'Tech support' **** as the name of the first button. Write 'Invoice' **** as the name of the second button (5) and hit the "Submit template" button (6)
**** IMPORTANT! To avoid accidental triggers (if the user writes similar combinations of words that the trigger listens for), it is important to make template buttons with unique characters. We recommend apostrophes around the edges. For example 'Tech support'.

Now let's create three automations (2), (3), (4) in Bitrix24 like in the picture below:

4.1 Hit "Create" button (1) from "Step 4" and create the first automation "Send SMS to customer" (2) for "Ask client" stage.

4.2 Our first automation will send our approved WhatsApp template from "Step 3". Insert template text in the text field (1). Make selections (2) and (3) and hit the "Save" button (4)

4.3 Hit "Create" button (1) from "Step 4" and create the second automation "Send SMS to customer" (2) for "Tech support" stage. Write the "Support" text in the text field (1). Make selections (2) and (3) and hit the "Save" button (4)

4.4 Hit "Create" button (1) from "Step 4" and create the third automation "Send message to the chat" (2) for the "Invoice" stage.

4.5 Write the "Invoice" text in the text field (1). Select (2) and then (3) to upload an invoice file from your drive. And hit the "Save" button (4)

5. Now let's test our result. Send "Hello" to your WhatsApp number and enjoy your work!

Instructions for sending templates in Bitrix24 via our WhatsApp Business API integration entity
In this guide, you will learn how to send template messages in Bitrix24 using our integration entity.
1. Go to the CRM -> Deals and choose a deal
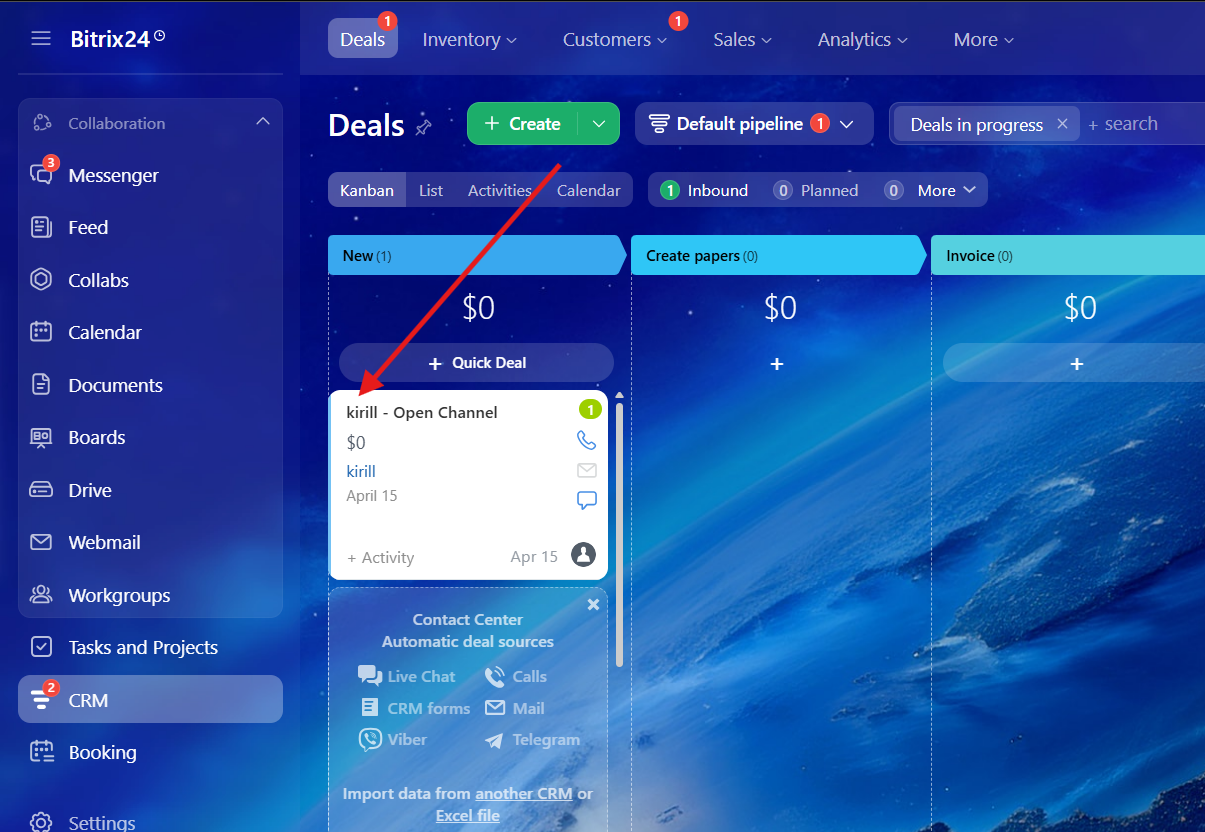
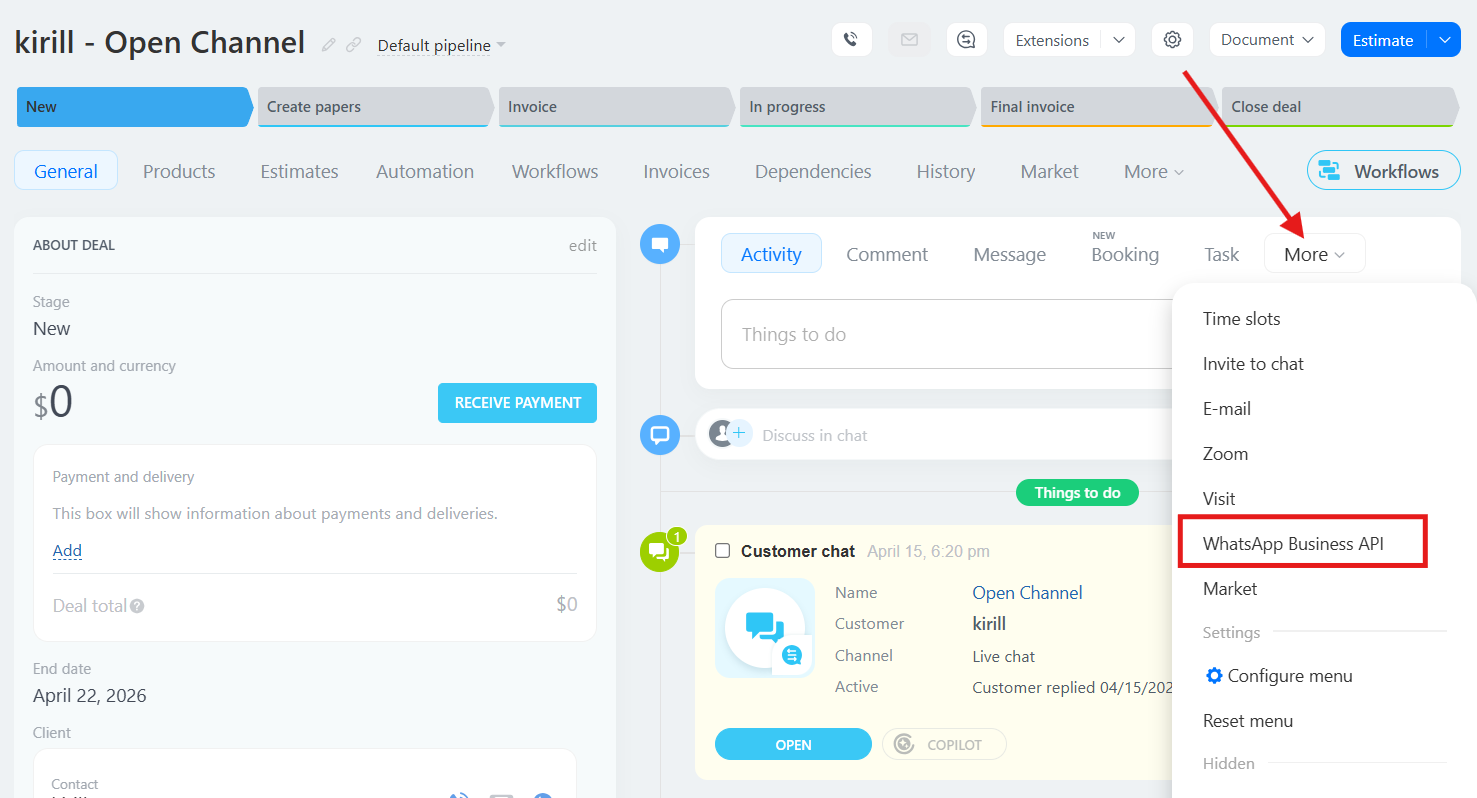
2. Press "More" and choose our entity "WhatsApp Business API"
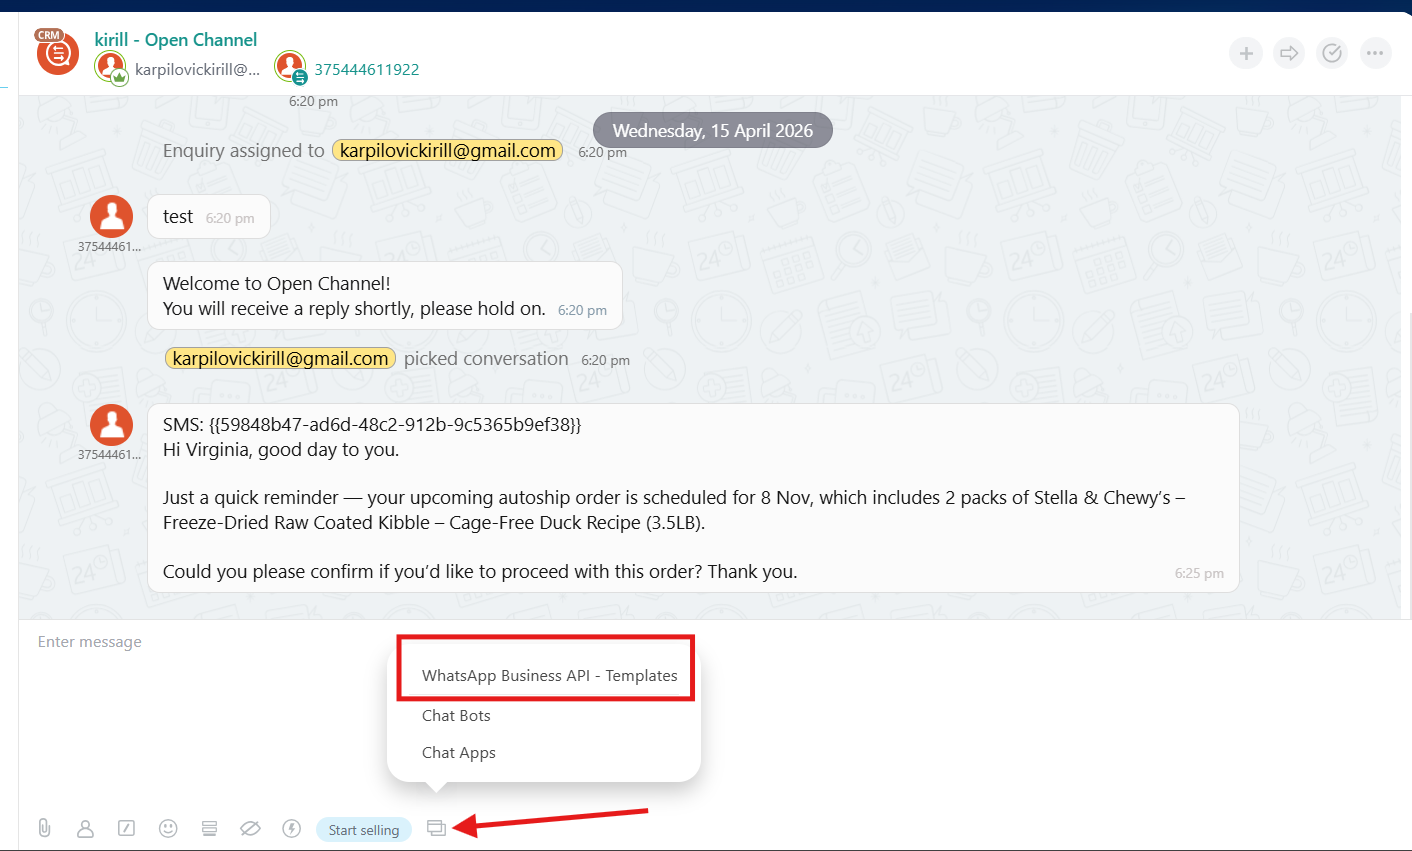
3. You will be redirected to Open Lines. In the chat window, at the bottom, there will be a button (indicated by an arrow in the screenshot). Click on it and select "WhatsApp Business API templates."
After that, choose the required template and send it to your client.
Instructions for sending a template from the client card in Bitrix24
In this guide, you will learn how to send template messages in Bitrix24 through the client card.
Video manual: https://www.youtube.com/watch?v=xDwp3tOS5Qo
1. First of all, you need to choose a deal\lead
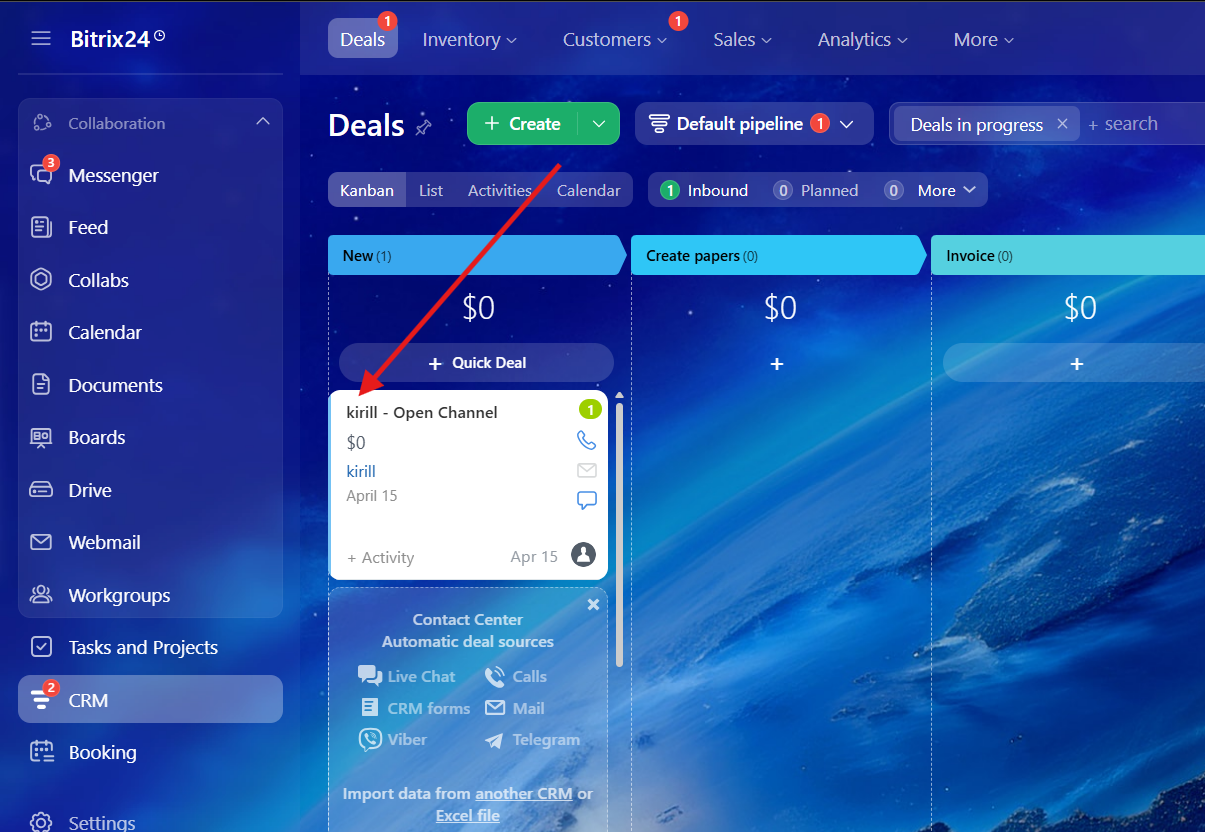
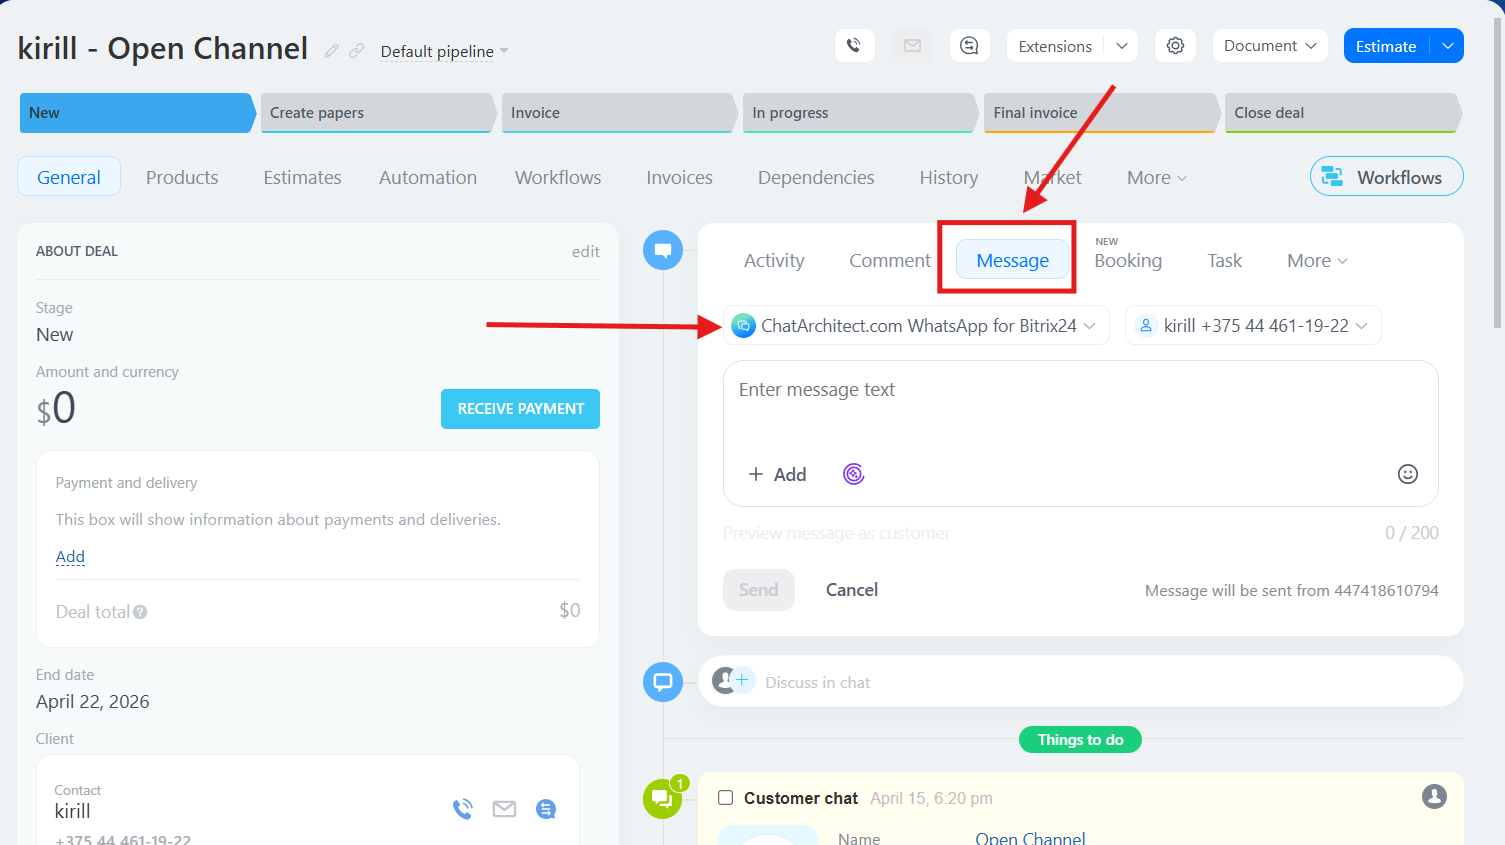
2. Choose "Message" button and choose our app as a provider
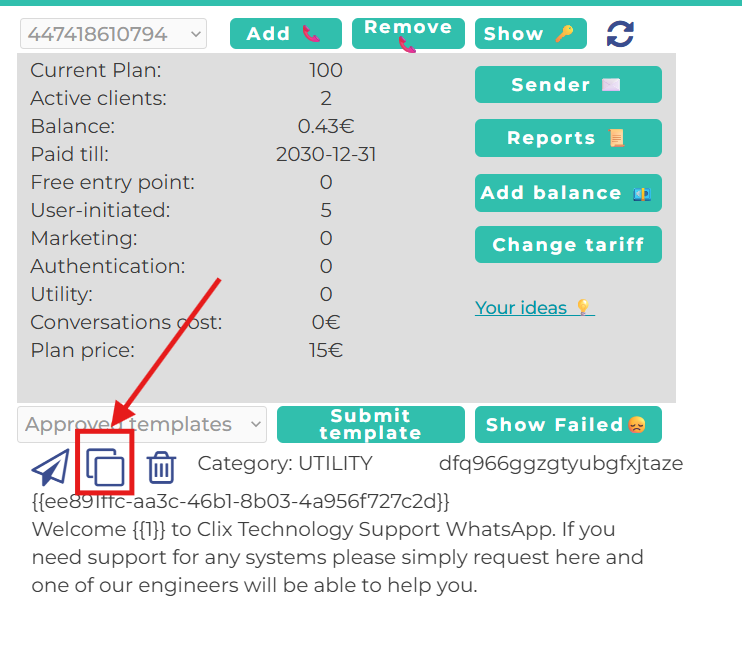
3. Go to your personal account ( https://wtargeted.com/ ) and copy a template that you need by using special button
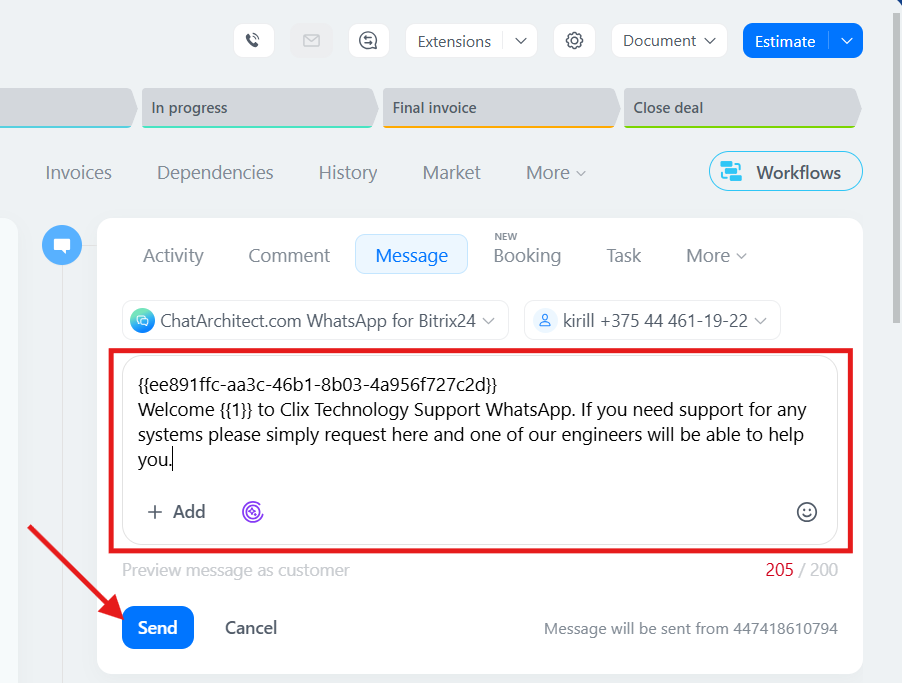
4. After that, return to the client card, paste the template text into the message field, and send it. Done!
How to create a template for WhatsApp Business API
Step-by-step instructions how to create a template in our app
1. First of all, you need to open wtargeted.com/ and click on the "Facebook Login" button or "Google Login" button

2. After you have logged in to your google \ facebook account, you must enter your PERSONAL phone number on which there is a WhatsApp application, a verification code will be sent to it (not to be confused with the number that you connected with us)

3. Put your App key and Secret and press "Yes, continue".

4. After this, an app menu will be opened. Click on the "Submit template" button.

5. Select the desired language and template type.
Write your message with variables in the first column. For example, "Hello, our employee will answer you as soon as possible. Ticket {{1}} has been created." Variables should be in braces {{}}.
Write a sample message replacing the variables with meaningful information in the second column. For example, "Hello, our employee will answer you as soon as possible. Ticket [999TTT] has been created.". The placeholder is square brackets [].
Then click "Submit Template".

6. After review, your template will appear in "Approved templates".

Don't forget to click on the "refresh" button.
How to improve your mailling
How to improve your Template
When preparing a mailing campaign, one of the most common questions is: How can I create an effective newsletter without risking being blocked? In this article, we’ll share practical recommendations to help you achieve that.

Text Length
Meta recommends keeping marketing templates under 500 characters to maximize customer engagement. The optimal range is 300–500 characters. In practice, this means keeping your message concise and focused: present the essence of your offer in just a few sentences instead of overwhelming readers with a wall of text.
Personalization with Variables
Personalization significantly improves the effectiveness of your campaigns. Using variables such as the customer’s name is a simple but powerful way to make your messages feel more personal. After all, everyone appreciates being addressed directly.
Use of Media
Adding visuals such as bright images or short videos is a proven way to increase click-through rates. High-quality media design not only attracts attention but also serves as an important driver of conversions.
Action Buttons

In addition, action buttons can redirect users directly to your website or phone number, making the communication process seamless and convenient.

Unsubscribe Button
Meta recommends including an “Unsubscribe” button in mass-mailing templates, and we strongly support this practice. It’s much better to give customers an easy, native way to opt out than to risk complaints or negative feedback.

Conclusion
If you want your newsletter to deliver high engagement and strong conversion rates, make sure your template includes all of the elements listed above: concise copy, personalization, engaging visuals, action buttons, and an unsubscribe option.
Important Note: Templates containing images or call-to-action buttons (such as a website link or phone number) can only be approved via chat with our support team: wa.me/421233221242
wa.me/17377101702
How to run a marketing campaign in Bitrix24.
In this guide, you will learn how to launch a marketing campaign using our module.
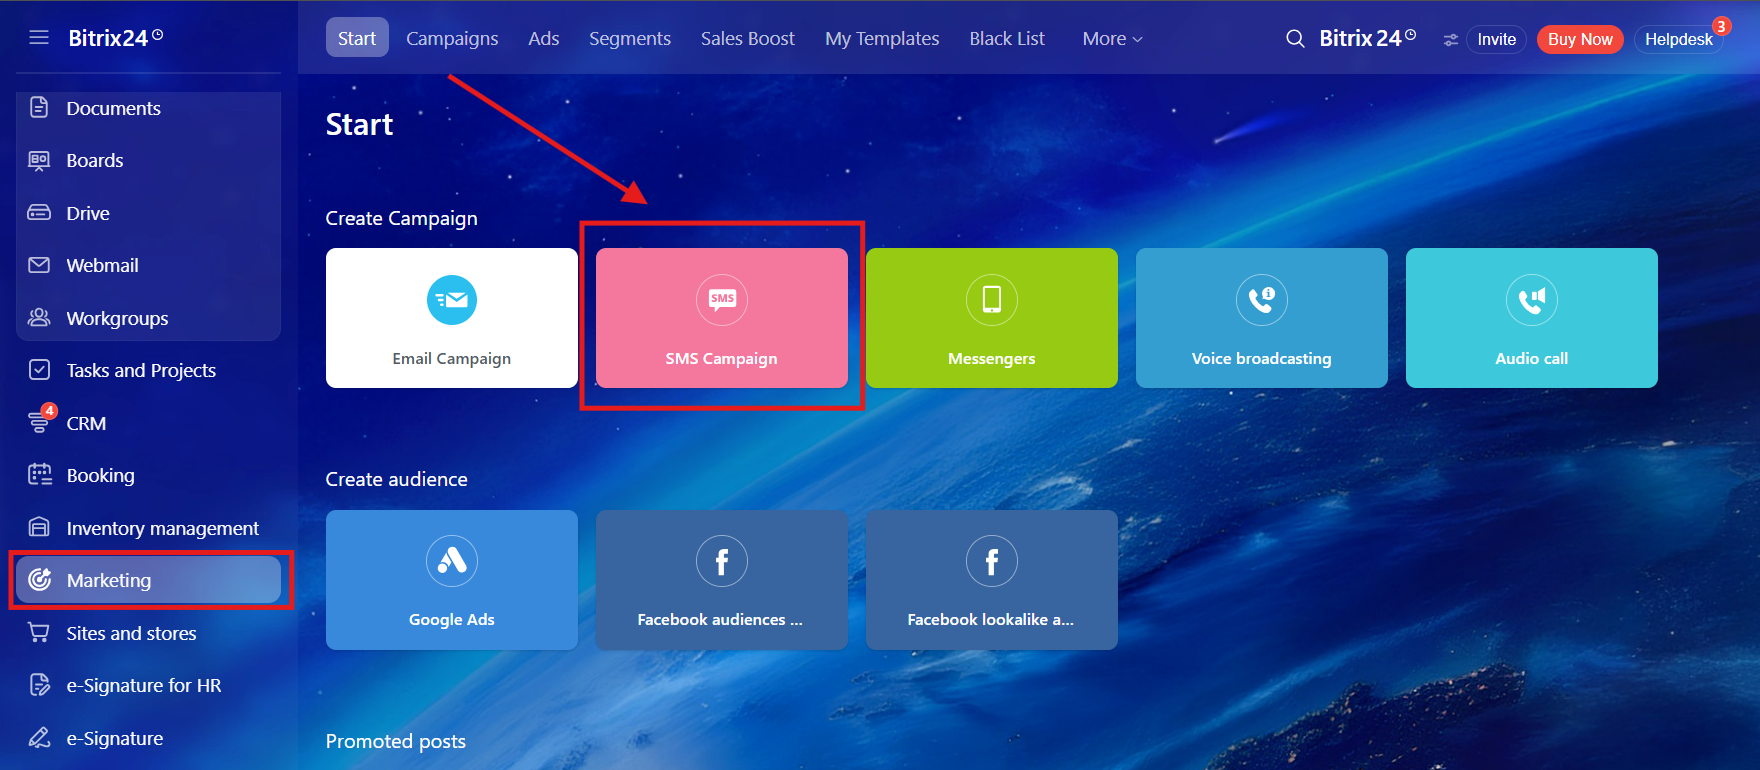
1. First of all go to the "Marketing" -> "SMS Campaign"
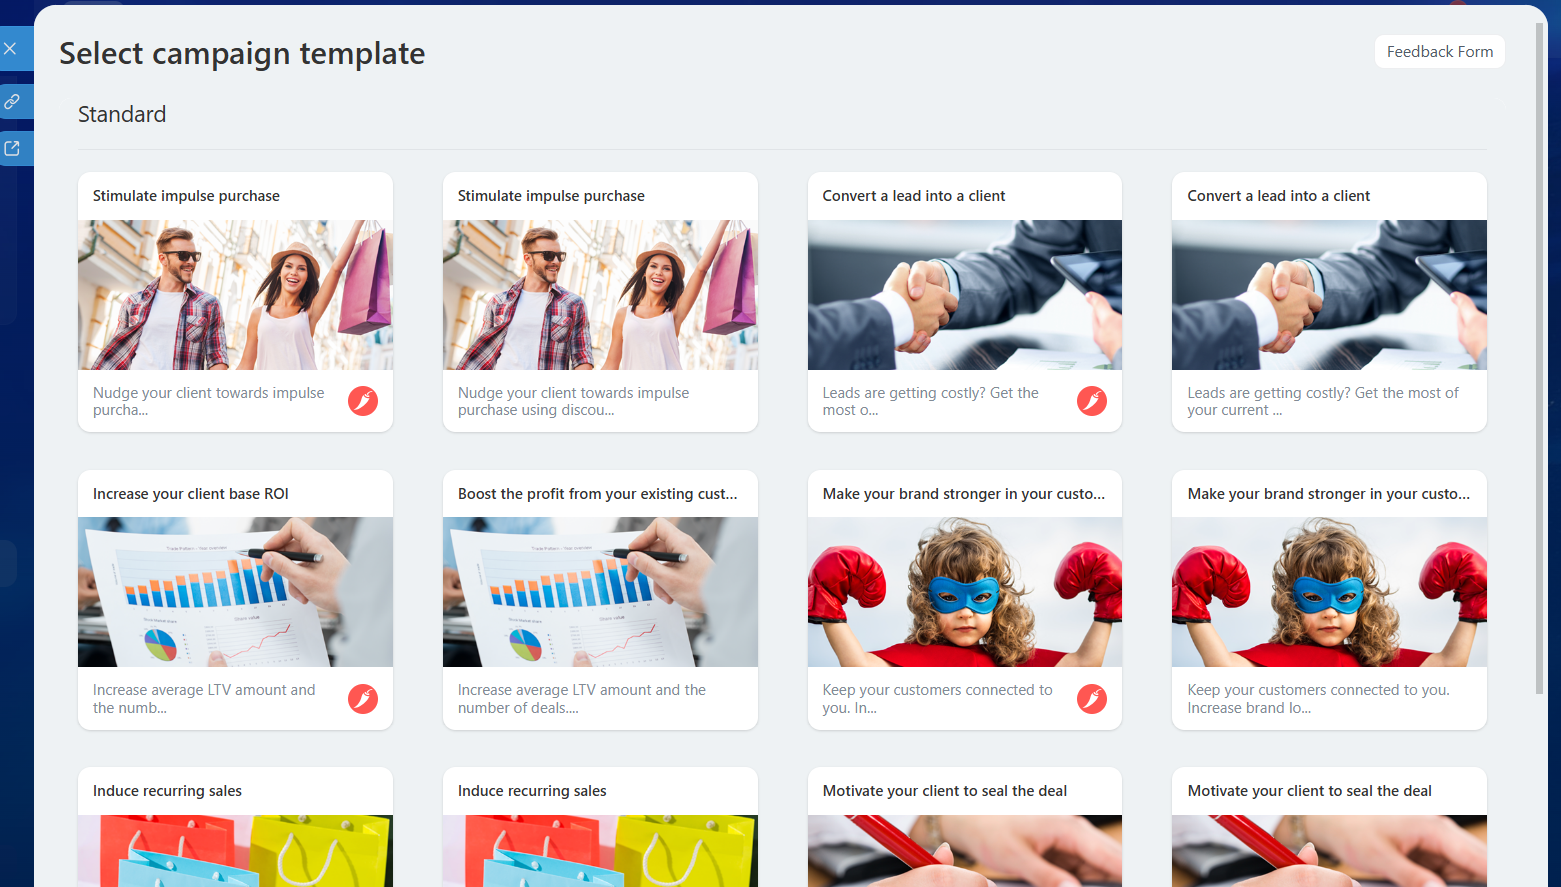
2. Choose any template
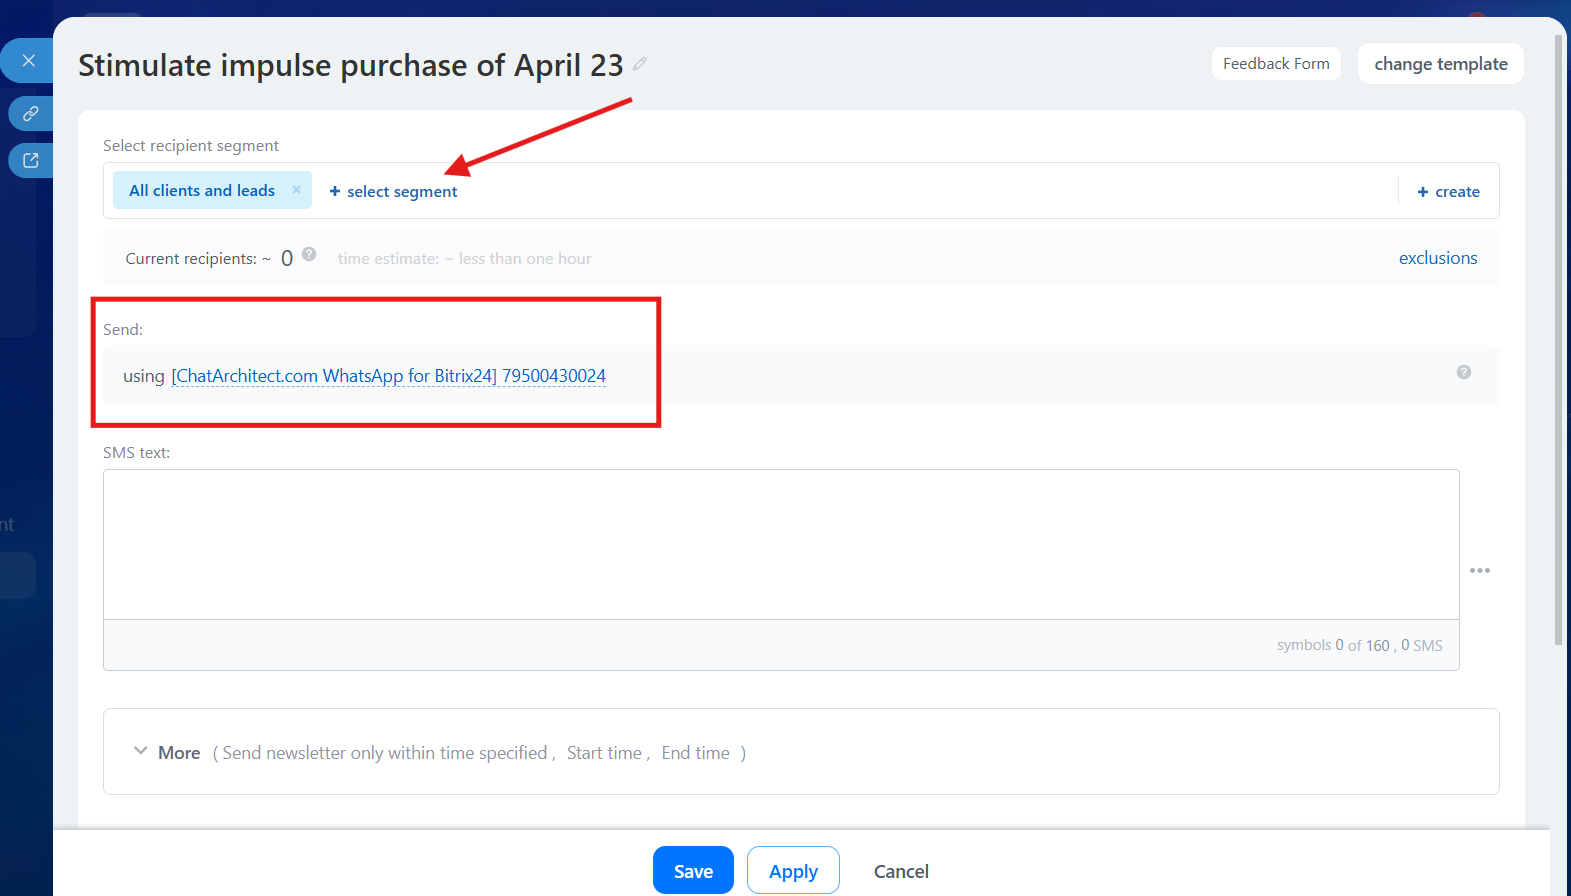
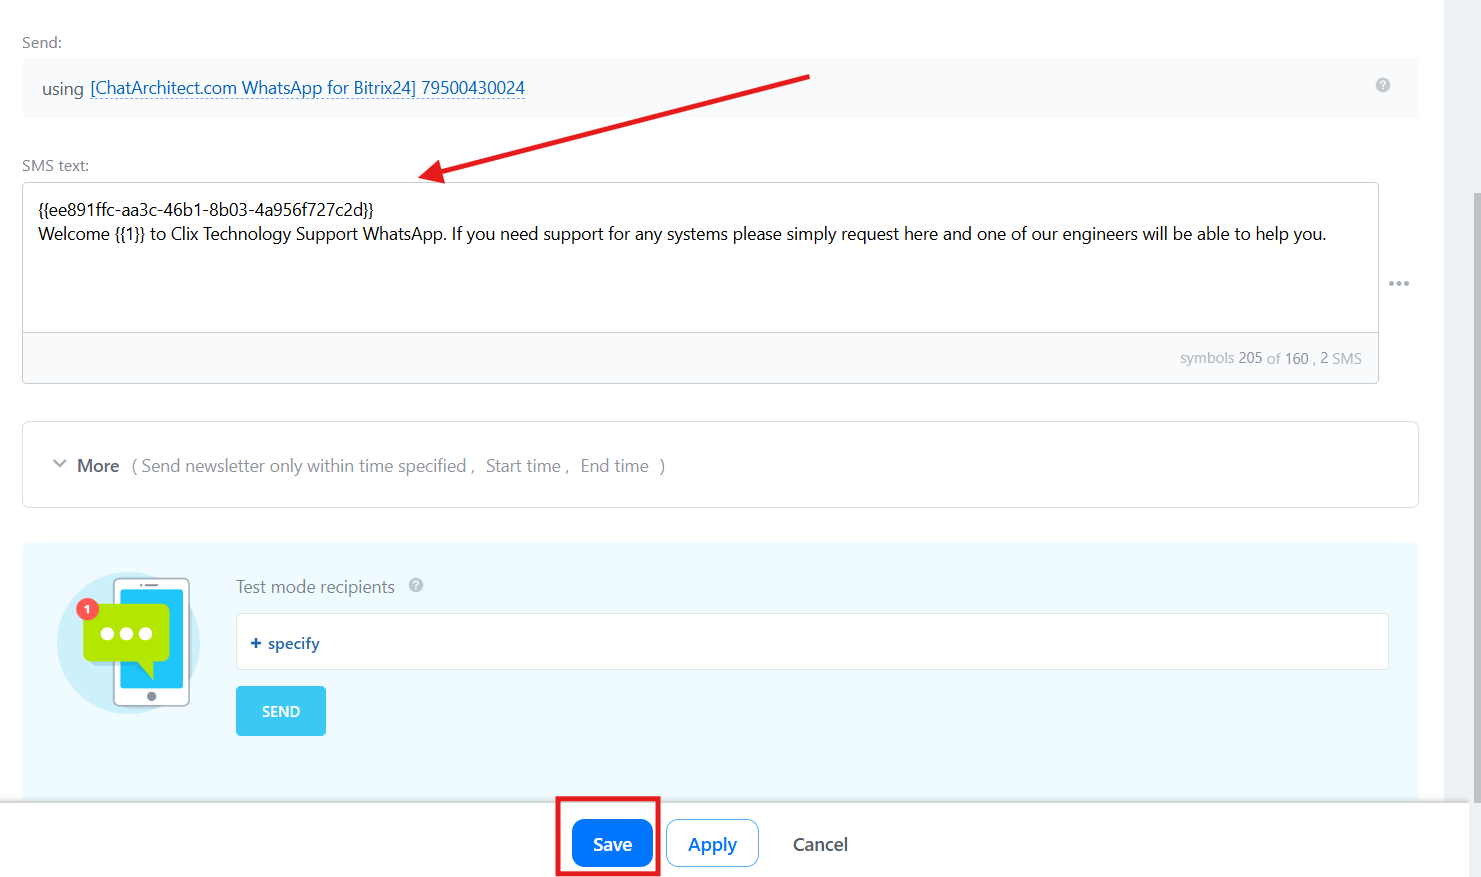
3. Choose a segment that you want to use and choose our app as a provider
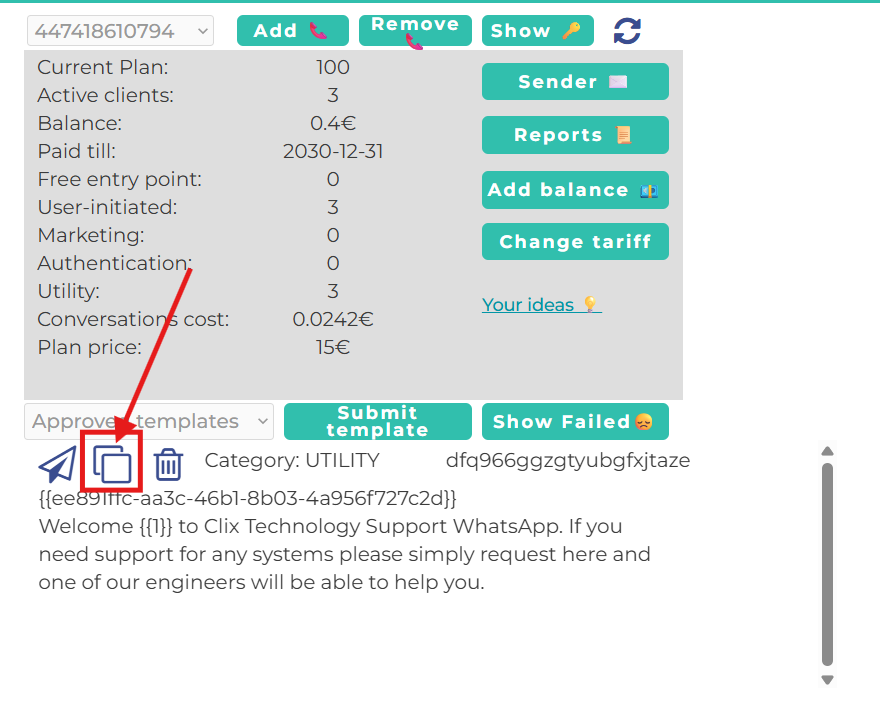
4. After this go to our app https://wtargeted.com/ and copy a template that you want to use by using "Copy" button
5. Then return to Bitrix24 and paste the template into the text field and press "Save"
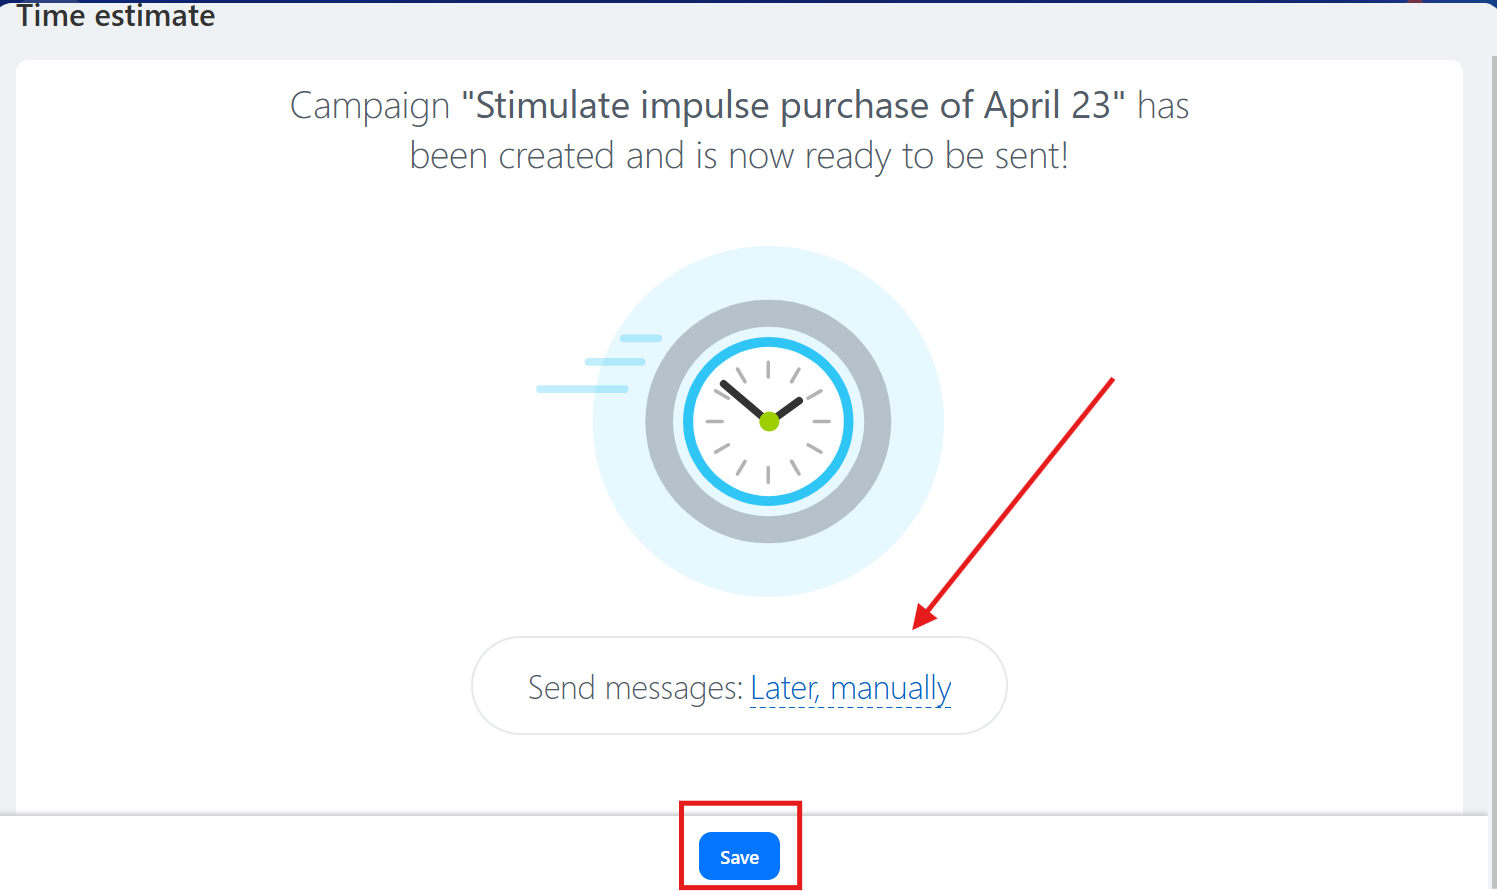
6. Select the time when you want the message to be sent and click “Save”
Done. Now you know how to send marketing campaigns from the Bitrix24 interface.