# WhatsApp for Zapier.com

# WhatsApp Business API for Zapier: Installation guide

**<span style="color: rgb(0,0,0);">In this guide, you will learn how to install our <span class="hover:entity-accent entity-underline inline cursor-pointer align-baseline"><span class="whitespace-normal">WhatsApp Business API</span></span> integration in <span class="hover:entity-accent entity-underline inline cursor-pointer align-baseline"><span class="whitespace-normal">Zapier</span></span>.  
  
</span>**<span style="color: rgb(0,0,0);">1. Go to the "**App Connections**" -&gt; in the search field write "**ChatArchitect**" and choose our app.  
</span>

[![image.png](https://support.chatarchitect.com/uploads/images/gallery/2026-04/scaled-1680-/wmZimage.png)
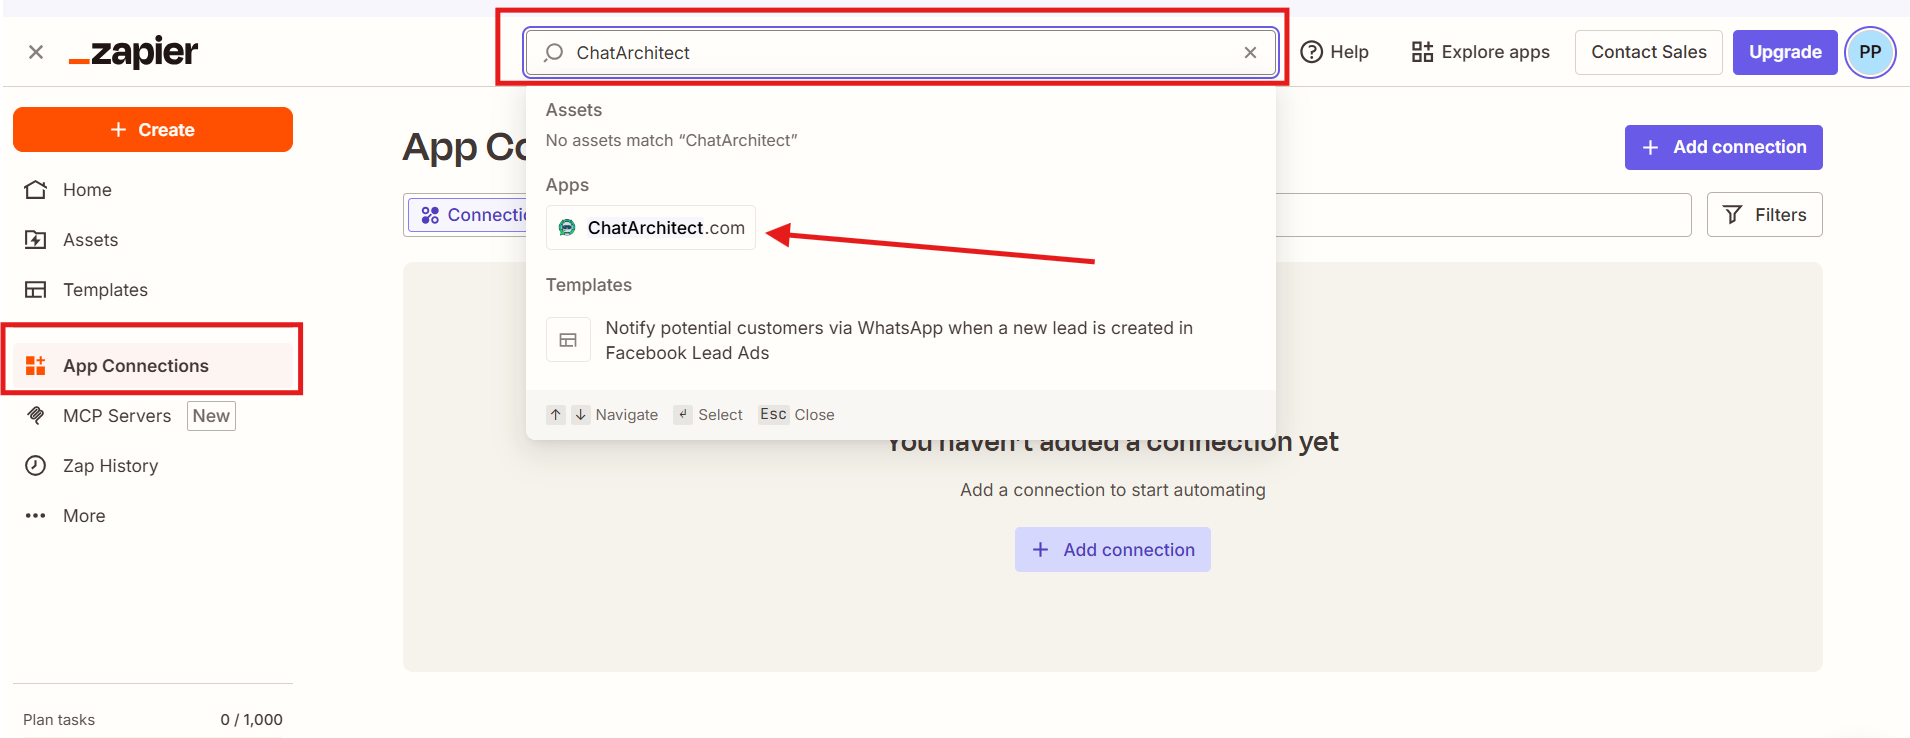
](https://support.chatarchitect.com/uploads/images/gallery/2026-04/wmZimage.png)  
  
2\. Press "**Add connection**"

[![image.png](https://support.chatarchitect.com/uploads/images/gallery/2026-04/scaled-1680-/g3zimage.png)
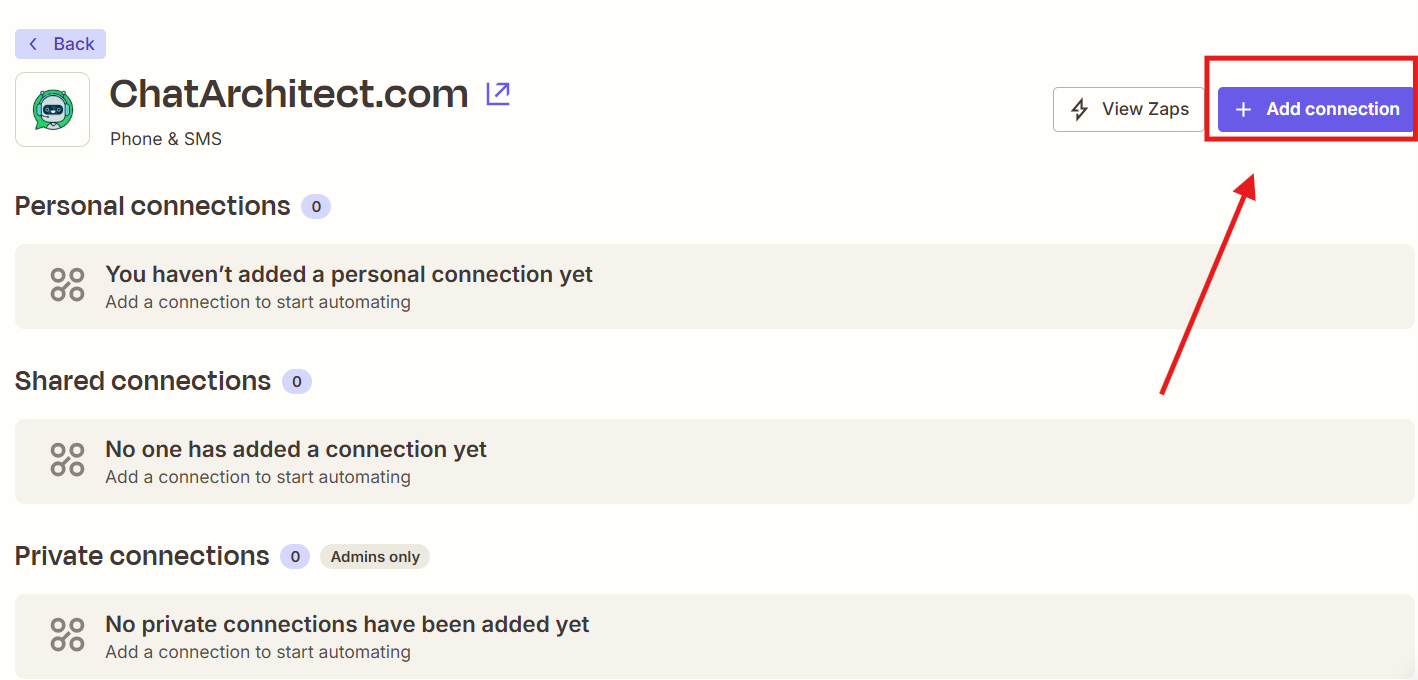
](https://support.chatarchitect.com/uploads/images/gallery/2026-04/g3zimage.png)

   
3\. Fill in your **APP ID** and **APP SECRET** and press "Yes, continue to ChatArchitect.com"

[![image.png](https://support.chatarchitect.com/uploads/images/gallery/2026-04/scaled-1680-/Vl3image.png)
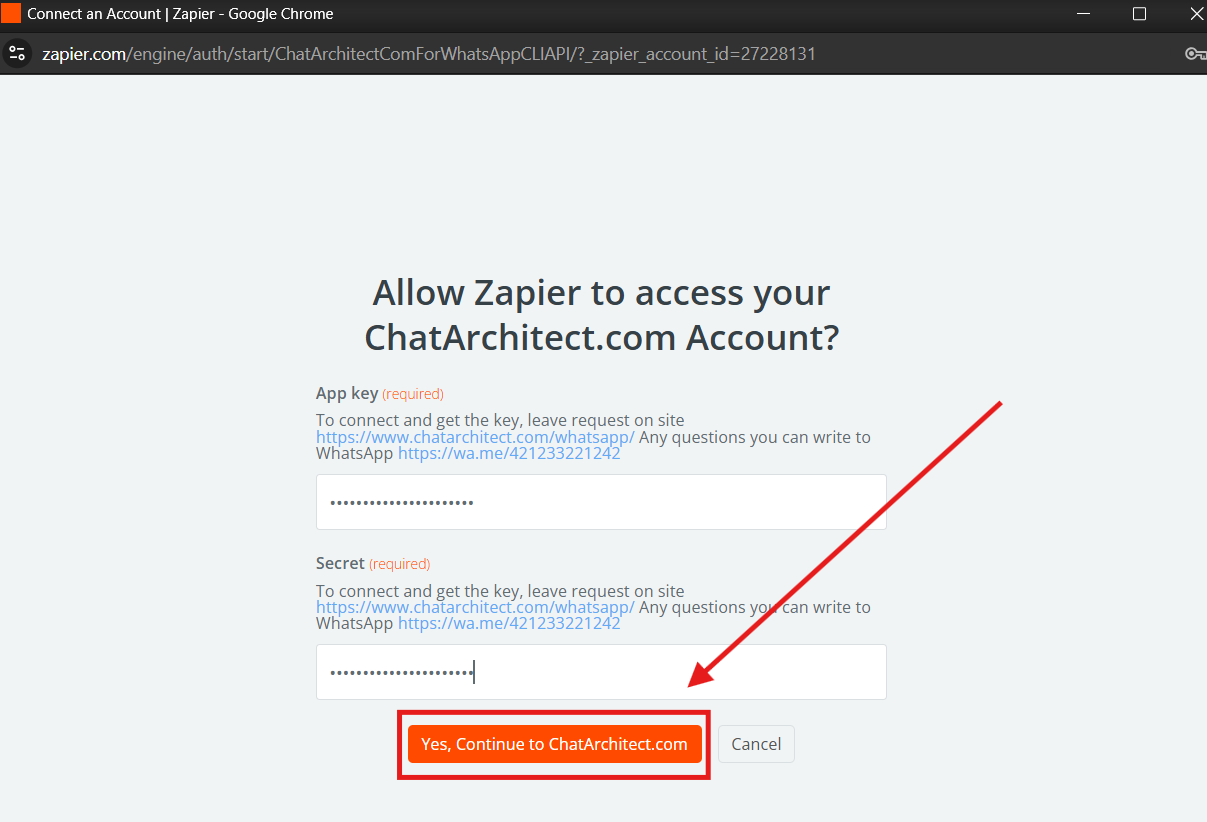
](https://support.chatarchitect.com/uploads/images/gallery/2026-04/Vl3image.png)

<span style="color: rgb(0,0,0);"><span style="font-size: 18px;">Done. Our integration is now installed in your <span class="hover:entity-accent entity-underline inline cursor-pointer align-baseline"><span class="whitespace-normal">Zapier</span></span>.  
</span></span>

[![image.png](https://support.chatarchitect.com/uploads/images/gallery/2026-04/scaled-1680-/OXqimage.png)
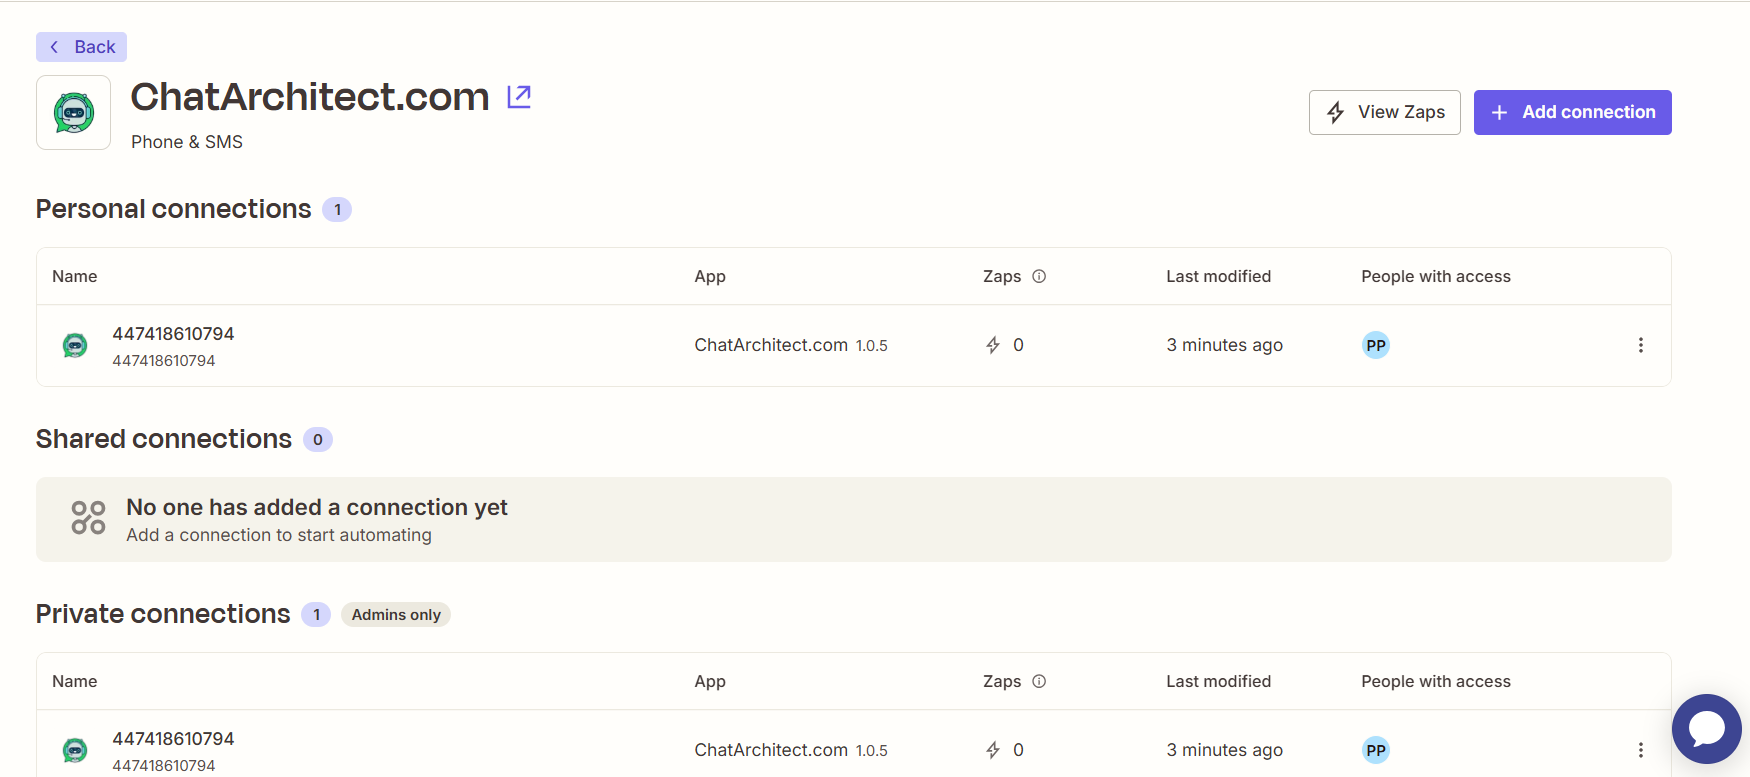
](https://support.chatarchitect.com/uploads/images/gallery/2026-04/OXqimage.png)

<span style="color: rgb(0,0,0);"><span style="font-size: 18px;">  
</span></span>

# Integration Zapier with Google Sheets

1\. After registering with Zapier, you need to go to the "My apps" tab and find "Google sheets" in the search box, click on the "Connect" button below

<figure id="bkmrk-">![323f0e0004ef8ba5fb5209754f6fd6b4.png](https://bookstack-support-u7942.vm.elestio.app/uploads/images/gallery/2026-03/embedded-image-vmn9za8s.png)</figure>2\. In the window that opens, select the desired Google account

<figure id="bkmrk--1">![667a0b509da4c0b1b8a5e5cce99bb778.png](https://bookstack-support-u7942.vm.elestio.app/uploads/images/gallery/2026-03/embedded-image-ouuqdbro.png)</figure>3\. Return to "My apps", in the search bar find our application ChatArchitect.com, click "Connect"

<figure id="bkmrk--2">![1a0079d5eccf48a525f36e0064e5fdfd.png](https://bookstack-support-u7942.vm.elestio.app/uploads/images/gallery/2026-03/embedded-image-ns3lhkxy.png)</figure>4\. In the window that opens write your APP ID and APP SECRET

<figure id="bkmrk--3">![7937c3d48296f53e2509f708cadb4716.png](https://bookstack-support-u7942.vm.elestio.app/uploads/images/gallery/2026-03/embedded-image-qfgvprnf.png)</figure>5\. We return to the main Zapier page, click +Create zap

<figure id="bkmrk--4">![f1c1cb8bc141486c46b6210a4159ea90.png](https://bookstack-support-u7942.vm.elestio.app/uploads/images/gallery/2026-03/embedded-image-v1ehx4n7.png)</figure>6\. To configure the Trigger in the search we are looking for Google sheets,

<figure id="bkmrk--5">![787078dfb7b588bd0a905c1d155dc9b9.png](https://bookstack-support-u7942.vm.elestio.app/uploads/images/gallery/2026-03/embedded-image-tuqyrtbq.png)</figure>7\. In the "Event" select New Spreadsheet Row, then you will need to select a Google account, after selecting an account, you will need to choose which table Zapier will take data from.

<figure id="bkmrk--6">![63b3e0a15122eb70efa881b302f58a12.png](https://bookstack-support-u7942.vm.elestio.app/uploads/images/gallery/2026-03/embedded-image-mmzmq4qf.png)</figure><figure id="bkmrk--7">![57495b859575b123f4954345aec62524.png](https://bookstack-support-u7942.vm.elestio.app/uploads/images/gallery/2026-03/embedded-image-owc5768f.png)</figure>8\. Next, select "Spreadsheet A/B" (most often, in Spreadsheet Row A it will be possible to pull up only the phone number. In Spreadsheet Row B, you can pull up the number and name

<figure id="bkmrk--8">![22d9a79def3548bccbfbbb36242acf1f.png](https://bookstack-support-u7942.vm.elestio.app/uploads/images/gallery/2026-03/embedded-image-pvaq6suw.png)</figure>9\. Next, in the action we select our application and select "Event", in our case it is Send a Text

<figure id="bkmrk--9">![2224de1a494c44f844da5995834cfd4c.png](https://bookstack-support-u7942.vm.elestio.app/uploads/images/gallery/2026-03/embedded-image-oovinpi9.png)</figure>10\. Next, select our account in chatarchitect and go to the "Set up action" setting. In "Destination" we select data from your table, in the Text tab - write the text of your template, in isHSM - True. After that, conduct a test send and you can start the mailing list.

<figure id="bkmrk--10">![e7de517729508c8de75169ab6095ff42.png](https://bookstack-support-u7942.vm.elestio.app/uploads/images/gallery/2026-03/embedded-image-cj7vdyzm.png)</figure>  
  
11\. We add numbers to the table after we have activated ZAP!!!

<figure id="bkmrk--11">![b1ad4182ea65a6b393bf7ce0c720cfdb.png](https://bookstack-support-u7942.vm.elestio.app/uploads/images/gallery/2026-03/embedded-image-dkytcysw.png)</figure>12\. Add numbers to the table, ZAP will work on them within 15 minutes

<figure id="bkmrk--12">![8d560b3478f7794b16955aa61675f718.png](https://bookstack-support-u7942.vm.elestio.app/uploads/images/gallery/2026-03/embedded-image-dglaqval.png)</figure>  
  
!!! Zapier works by adding a new column to the table, i.e. in order for it to send out mailings to the numbers you need, they must be added to the table only after activating Zap !!!