# WhatsApp for Albato.com

# Sending messages from Google Sheets to WhatsApp via Albato.com

0\. To connect your number and receive an access key, please write to our WhatsApp [https://wa.me/421233221242](https://wa.me/421233221242)

Or you can fill the form on our website [https://www.chatarchitect.com/whatsapp/](https://www.chatarchitect.com/whatsapp/)

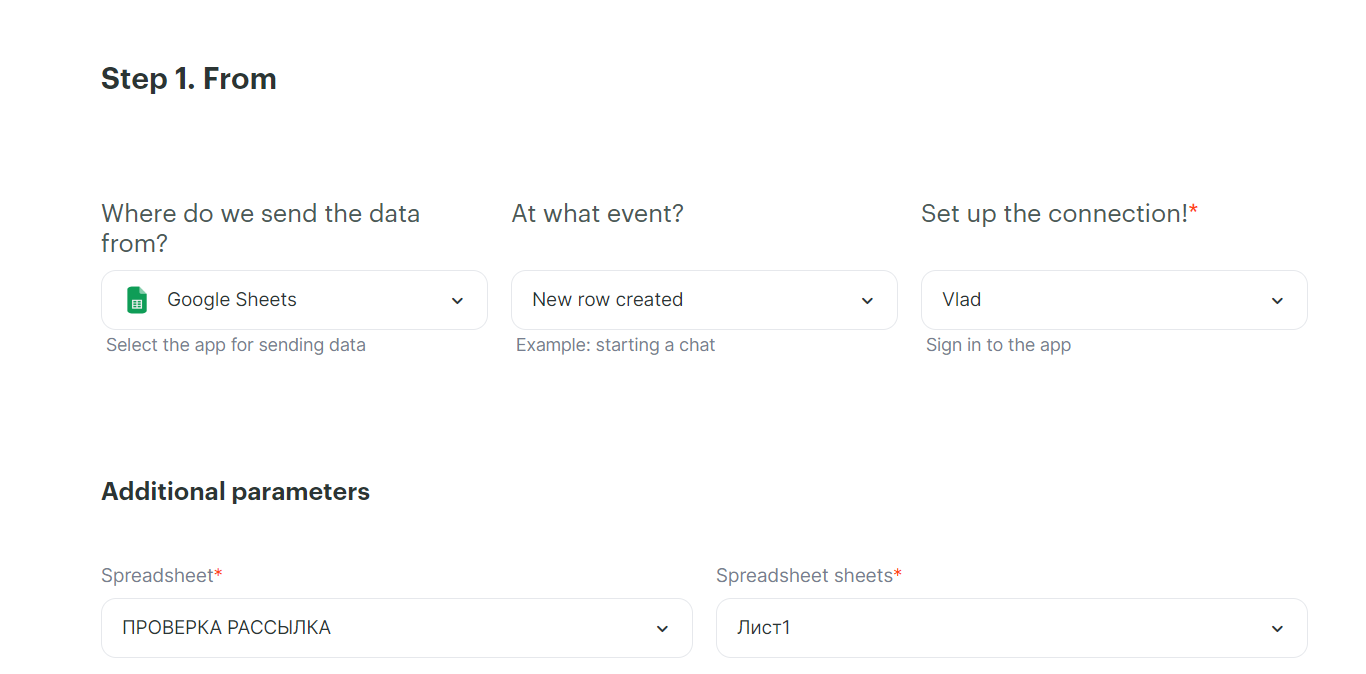
1\. Select Google Sheets, Event - New Row Created, select the desired table.

<figure id="bkmrk-" style="display:block;margin:0px 0px 1em;padding:0px;clear:both;color:rgb(213,214,215);font-family:Roboto, helveticaregular, Helvetica, Arial;font-size:14px;font-style:normal;font-weight:400;letter-spacing:normal;text-indent:0px;text-transform:none;white-space:normal;word-spacing:0px;background-color:rgb(34,34,34);">![1209bf12999d4c777b02d3c0b142bb4c.png](https://bookstack-support-u7942.vm.elestio.app/uploads/images/gallery/2026-03/embedded-image-xw1e3xkc.png)</figure>
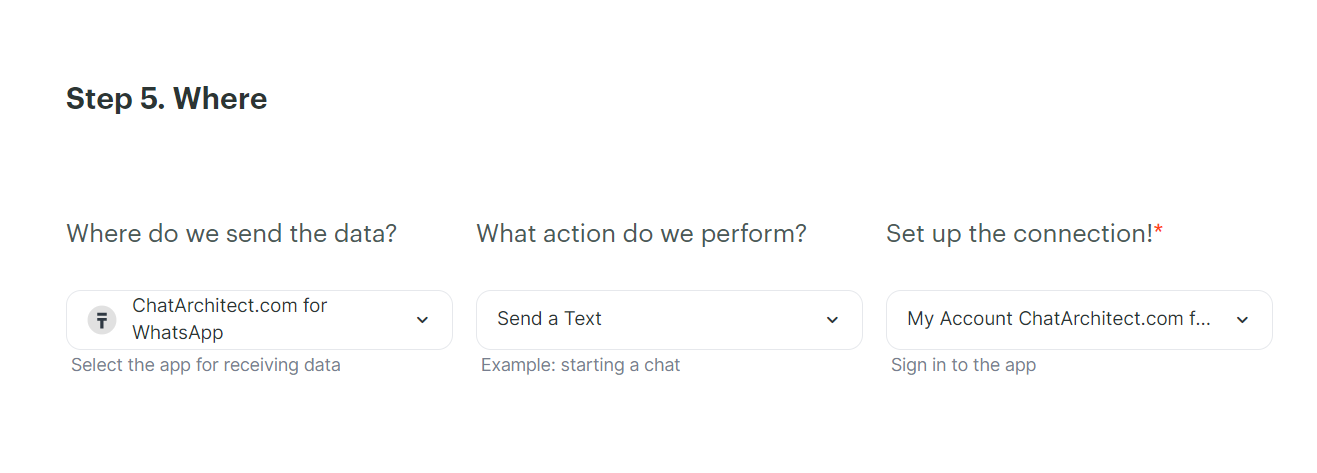
2\. Adding our application ChatArchitect.com, Event - Send a Text. Add your ChatArchitect account (you must enter the app id and app secret that you received after connecting)

<figure id="bkmrk--1" style="display:block;margin:0px 0px 1em;padding:0px;clear:both;color:rgb(213,214,215);font-family:Roboto, helveticaregular, Helvetica, Arial;font-size:14px;font-style:normal;font-weight:400;letter-spacing:normal;text-indent:0px;text-transform:none;white-space:normal;word-spacing:0px;background-color:rgb(34,34,34);">![0b614eaac64b0b67fb53581c572fec9e.png](https://bookstack-support-u7942.vm.elestio.app/uploads/images/gallery/2026-03/embedded-image-gifkpvty.png)</figure>
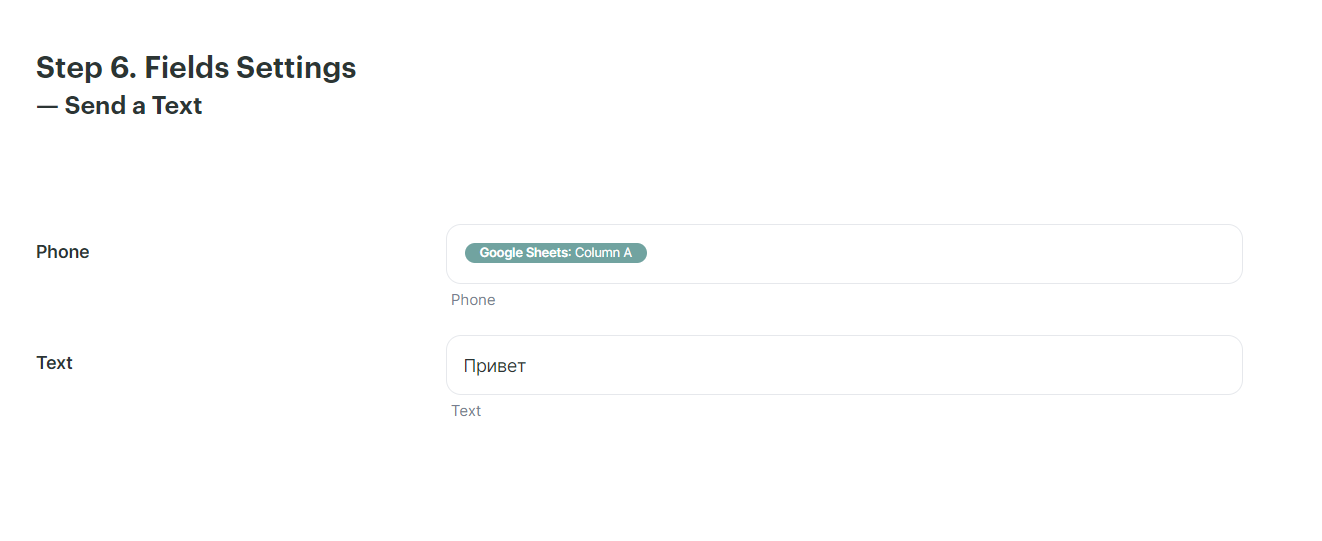
3\. Specify from which column the numbers will be pulled up, in the Text field enter the text of a submitted template

<figure id="bkmrk--2" style="display:block;margin:0px 0px 1em;padding:0px;clear:both;color:rgb(213,214,215);font-family:Roboto, helveticaregular, Helvetica, Arial;font-size:14px;font-style:normal;font-weight:400;letter-spacing:normal;text-indent:0px;text-transform:none;white-space:normal;word-spacing:0px;background-color:rgb(34,34,34);">![3abf15f52d784ba4b5ccd1d9cb1e47e2.png](https://bookstack-support-u7942.vm.elestio.app/uploads/images/gallery/2026-03/embedded-image-k07cz6y5.png)</figure>4\. After that, click on the "+" and select "Action"

<figure id="bkmrk--3" style="display:block;margin:0px 0px 1em;padding:0px;clear:both;color:rgb(213,214,215);font-family:Roboto, helveticaregular, Helvetica, Arial;font-size:14px;font-style:normal;font-weight:400;letter-spacing:normal;text-indent:0px;text-transform:none;white-space:normal;word-spacing:0px;background-color:rgb(34,34,34);">![1c726158d6ebbf66effac8ef4dac8332.png](https://bookstack-support-u7942.vm.elestio.app/uploads/images/gallery/2026-03/embedded-image-ltvslxsw.png)</figure>
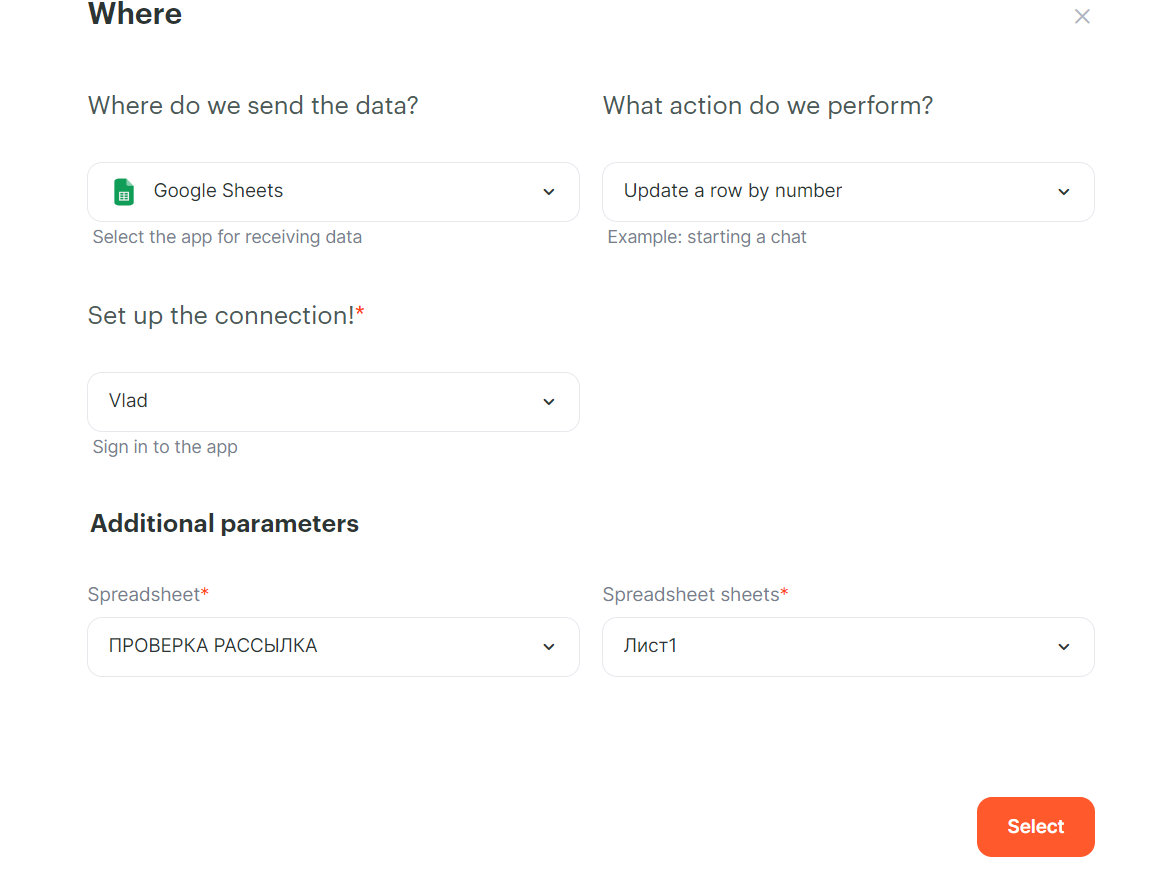
5\. Once again select Google Sheets, Action - Update a row by number, then add the same table as in the first case.

<figure id="bkmrk--4" style="display:block;margin:0px 0px 1em;padding:0px;clear:both;color:rgb(213,214,215);font-family:Roboto, helveticaregular, Helvetica, Arial;font-size:14px;font-style:normal;font-weight:400;letter-spacing:normal;text-indent:0px;text-transform:none;white-space:normal;word-spacing:0px;background-color:rgb(34,34,34);">![4988e8d196b1a402f615973310392699.png](https://bookstack-support-u7942.vm.elestio.app/uploads/images/gallery/2026-03/embedded-image-x0ogprv2.png)</figure>
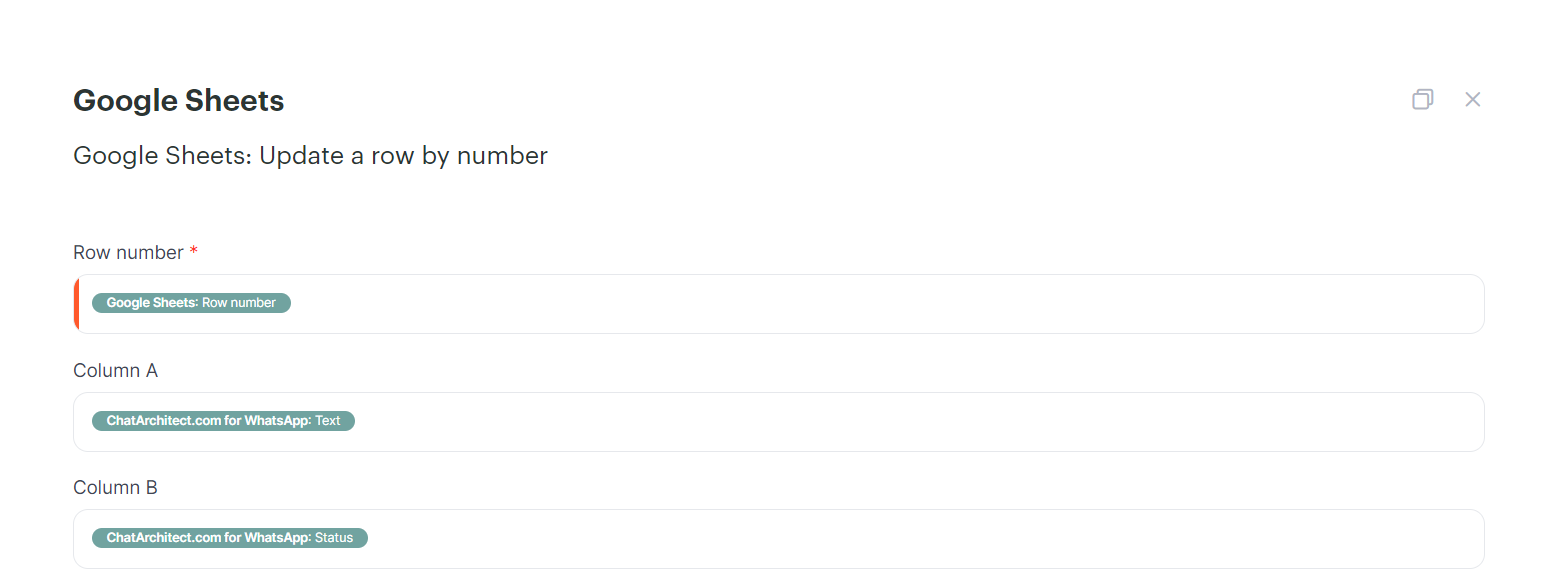
6\. Then choose as in the screenshot:  
1\. Row number - Google Sheets: Row number  
2\. Column A - ChatArchitect.com for Whatsapp: Text  
3\. Column B - ChatArchitect.com for WhatsApp: Status  
You can change the columns according to what you need.

<figure id="bkmrk--5" style="display:block;margin:0px 0px 1em;padding:0px;clear:both;color:rgb(213,214,215);font-family:Roboto, helveticaregular, Helvetica, Arial;font-size:14px;font-style:normal;font-weight:400;letter-spacing:normal;text-indent:0px;text-transform:none;white-space:normal;word-spacing:0px;background-color:rgb(34,34,34);">![44b78c45d4a2820076494166cfd5d7fc.png](https://bookstack-support-u7942.vm.elestio.app/uploads/images/gallery/2026-03/embedded-image-ipaxcy7u.png)</figure>
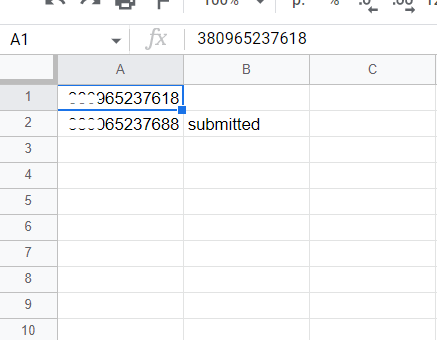
7\. After that, launch Albato; after launching, send a test message to your WABA number and check if the table has been updated.  
It should look like this:

<figure id="bkmrk--6">![a82c57818b242b207f290069137e124e.png](https://bookstack-support-u7942.vm.elestio.app/uploads/images/gallery/2026-03/embedded-image-etuwgvbn.png)</figure>

# Getting message delivery statuses in WhatsApp via Albato.com

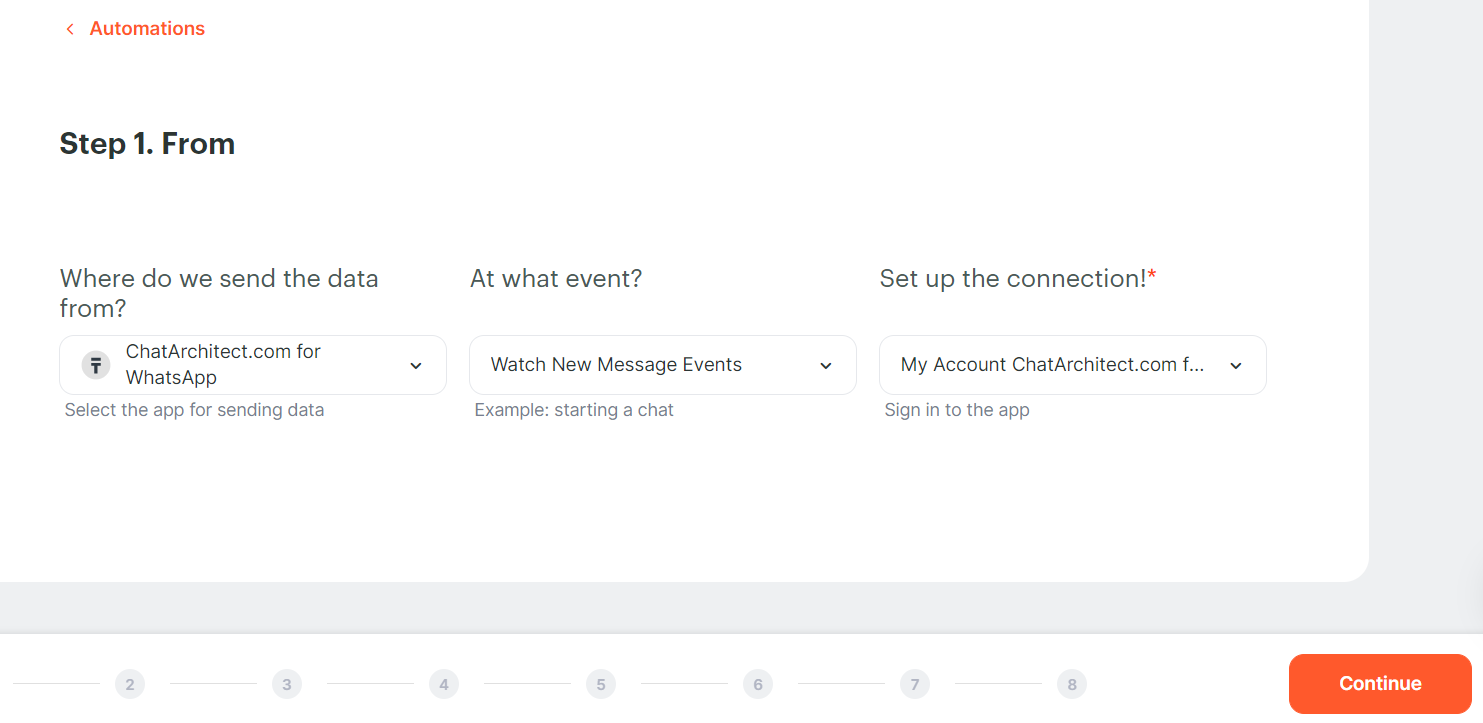
1\. At the first stage, we add our application ChatArchitect.com for WhatsApp, Event - Watch New Message Events.

<figure id="bkmrk-" style="display:block;margin:0px 0px 1em;padding:0px;clear:both;color:rgb(213,214,215);font-family:Roboto, helveticaregular, Helvetica, Arial;font-size:14px;font-style:normal;font-weight:400;letter-spacing:normal;text-indent:0px;text-transform:none;white-space:normal;word-spacing:0px;background-color:rgb(34,34,34);text-decoration-thickness:initial;text-decoration-style:initial;text-decoration-color:initial;">![embedded-image-npkylagi.png](https://bookstack-support-u7942.vm.elestio.app/uploads/images/gallery/2026-03/embedded-image-npkylagi.png)</figure>2\. Next, add your Google account, action - Create / update a row

<figure id="bkmrk--1" style="display:block;margin:0px 0px 1em;padding:0px;clear:both;color:rgb(213,214,215);font-family:Roboto, helveticaregular, Helvetica, Arial;font-size:14px;font-style:normal;font-weight:400;letter-spacing:normal;text-indent:0px;text-transform:none;white-space:normal;word-spacing:0px;background-color:rgb(34,34,34);text-decoration-thickness:initial;text-decoration-style:initial;text-decoration-color:initial;">![embedded-image-yk3qgwvo.png](https://bookstack-support-u7942.vm.elestio.app/uploads/images/gallery/2026-03/embedded-image-yk3qgwvo.png)</figure>
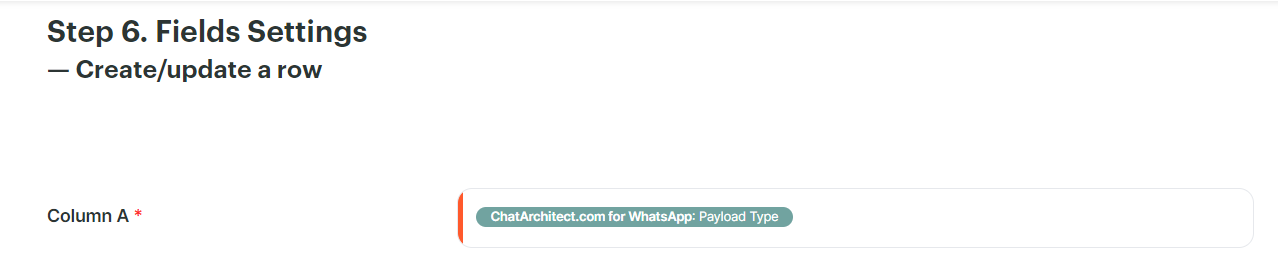
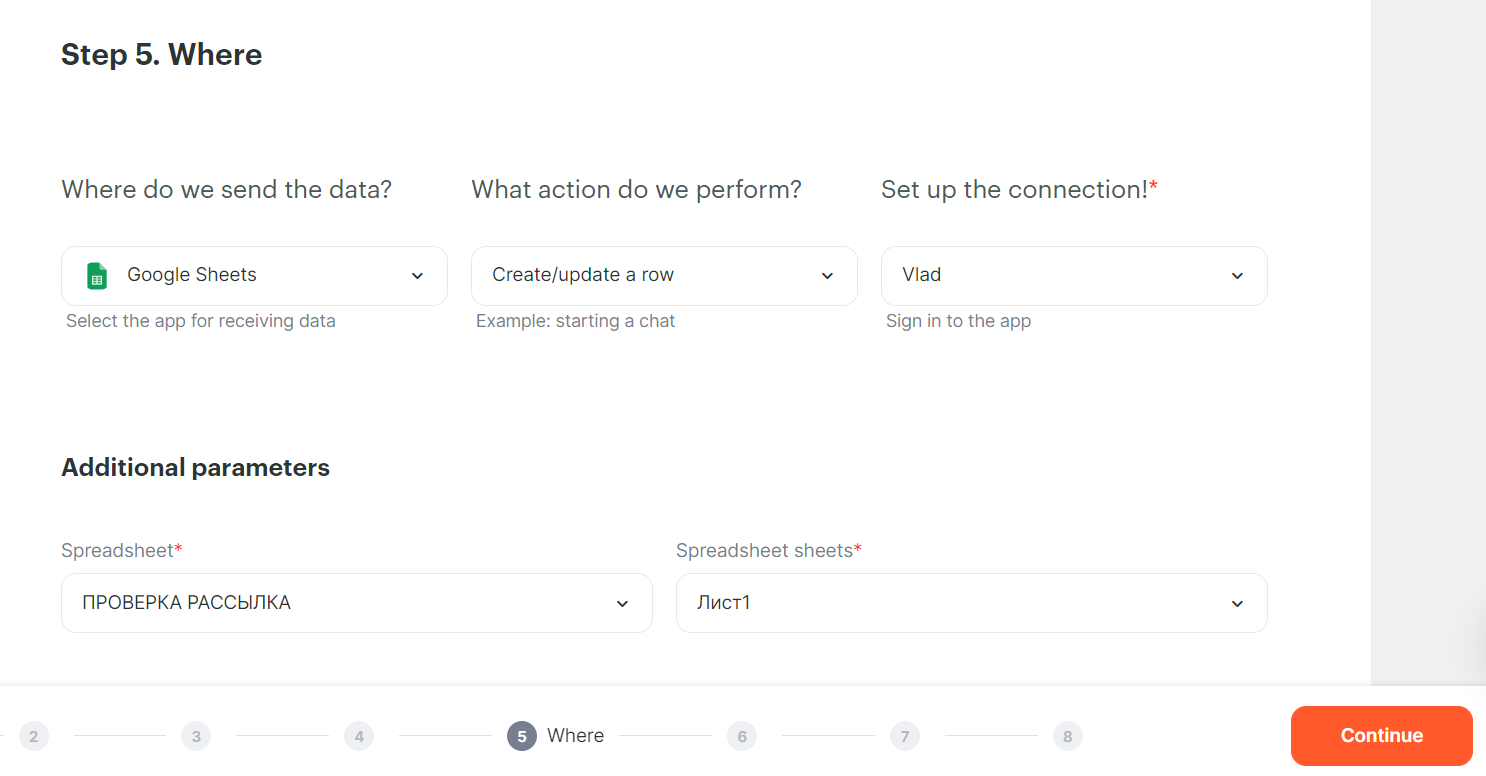
3\. In column A we set the Payload Type. After that, you can run the trigger and start mailing.

<figure id="bkmrk--2" style="display:block;margin:0px 0px 1em;padding:0px;clear:both;color:rgb(213,214,215);font-family:Roboto, helveticaregular, Helvetica, Arial;font-size:14px;font-style:normal;font-weight:400;letter-spacing:normal;text-indent:0px;text-transform:none;white-space:normal;word-spacing:0px;background-color:rgb(34,34,34);text-decoration-thickness:initial;text-decoration-style:initial;text-decoration-color:initial;">![embedded-image-y28vmgoe.png](https://bookstack-support-u7942.vm.elestio.app/uploads/images/gallery/2026-03/embedded-image-y28vmgoe.png)</figure>
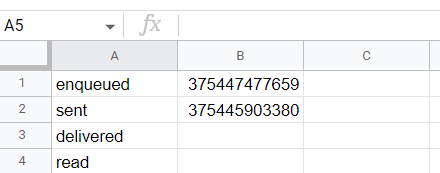
4\. In the table it will look like this:

<figure id="bkmrk--3">![embedded-image-islzpjlr.png](https://bookstack-support-u7942.vm.elestio.app/uploads/images/gallery/2026-03/embedded-image-islzpjlr.png)</figure>

# How to integrate Salebot.pro with WhatsApp through Albato.com

In this instruction you will learn how to set up a simple Salebot.pro bot that will auto-answer on your clients WhatsApp.

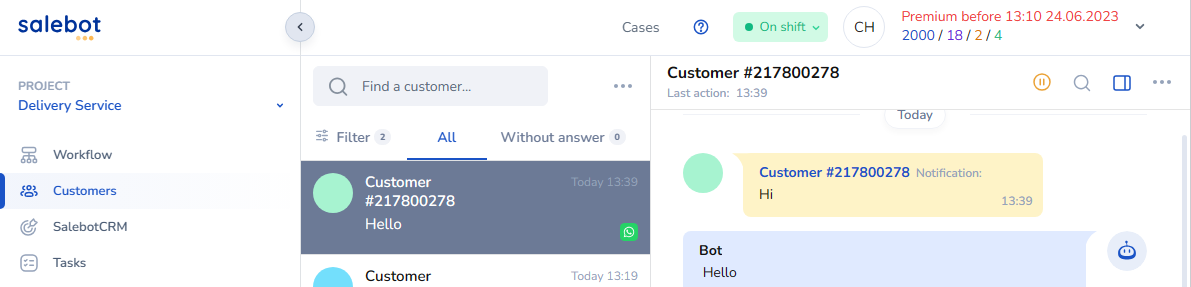
**After all steps are done you should get next result:**

<figure id="bkmrk-">![WrA_Z0WdyQxFsguRXpOGIsHnf6rTSOXszyZE0CSL](https://bookstack-support-u7942.vm.elestio.app/uploads/images/gallery/2026-03/embedded-image-teaezbj4.png)</figure>## Step by Step guide

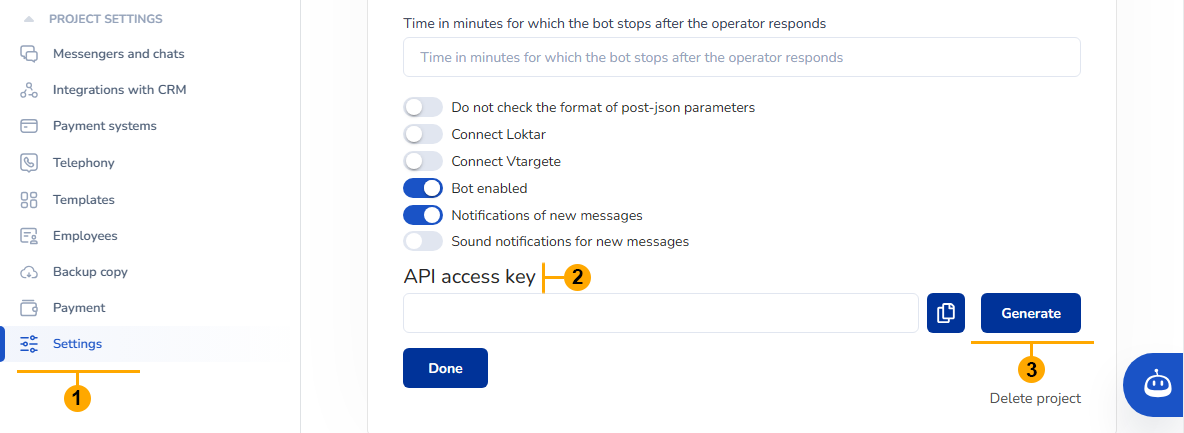
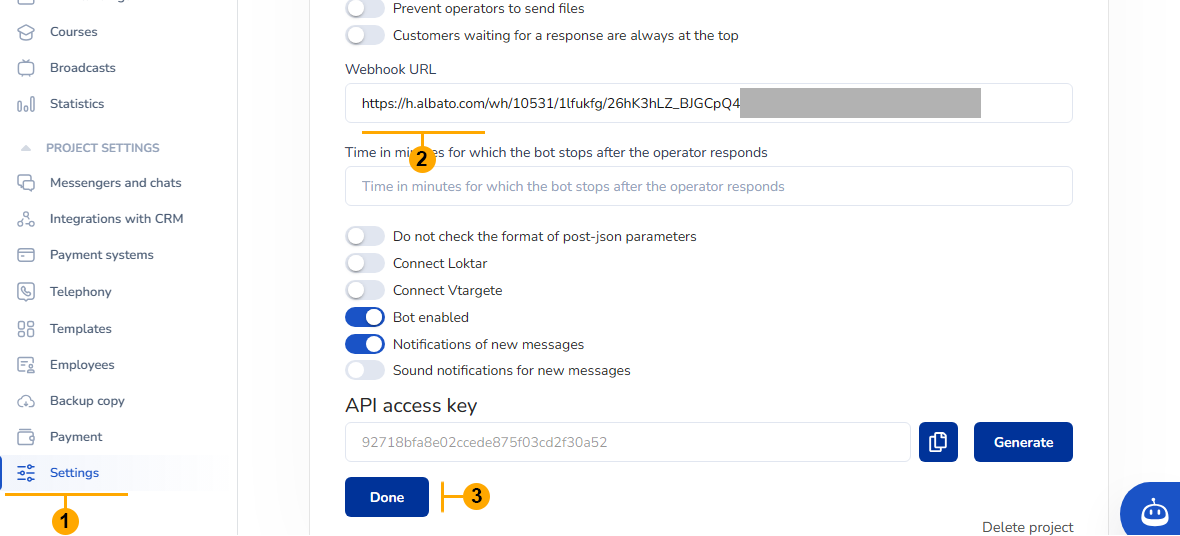
1\. Go to your Salebot.pro account. Open project "Settings" (1). Find API key field (2) and press "Generate" button (3) after that copy generated key.


<figure id="bkmrk--4">![GN8DbqOSQrPTFjhYztVE0sIAVrRA5ZfSbsnPbc2G](https://bookstack-support-u7942.vm.elestio.app/uploads/images/gallery/2026-03/embedded-image-kdw4jhtf.png)</figure>
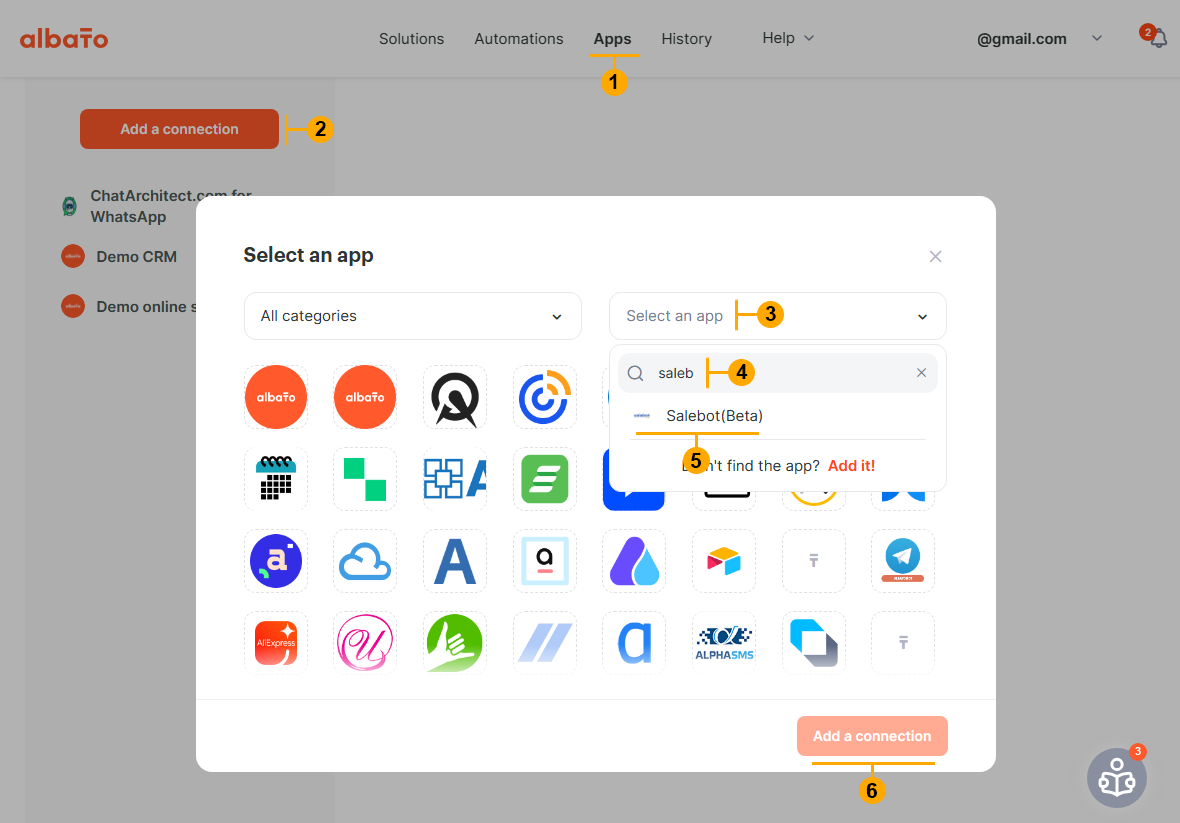
2\. Go to your Albato account. Go to "Apps" page (1). Press "Add a connection" button (2). Click on "Select an App" field (3). Type "salebot" (4). Select app (5). Press "Add a connection button" (6)

<figure id="bkmrk--5">![0RNCbhgVK566ptPxL8iFLYjd5uoOkyNnd7HGHCW0](https://bookstack-support-u7942.vm.elestio.app/uploads/images/gallery/2026-03/embedded-image-vmgvyarw.png)</figure>
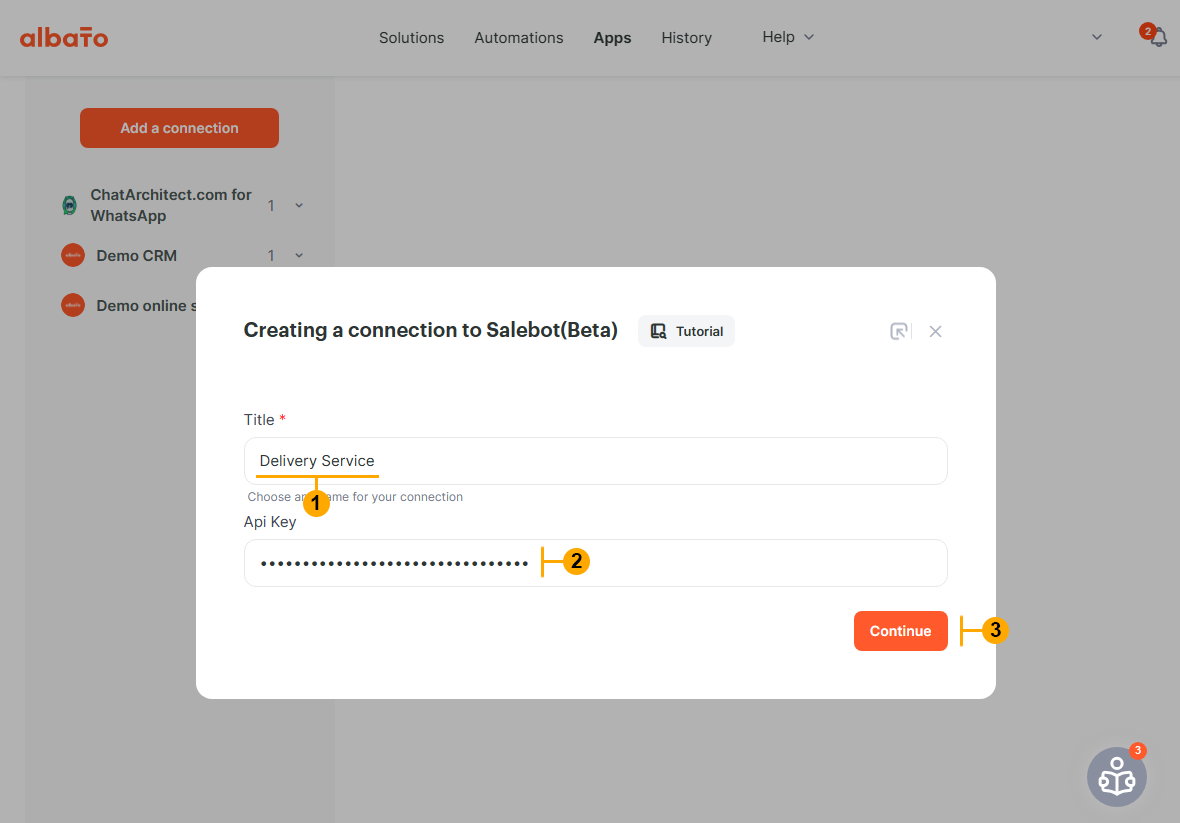
3\. In the appeared window type Title for your project (1). Paste your Salebot.pro API key that you copied on "Step 1" (2). Press "Continue" button (3)

<figure id="bkmrk--6">![09AOjMtZI-p2G0dRokchDi1lNyQJUJ8uf6zQt2ay](https://bookstack-support-u7942.vm.elestio.app/uploads/images/gallery/2026-03/embedded-image-pmas5doi.png)</figure>
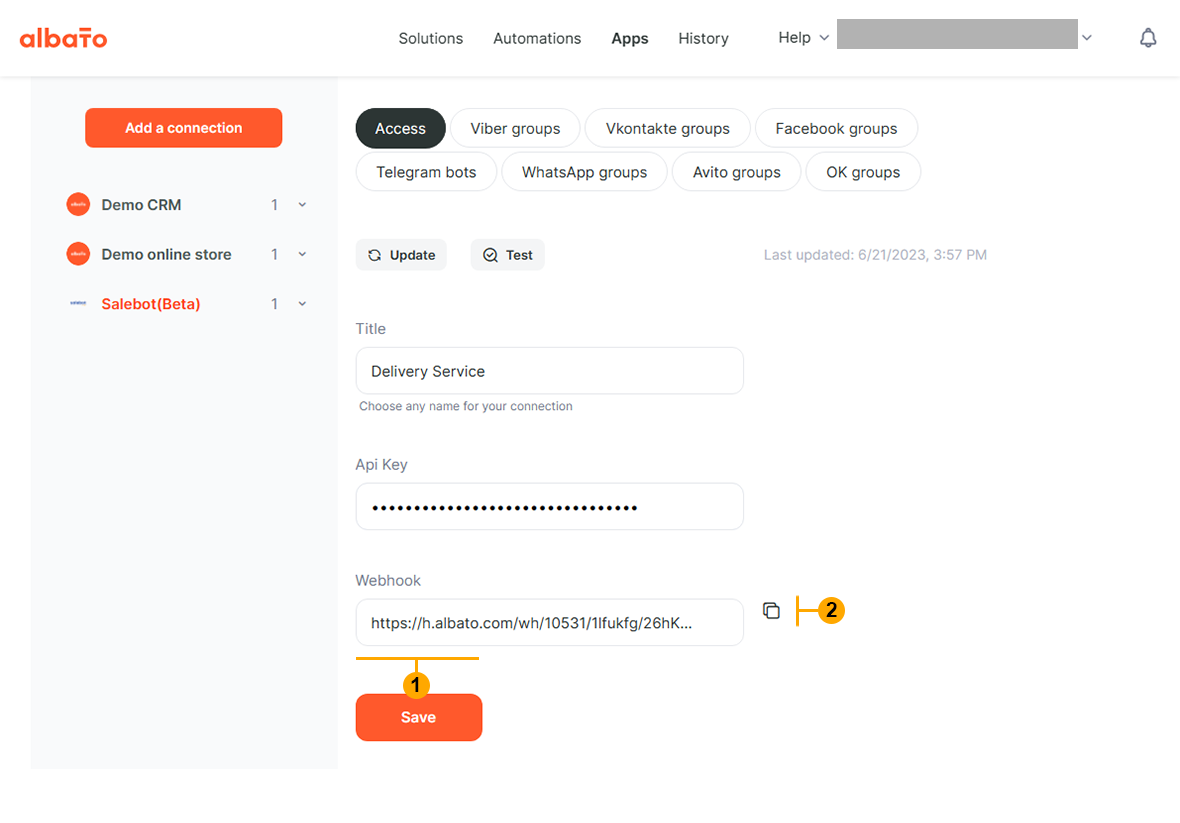
4\. After "Step 3" Albato will create a Webhook URL (1). Press button (2) to copy this URL

<figure id="bkmrk--7">![ubp6Eyti2IFYSjEcreYUEuQaMk4DlivW-gmBAcks](https://bookstack-support-u7942.vm.elestio.app/uploads/images/gallery/2026-03/embedded-image-qtmhtd4p.png)</figure>5\. Go to your Salebot.pro account. Open project "Settings" (1). Find "Webhook URL" field (2) and paste your Albato webhook from "Step 4". Press "Done" button (3)

<figure id="bkmrk--8">![M5-uMFcfe_cpdIgxsuHL3HedVkpYftfSYQ5lSnLW](https://bookstack-support-u7942.vm.elestio.app/uploads/images/gallery/2026-03/embedded-image-wcrdm5ur.png)</figure>
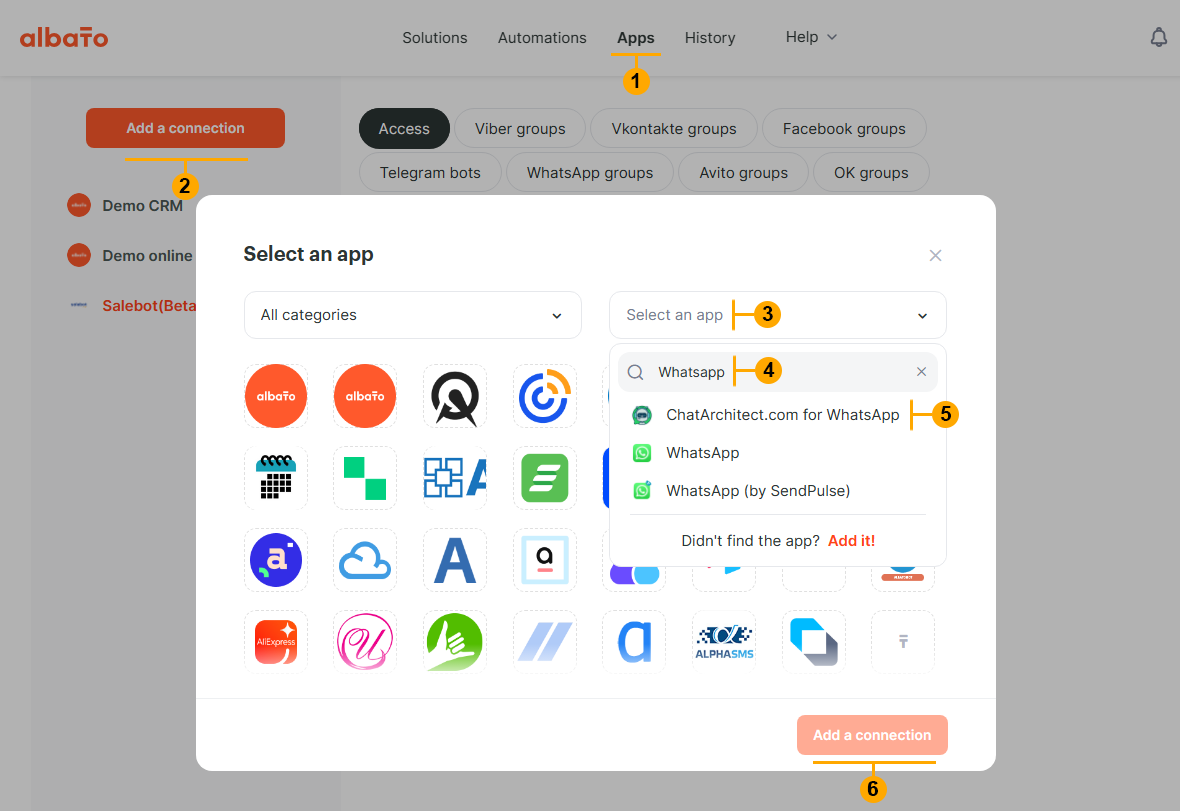
6\. Go to your Albato account. Go to "Apps" page (1). Press "Add a connection" button (2). Click on "Select an App" field (3). Type "whatsapp" (4). Select "Chatarchitect.com for WhatsApp" app (5). Press "Add a connection button" (6)

<figure id="bkmrk--9">![vgFm8wnu6O3P4vxtboz7BrI6hULOG8uaFKRtBMsc](https://bookstack-support-u7942.vm.elestio.app/uploads/images/gallery/2026-03/embedded-image-cz7xlza0.png)</figure>
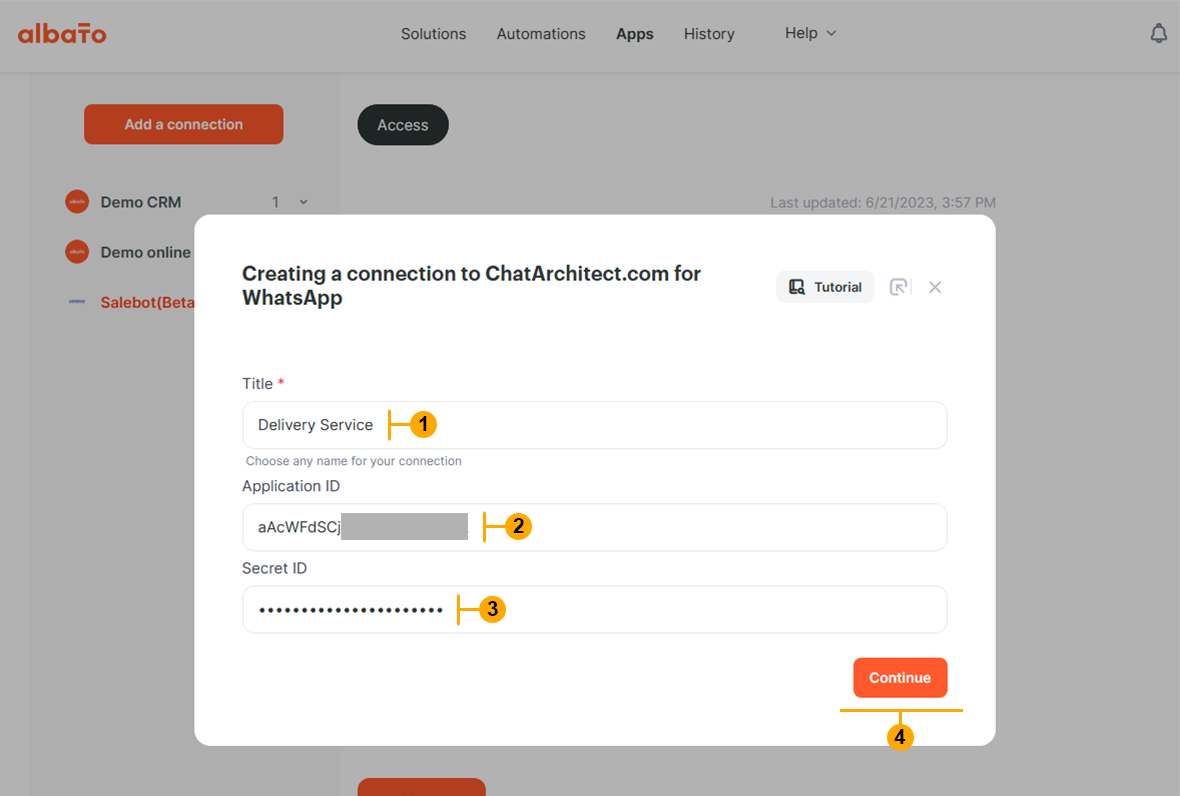
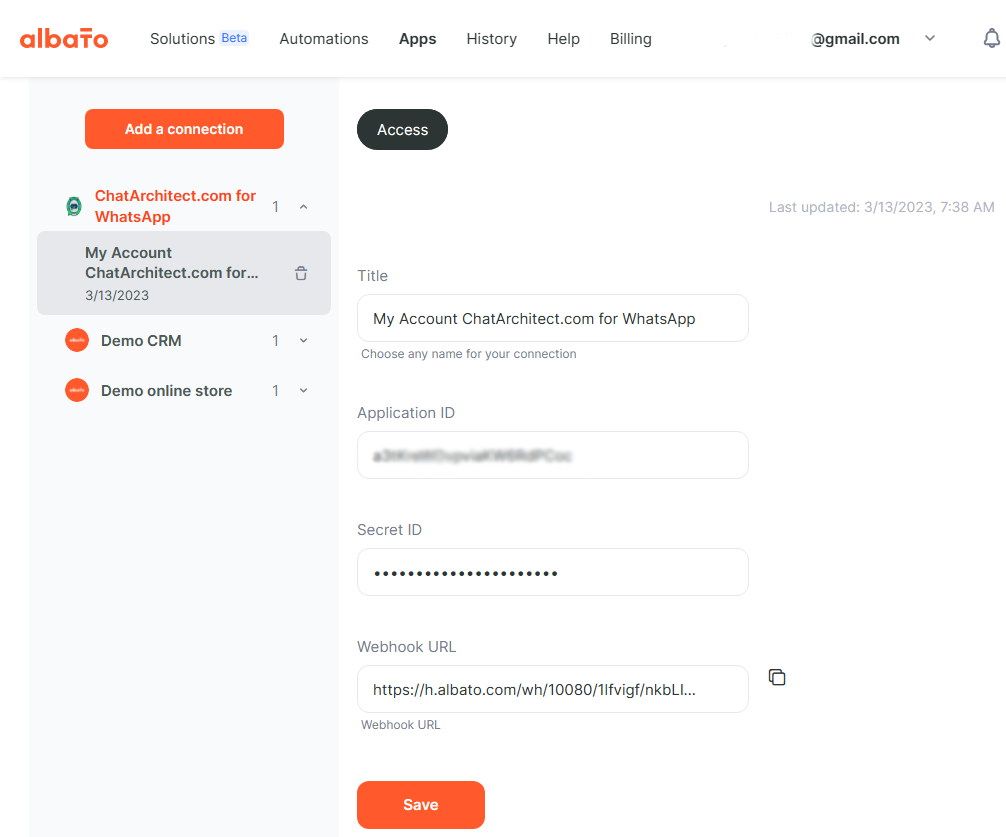
7\. In the appeared window type Title for your project (1). Paste your "Application ID" (2) and "Secret ID" (3). Press "Continue" button (4).

NOTE: To get your "Application ID" and "Secret ID" please write to our customer support [https://wa.me/421233221242](https://wa.me/421233221242?text=support)

<figure id="bkmrk--10">![GJjYYZEYVxYOc44dSFk-SpuTOp_FASzZSc0Q-LVy](https://bookstack-support-u7942.vm.elestio.app/uploads/images/gallery/2026-03/embedded-image-txeryhmu.png)</figure>
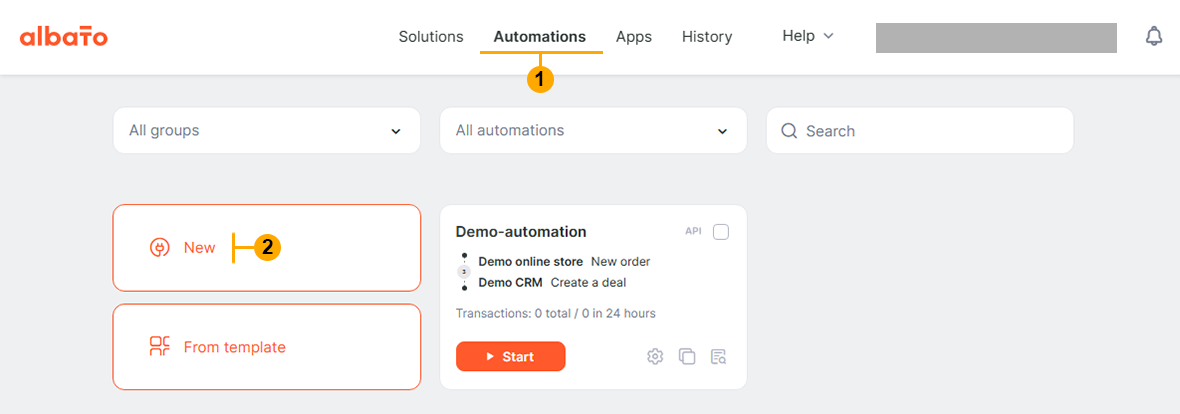
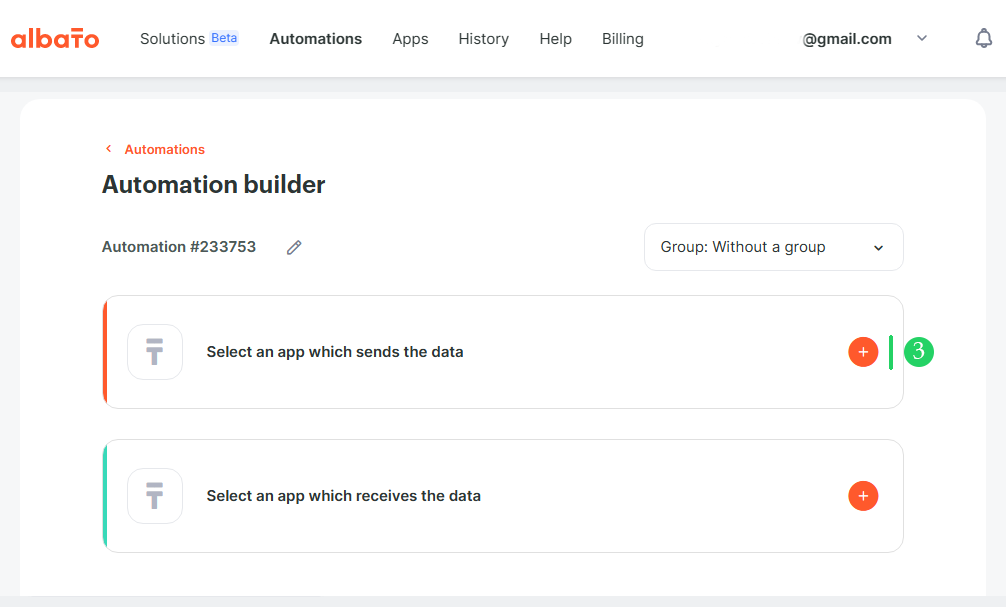
8\. Create the first automation in Albato to receive messages from WhatsApp and send them to Salebot.pro. Go to Albato "Automations" page (1) and press "New" button (2)

<figure id="bkmrk--11">![r63mPTEKMvQZMxI-FJtur9LqfVC4spjNzf1Ep-d5](https://bookstack-support-u7942.vm.elestio.app/uploads/images/gallery/2026-03/embedded-image-wt1w4bkh.png)</figure>
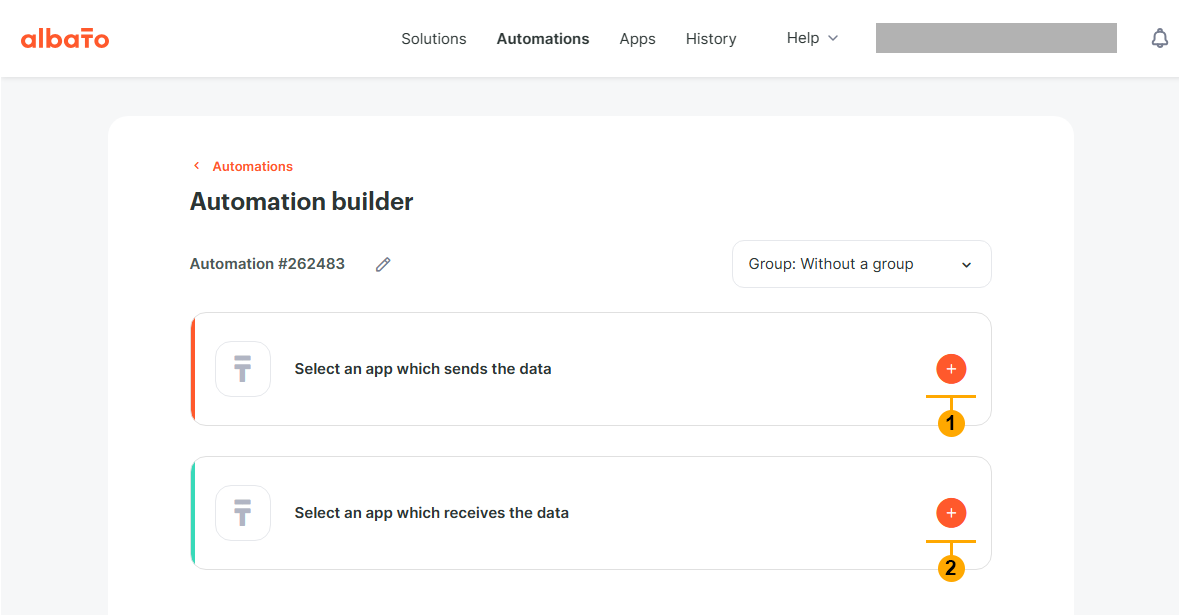
8.1 Press button (1) to select an App which sends data

<figure id="bkmrk--12">![jT5CWPB8ZabVFTEQTSlADuQXDy9ZkWy_GnigYi1I](https://bookstack-support-u7942.vm.elestio.app/uploads/images/gallery/2026-03/embedded-image-1xco1aie.png)</figure>
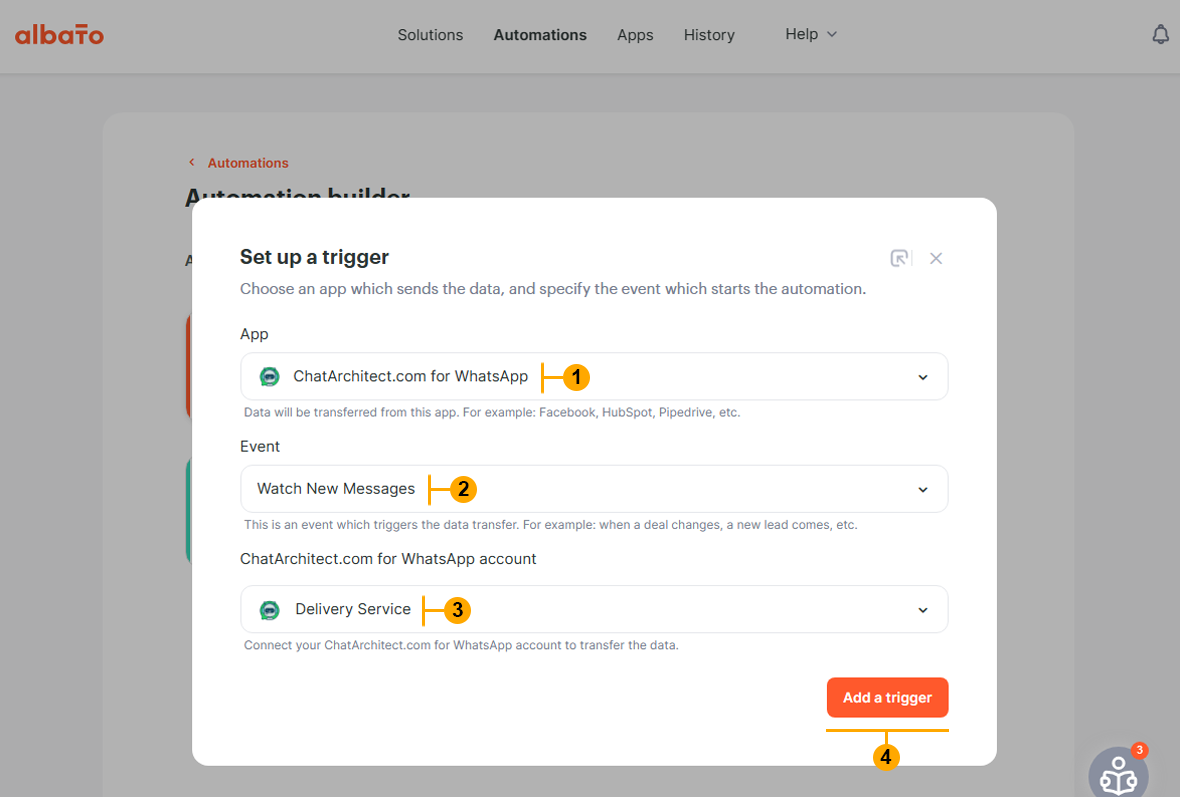
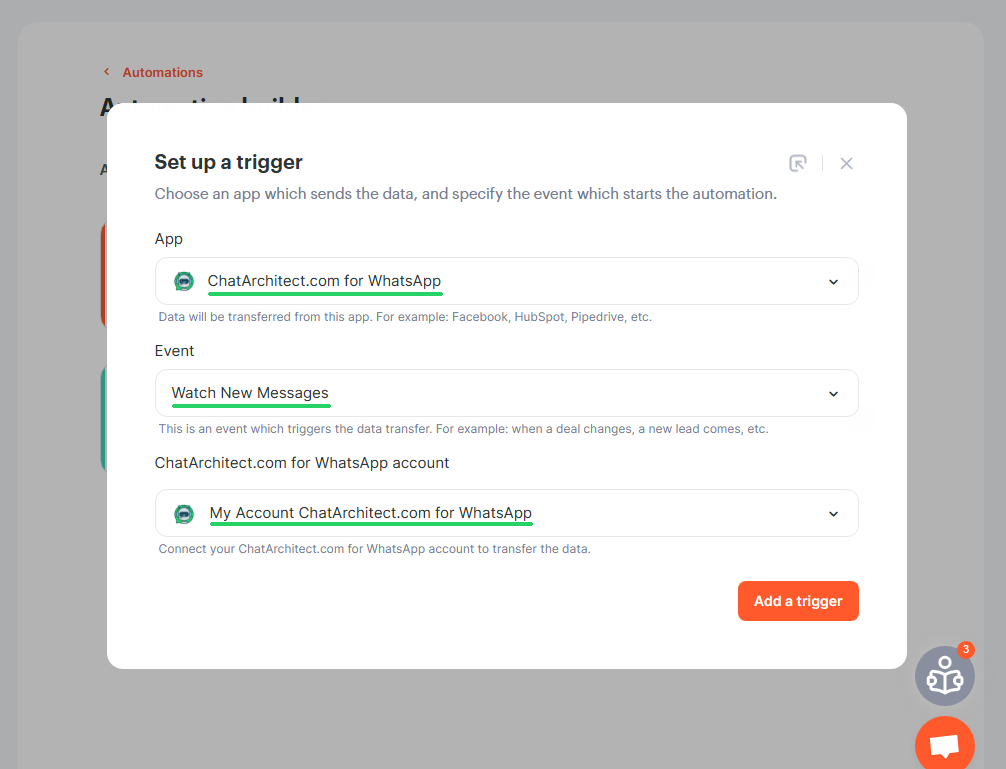
8.2 Make selections (1), (2), (3) and press "Add a trigger" button (4)

<figure id="bkmrk--13">![4Tfxijs41cLlvaEXiK7Wgjl0bDoSaDe3WB0YZevJ](https://bookstack-support-u7942.vm.elestio.app/uploads/images/gallery/2026-03/embedded-image-zstbt9xz.png)</figure>
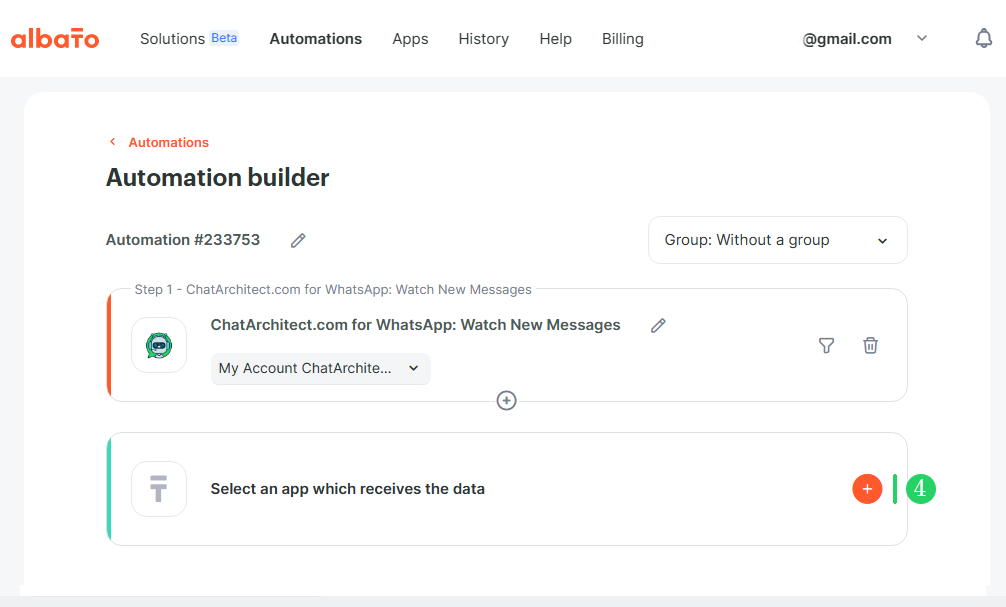
8.3 Press button (2) to select an App which receives data

<figure id="bkmrk--14">![jT5CWPB8ZabVFTEQTSlADuQXDy9ZkWy_GnigYi1I](https://bookstack-support-u7942.vm.elestio.app/uploads/images/gallery/2026-03/embedded-image-7fhvtpis.png)</figure>  
  
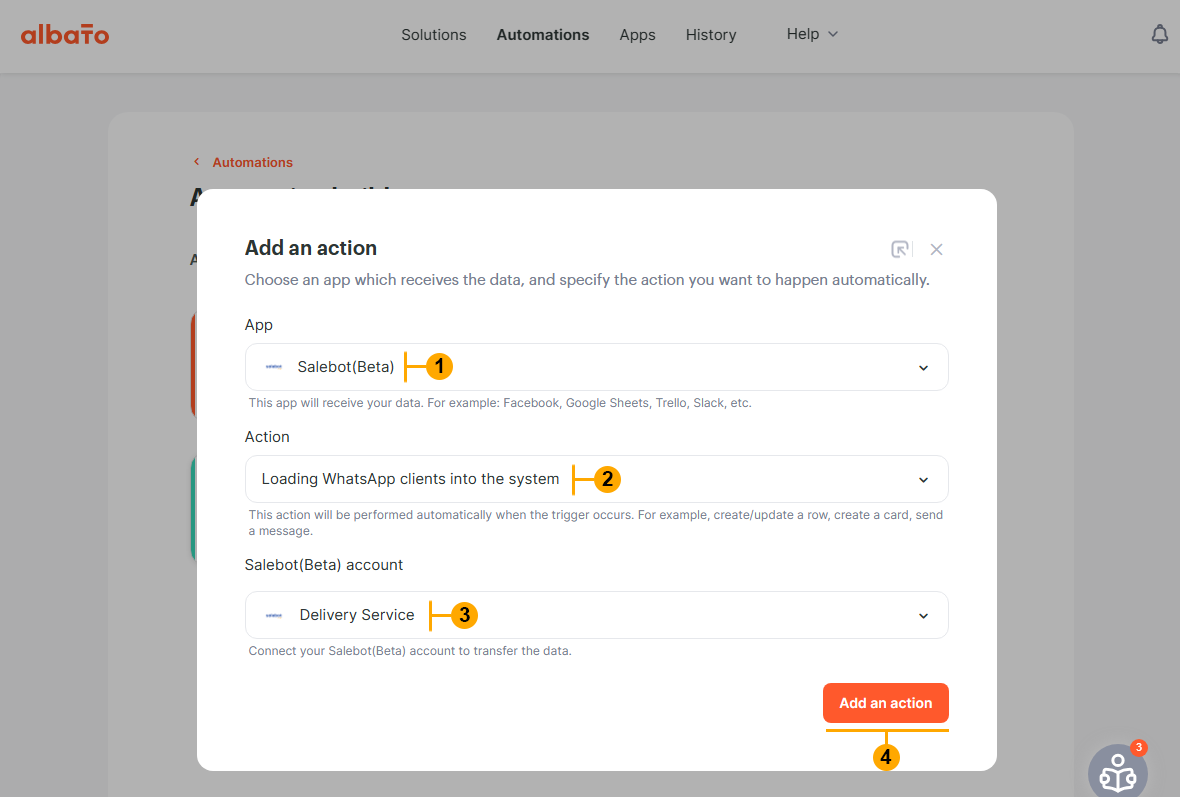
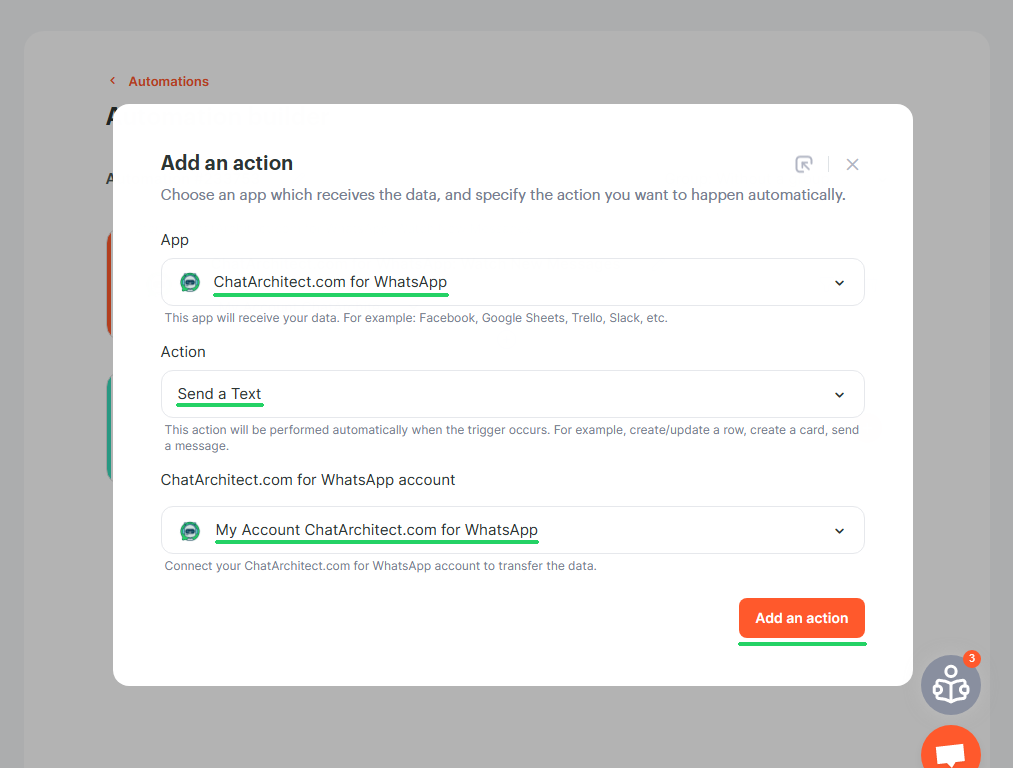
8.4 Make selections (1), (2), (3) and press "Add an action" button (4)

<figure id="bkmrk--15">![apzZL1M0CErZsX4HfbtQe693Wn8Hd6Dmk-K-QGYa](https://bookstack-support-u7942.vm.elestio.app/uploads/images/gallery/2026-03/embedded-image-0chbigiv.png)</figure>
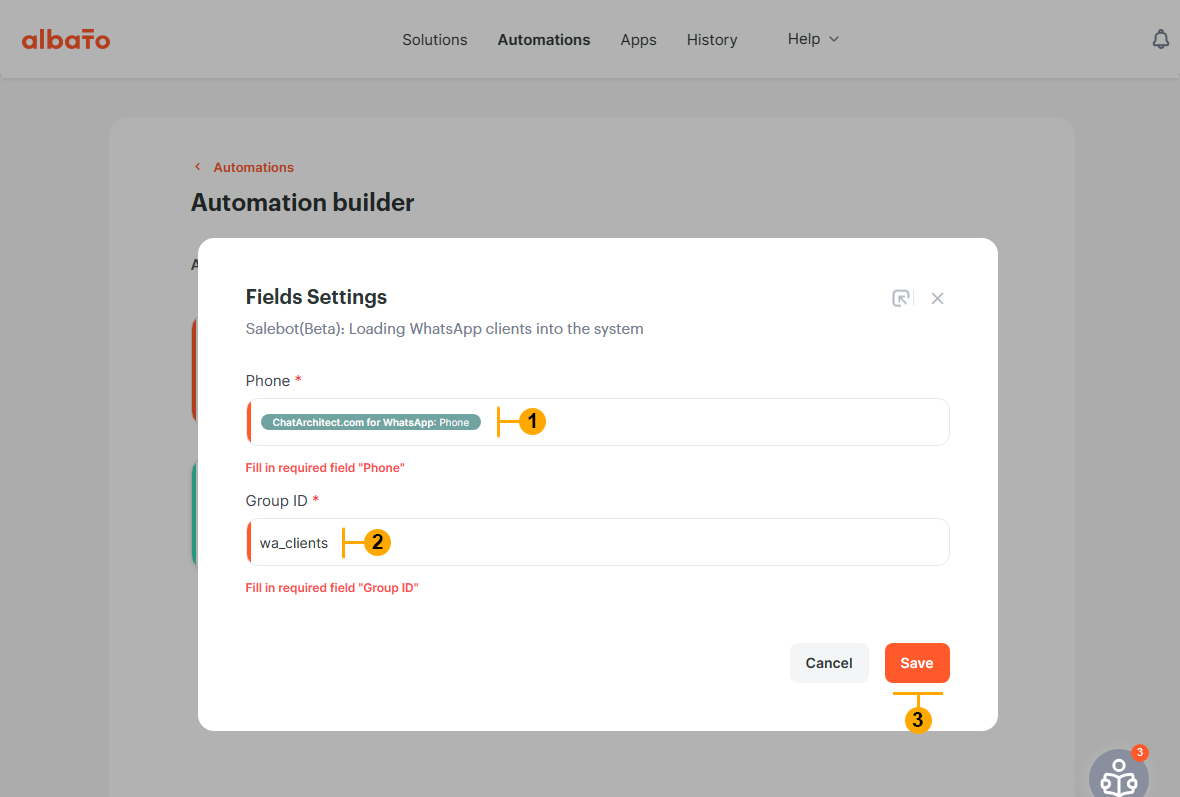
8.5 In the appeared window make selection in "Phone" field like on screenshot (1). After that type "Group ID" (2) and press "Save" button (3)

NOTE: Name of "Group ID" can be any you want.

<figure id="bkmrk--16">![ZGX66Hs8Cr0JAiINrUfwhd1LY_6jjHcn0F-TmmkK](https://bookstack-support-u7942.vm.elestio.app/uploads/images/gallery/2026-03/embedded-image-ucnfqj3d.png)</figure>
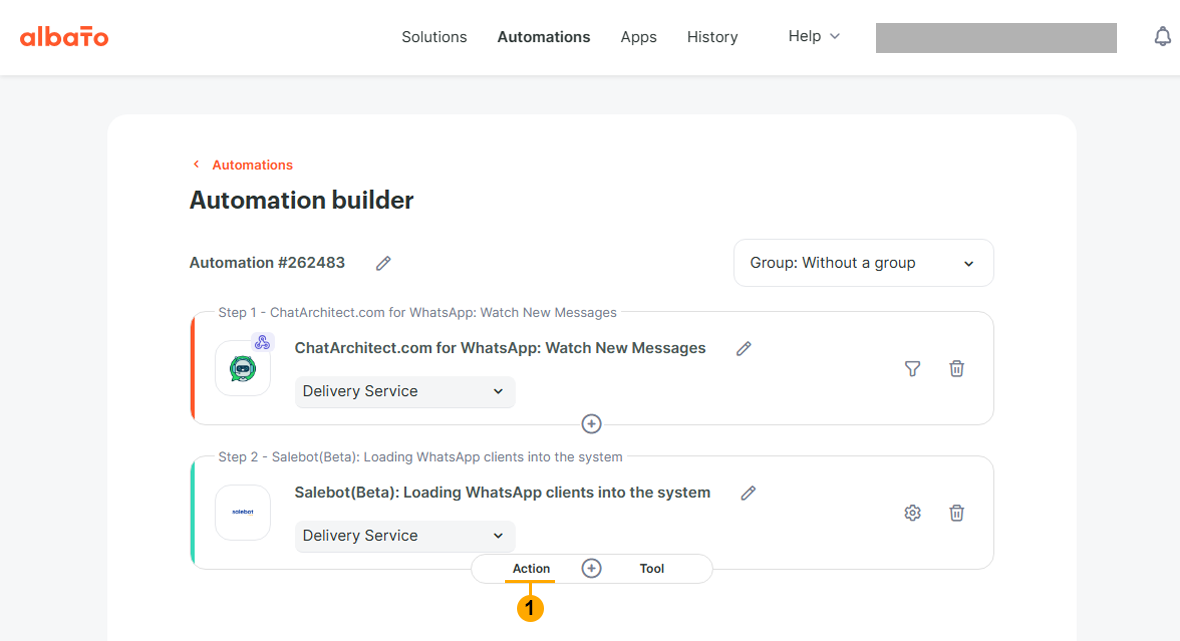
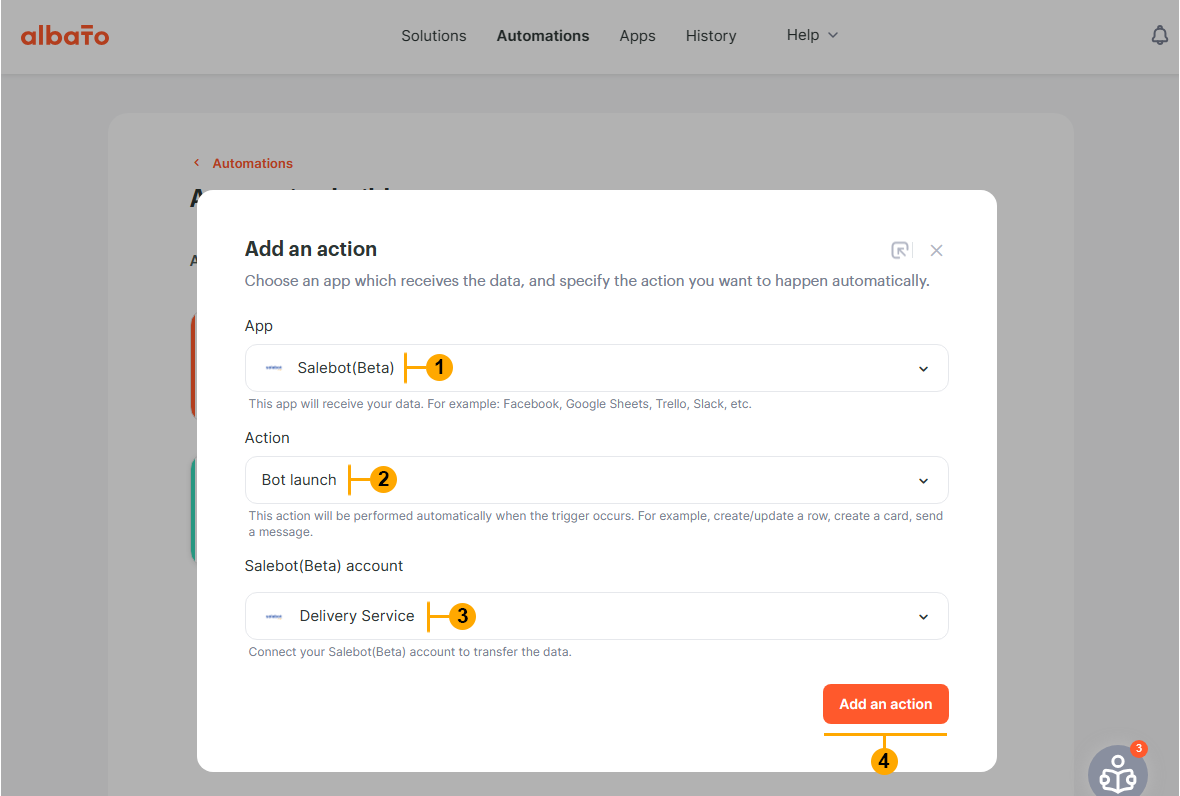
8.6 Now you need to add an action. Press "Plus" (+) and then press "Action" button (1)

<figure id="bkmrk--17">![qiE5_GqymcbMbeMYLcuqDSKXFqPpyU6j0OBShAFf](https://bookstack-support-u7942.vm.elestio.app/uploads/images/gallery/2026-03/embedded-image-mgzo4vtf.png)</figure>
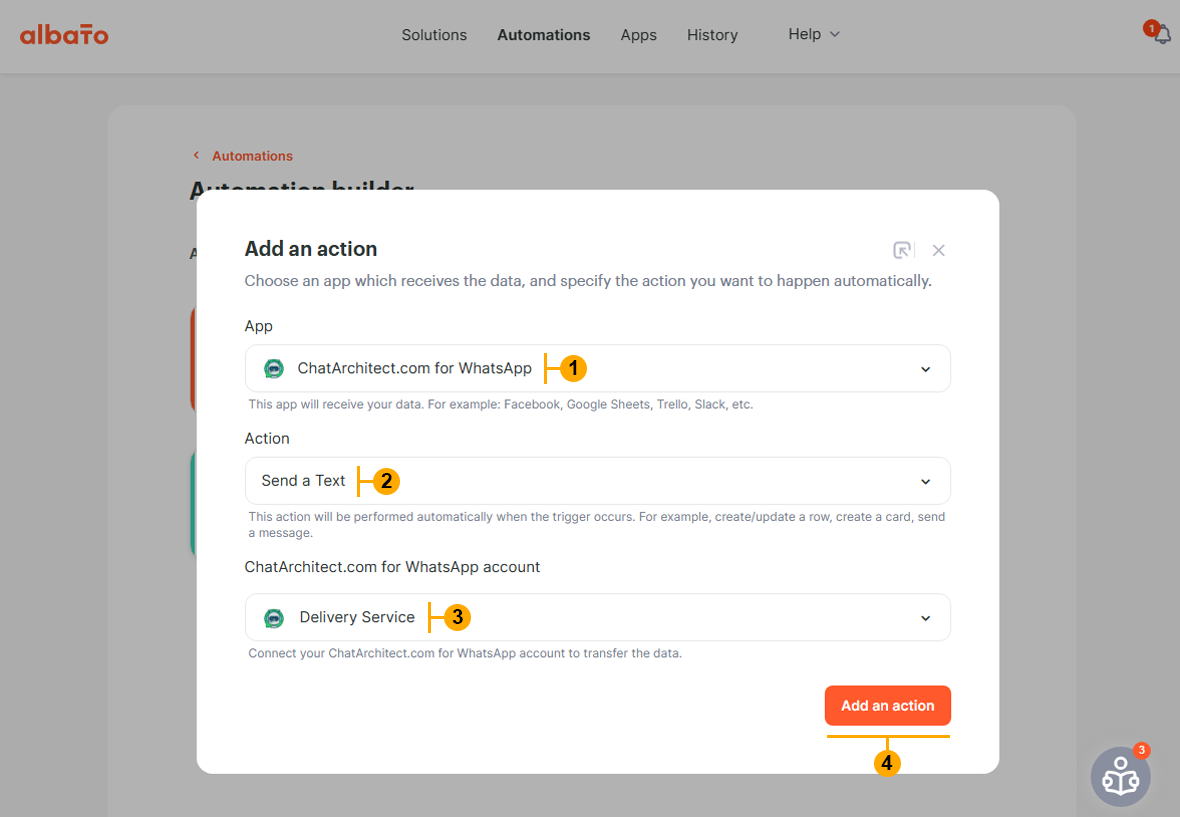
8.7 Make selections (1), (2), (3) and press "Add an action" button (4)

<figure id="bkmrk--18">![4owJGXytLf9q0UJzVFgMHYW_2C-MvB1PJXNKAbtM](https://bookstack-support-u7942.vm.elestio.app/uploads/images/gallery/2026-03/embedded-image-bpvqaklx.png)</figure>
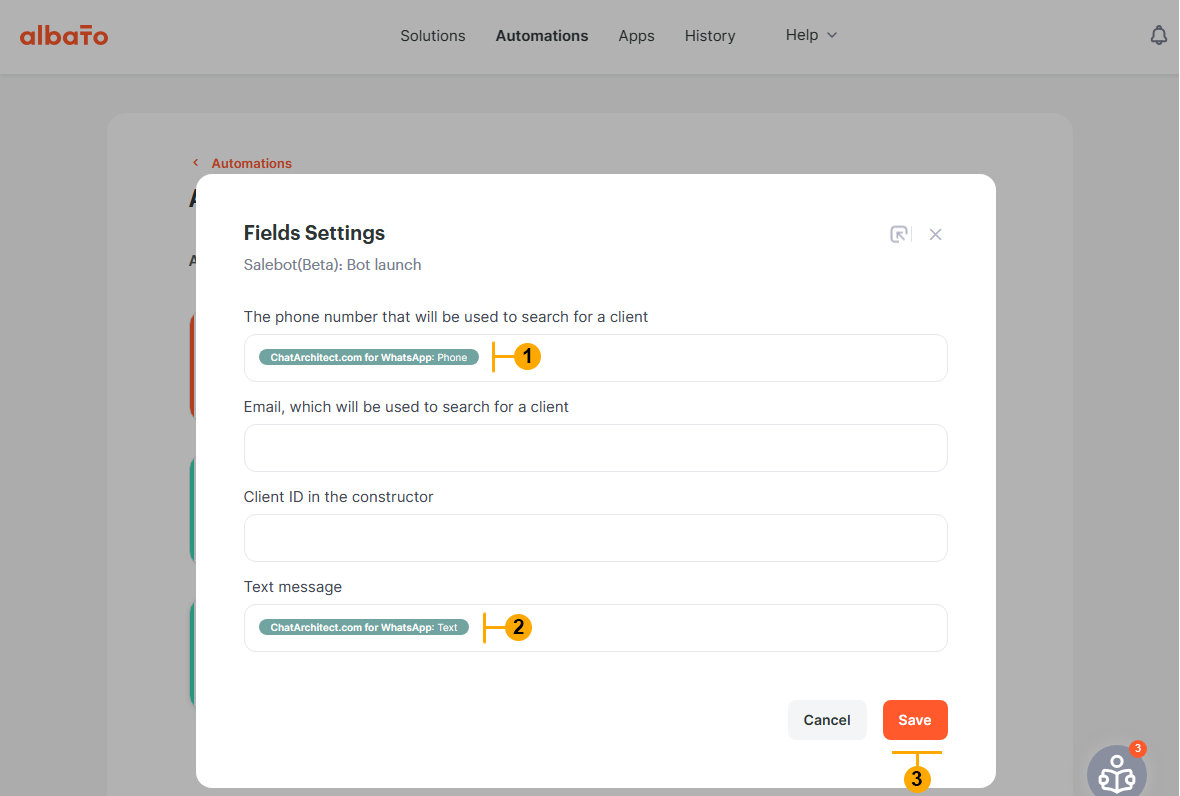
8.8 In the window that appears after "Step 8.7" make next selections (1), (2) and press "Save" button (3)

<figure id="bkmrk--19">![KQxHREZvcGCkbqA_-aO_DT6ZRTyg6zmjYkujnp1f](https://bookstack-support-u7942.vm.elestio.app/uploads/images/gallery/2026-03/embedded-image-xwjku403.png)</figure>9\. Create the second automation in Albato to receive messages from Salebot.pro and send them to WhatsApp. Go to Albato "Automations" page and press "New" button. Same as in "Step 8"

9.1 Press button (1) to select an App which sends data.

<figure id="bkmrk--20">![jT5CWPB8ZabVFTEQTSlADuQXDy9ZkWy_GnigYi1I](https://bookstack-support-u7942.vm.elestio.app/uploads/images/gallery/2026-03/embedded-image-rq9jbhuv.png)</figure>9.2 Make selections (1), (2), (3) and press "Add a trigger" button (4)

<figure id="bkmrk--21">![Py4ugxr5Hmd6-ZBaCSE1W_Hrle1YQyHB-TlJTLRr](https://bookstack-support-u7942.vm.elestio.app/uploads/images/gallery/2026-03/embedded-image-pjgbahe3.png)</figure>
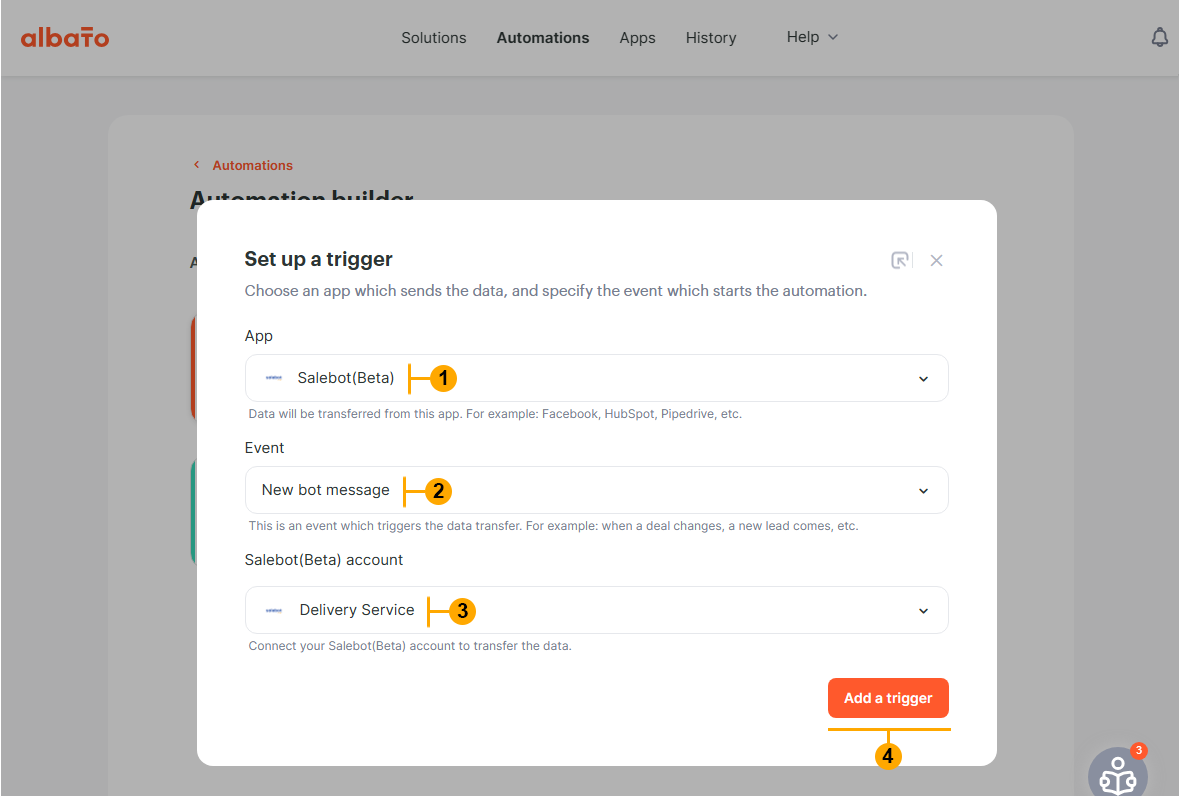
9.3 Press button (2) from step 9.1 to "Select an app which receives the data". Make selections (1), (2), (3) and press "Add a trigger" button (4)

<figure id="bkmrk--22">![66Kg24XaYn9EK3tRUOOxGu-Lz5XzzELiFJ-jR35S](https://bookstack-support-u7942.vm.elestio.app/uploads/images/gallery/2026-03/embedded-image-nm5mujrw.png)</figure>
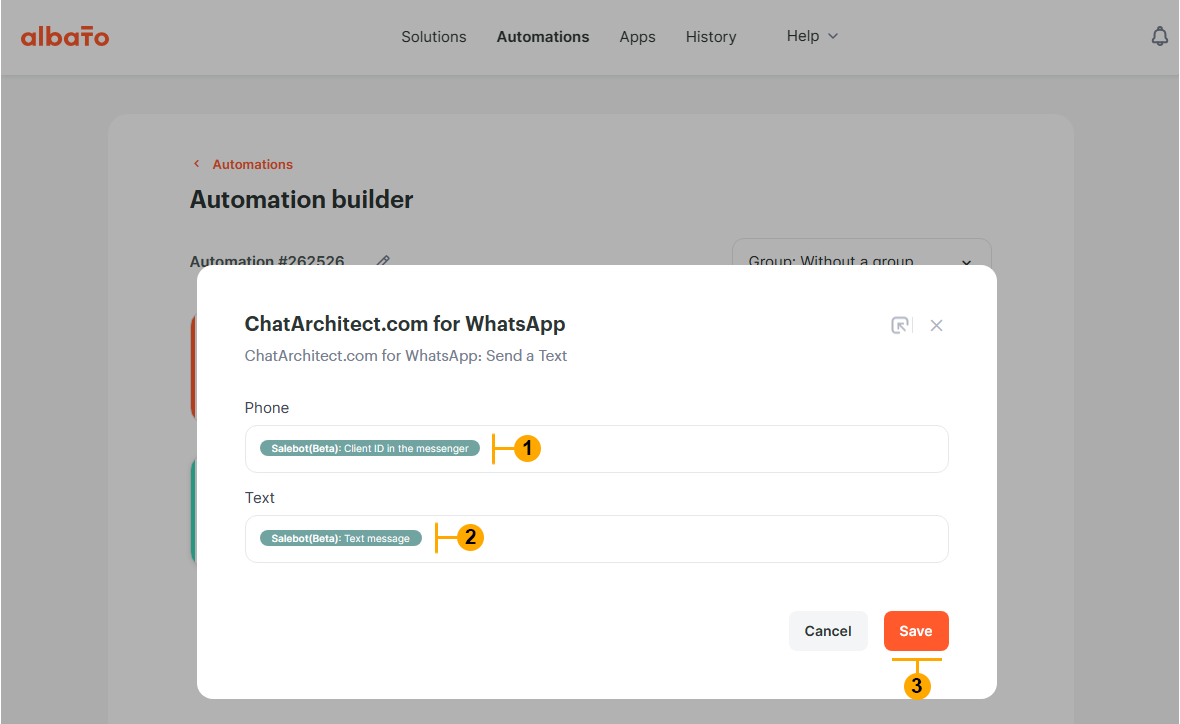
9.4 In the next appeared window make selections (1), (2) and press "Save" button (3)

<figure id="bkmrk--23">![xbKH_9wzXixyhIxh6iIaOOiaKb8Lp2bCBdz1UlYf](https://bookstack-support-u7942.vm.elestio.app/uploads/images/gallery/2026-03/embedded-image-4cotkwrj.png)</figure>
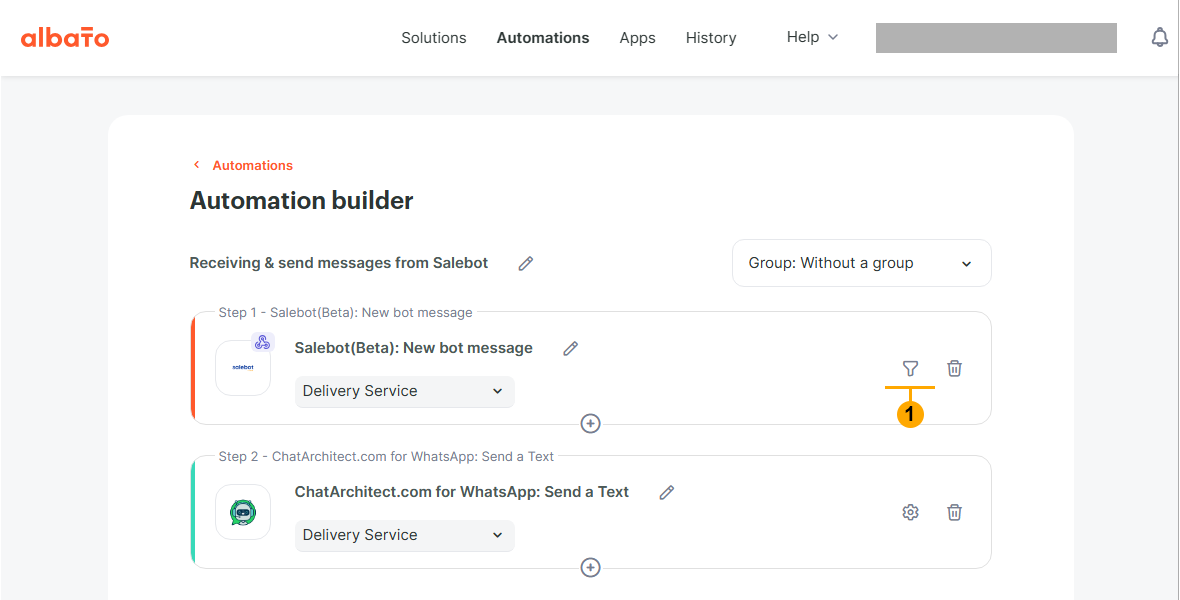
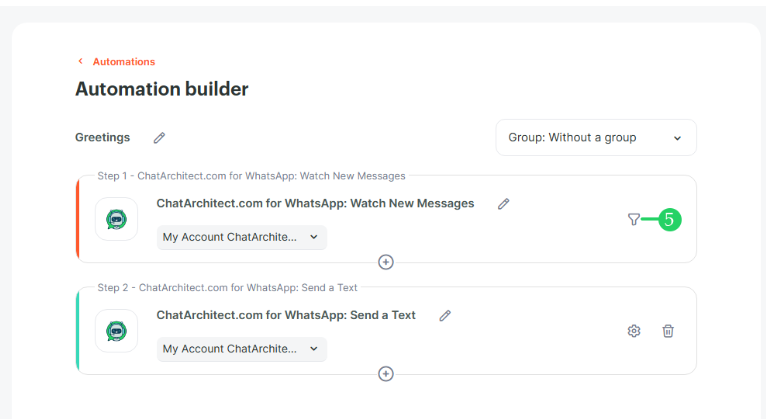
9.5 Now you need to adjust the filter to process only messages from Salebot.pro bot. To do this press "filter" button (1)

<figure id="bkmrk--24">![BZI1TJeG_0Vhax4w-YjMYgacRi5OzSxrii39QbIZ](https://bookstack-support-u7942.vm.elestio.app/uploads/images/gallery/2026-03/embedded-image-27bme63p.png)</figure>
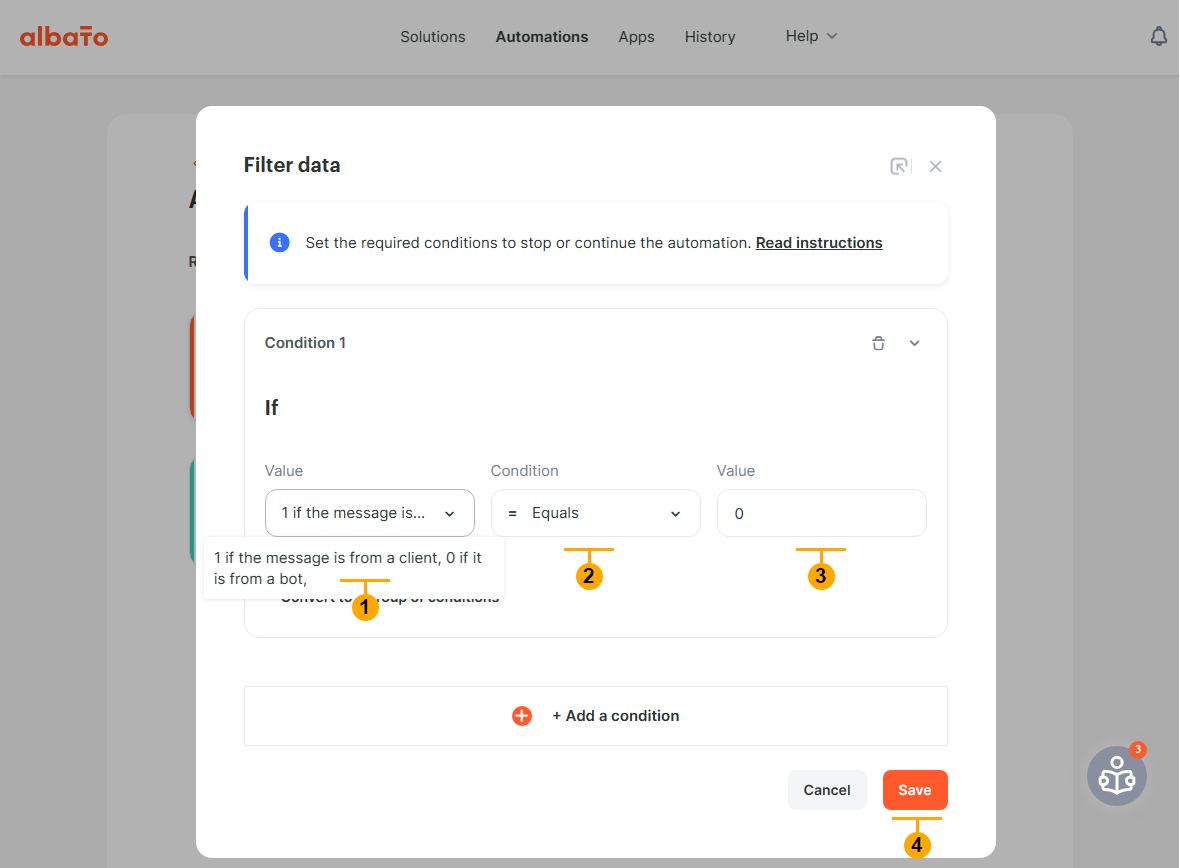
9.6 Adjust filter as shown below (1), (2), (3) and press "Save" button (4)

<figure id="bkmrk--25">![oD0wN0L_xfqA4IBuzpPrke4qj_NfwNG_QkQgHcEv](https://bookstack-support-u7942.vm.elestio.app/uploads/images/gallery/2026-03/embedded-image-ys4wnu7i.png)</figure>
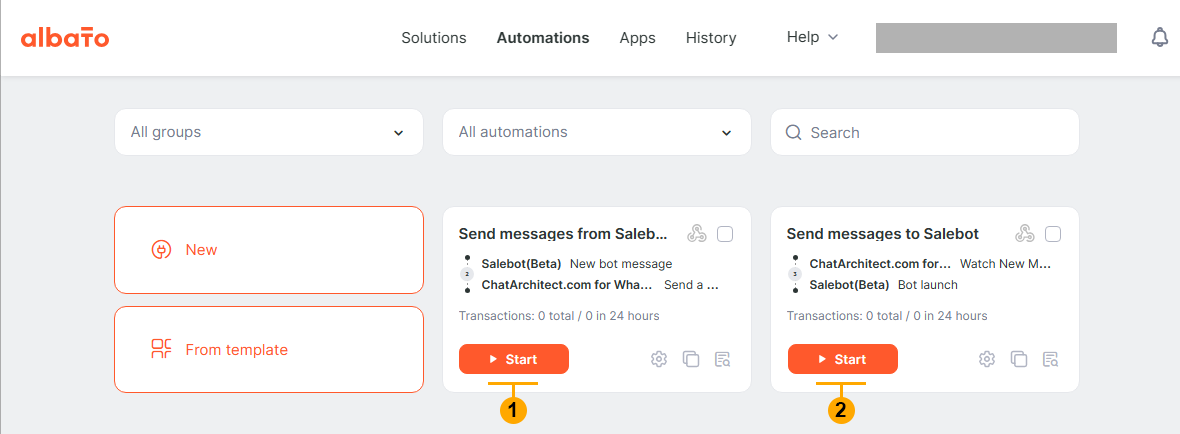
10 Go to "Automations" page and press the "Start" buttons on both automations (1), (2)

<figure id="bkmrk--26">![wZbRHYtuv37BDLGxkcb6hz-7J7-A8m0_SebAeZvQ](https://bookstack-support-u7942.vm.elestio.app/uploads/images/gallery/2026-03/embedded-image-dpdkdg11.png)</figure>
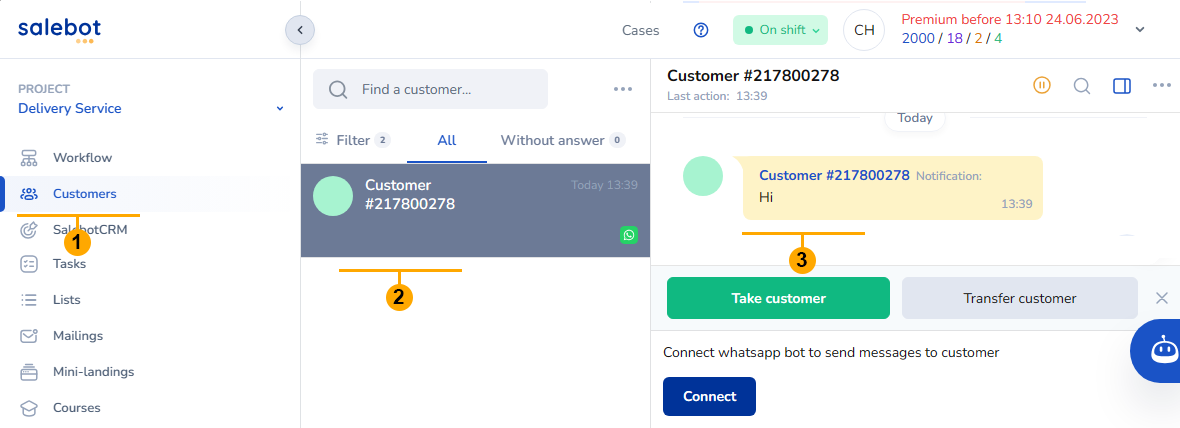
11\. Write to your WhatsApp number to test connection. You should receive your message in the Salebot.pro "Customers" section.

<figure id="bkmrk--27">![zAgcaR07ChYsI-jkZYyJyLgBWlLXF6ZJAviy29v7](https://bookstack-support-u7942.vm.elestio.app/uploads/images/gallery/2026-03/embedded-image-7s4phzqd.png)</figure>
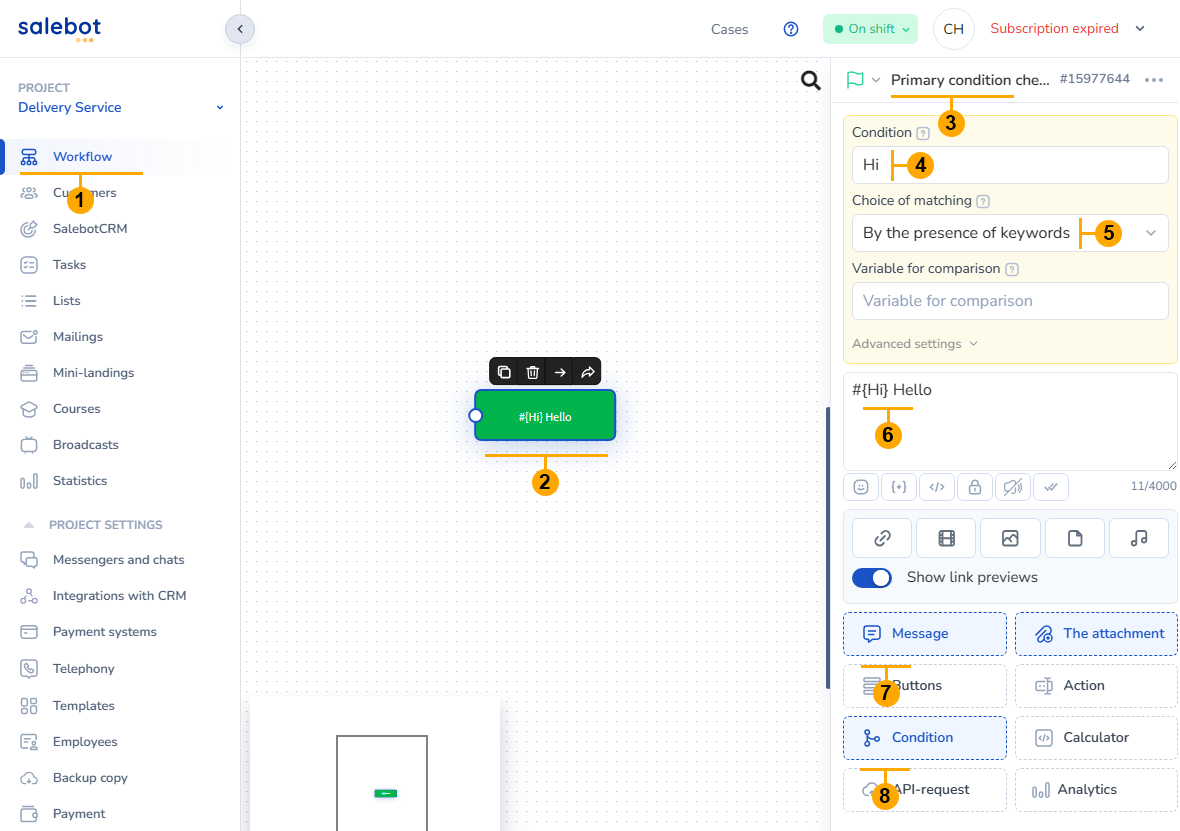
12\. Configure Salebot.pro workflow like on screenshot below:

<figure id="bkmrk--28">![oF7oDsqs6TiFwQk5yf_1YAgF95uQj-RkKcZRbyDr](https://bookstack-support-u7942.vm.elestio.app/uploads/images/gallery/2026-03/embedded-image-8xg7xgd3.png)</figure>13\. Write to your phone number keyword "Hi". After some delay bot must reply "Hello"

<figure id="bkmrk--29">![WrA_Z0WdyQxFsguRXpOGIsHnf6rTSOXszyZE0CSL](https://bookstack-support-u7942.vm.elestio.app/uploads/images/gallery/2026-03/embedded-image-4mnm4f48.png)</figure>

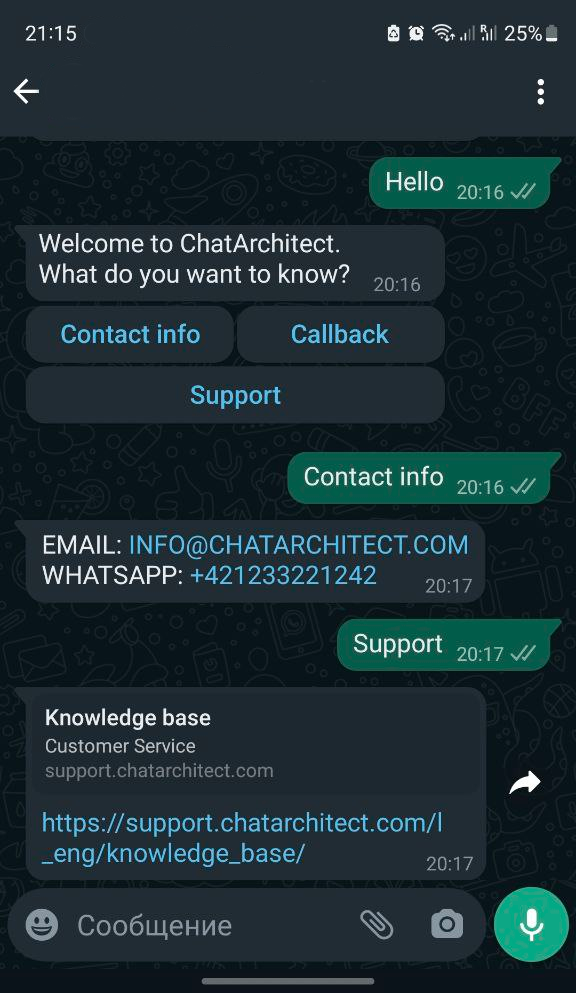
# Set up a WhatsApp bot based on Albato.com

<span style="font-size:20px;">Step by step instruction</span>

  
1.1 Create an account on Albato.com and go to the Apps section  
  
1.2 Add a connection to ChatArchitect.com for WhatsApp by clicking the Add a connection button<figure id="bkmrk--4" style="display:block;margin:0px 0px 1em;padding:0px;clear:both;color:rgb(213,214,215);font-family:Roboto, Helvetica, Arial, sans-serif;font-size:14px;font-style:normal;font-weight:400;letter-spacing:normal;text-indent:0px;text-transform:none;white-space:normal;word-spacing:0px;background-color:rgb(34,34,34);text-decoration-thickness:initial;text-decoration-style:initial;text-decoration-color:initial;">![embedded-image-y3foekut.png](https://bookstack-support-u7942.vm.elestio.app/uploads/images/gallery/2026-03/embedded-image-y3foekut.png)</figure>
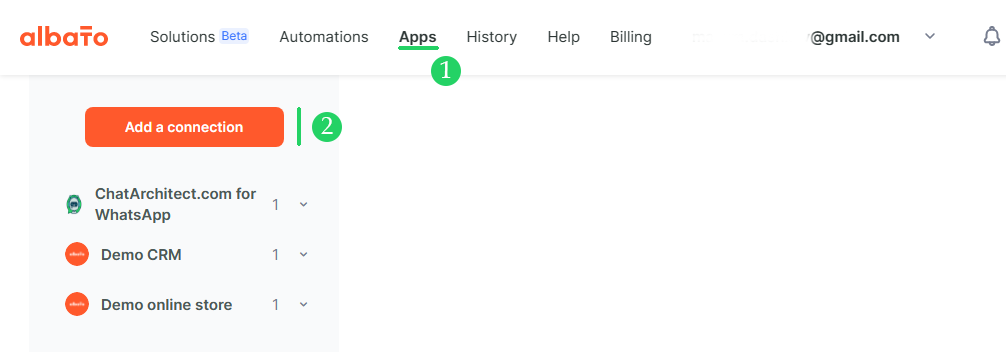
1.3 Add App ID and Secret ID

<figure id="bkmrk--5" style="display:block;margin:0px 0px 1em;padding:0px;clear:both;color:rgb(213,214,215);font-family:Roboto, Helvetica, Arial, sans-serif;font-size:14px;font-style:normal;font-weight:400;letter-spacing:normal;text-indent:0px;text-transform:none;white-space:normal;word-spacing:0px;background-color:rgb(34,34,34);text-decoration-thickness:initial;text-decoration-style:initial;text-decoration-color:initial;">![embedded-image-bwk6dmhq.png](https://bookstack-support-u7942.vm.elestio.app/uploads/images/gallery/2026-03/embedded-image-bwk6dmhq.png)</figure><span style="font-size:20px;">  
1\. Making a bot using Albato tools without third-party integrations</span>  
  
2.1 We approve the message template on app.chatarchitect.com.

<figure id="bkmrk--7" style="display:block;margin:0px 0px 1em;padding:0px;clear:both;color:rgb(213,214,215);font-family:Roboto, Helvetica, Arial, sans-serif;font-size:14px;font-style:normal;font-weight:400;letter-spacing:normal;text-indent:0px;text-transform:none;white-space:normal;word-spacing:0px;background-color:rgb(34,34,34);text-decoration-thickness:initial;text-decoration-style:initial;text-decoration-color:initial;">![embedded-image-xcaso2qy.png](https://bookstack-support-u7942.vm.elestio.app/uploads/images/gallery/2026-03/embedded-image-xcaso2qy.png)</figure>  
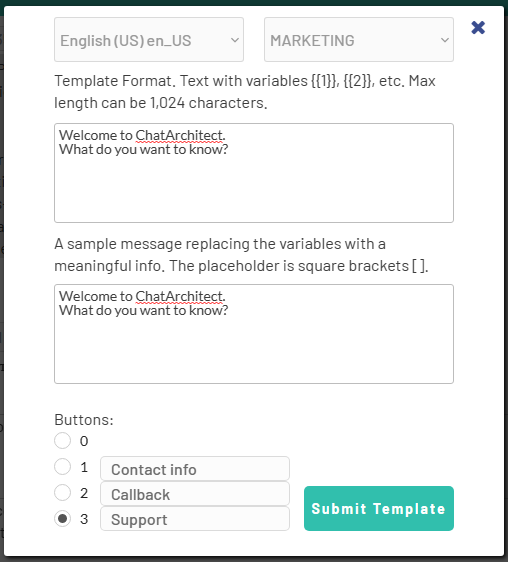
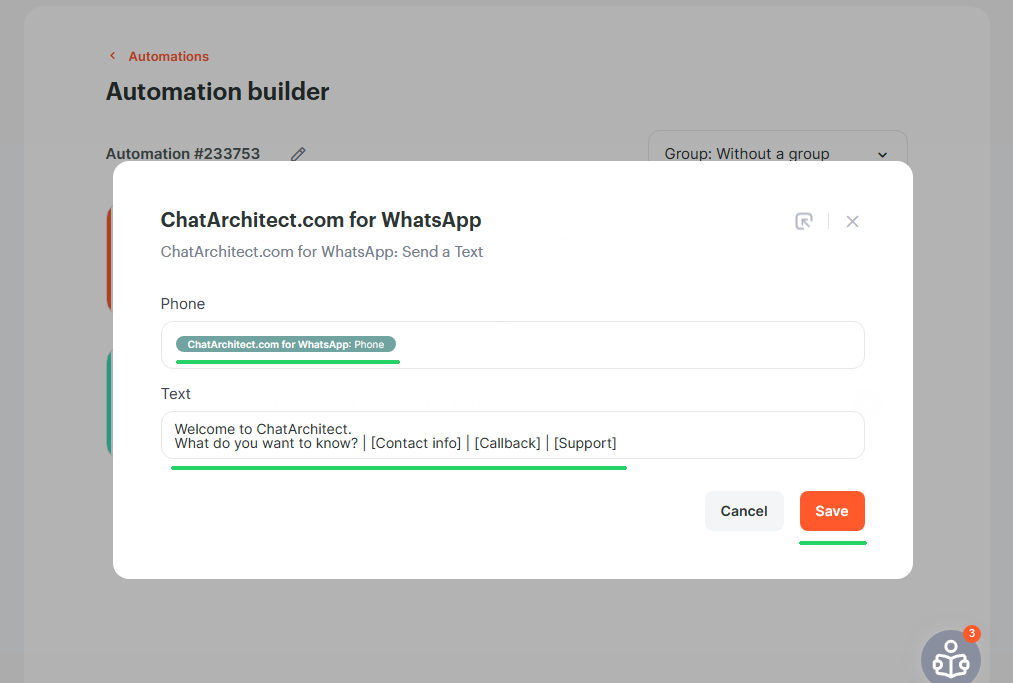
2.2 Add approved template in Albato automation. This message will be sent to all customers who contact us by default (i.e. if the keywords \[Contact info\], \[Callback\] or \[Support\] are not found)

  
2.3 To do this, go to the "Automations" section and click the "New" button<figure id="bkmrk--10" style="display:block;margin:0px 0px 1em;padding:0px;clear:both;color:rgb(213,214,215);font-family:Roboto, Helvetica, Arial, sans-serif;font-size:14px;font-style:normal;font-weight:400;letter-spacing:normal;text-indent:0px;text-transform:none;white-space:normal;word-spacing:0px;background-color:rgb(34,34,34);text-decoration-thickness:initial;text-decoration-style:initial;text-decoration-color:initial;">![embedded-image-s5lotp0b.png](https://bookstack-support-u7942.vm.elestio.app/uploads/images/gallery/2026-03/embedded-image-s5lotp0b.png)</figure>2.4

<figure id="bkmrk--11" style="display:block;margin:0px 0px 1em;padding:0px;clear:both;color:rgb(213,214,215);font-family:Roboto, Helvetica, Arial, sans-serif;font-size:14px;font-style:normal;font-weight:400;letter-spacing:normal;text-indent:0px;text-transform:none;white-space:normal;word-spacing:0px;background-color:rgb(34,34,34);text-decoration-thickness:initial;text-decoration-style:initial;text-decoration-color:initial;">![embedded-image-kfbdcf9w.png](https://bookstack-support-u7942.vm.elestio.app/uploads/images/gallery/2026-03/embedded-image-kfbdcf9w.png)</figure>2.5

<figure id="bkmrk--12" style="display:block;margin:0px 0px 1em;padding:0px;clear:both;color:rgb(213,214,215);font-family:Roboto, Helvetica, Arial, sans-serif;font-size:14px;font-style:normal;font-weight:400;letter-spacing:normal;text-indent:0px;text-transform:none;white-space:normal;word-spacing:0px;background-color:rgb(34,34,34);text-decoration-thickness:initial;text-decoration-style:initial;text-decoration-color:initial;">![embedded-image-h4bfywyf.png](https://bookstack-support-u7942.vm.elestio.app/uploads/images/gallery/2026-03/embedded-image-h4bfywyf.png)</figure>2.6

<figure id="bkmrk--13" style="display:block;margin:0px 0px 1em;padding:0px;clear:both;color:rgb(213,214,215);font-family:Roboto, Helvetica, Arial, sans-serif;font-size:14px;font-style:normal;font-weight:400;letter-spacing:normal;text-indent:0px;text-transform:none;white-space:normal;word-spacing:0px;background-color:rgb(34,34,34);text-decoration-thickness:initial;text-decoration-style:initial;text-decoration-color:initial;">![embedded-image-s2iv9qev.png](https://bookstack-support-u7942.vm.elestio.app/uploads/images/gallery/2026-03/embedded-image-s2iv9qev.png)</figure>2.7

<figure id="bkmrk--14" style="display:block;margin:0px 0px 1em;padding:0px;clear:both;color:rgb(213,214,215);font-family:Roboto, Helvetica, Arial, sans-serif;font-size:14px;font-style:normal;font-weight:400;letter-spacing:normal;text-indent:0px;text-transform:none;white-space:normal;word-spacing:0px;background-color:rgb(34,34,34);text-decoration-thickness:initial;text-decoration-style:initial;text-decoration-color:initial;">![embedded-image-lxpke6da.png](https://bookstack-support-u7942.vm.elestio.app/uploads/images/gallery/2026-03/embedded-image-lxpke6da.png)</figure>2.8 Add a rule to return a message to the number from which the message came to us and insert the text of the message

<figure id="bkmrk--15" style="display:block;margin:0px 0px 1em;padding:0px;clear:both;color:rgb(213,214,215);font-family:Roboto, Helvetica, Arial, sans-serif;font-size:14px;font-style:normal;font-weight:400;letter-spacing:normal;text-indent:0px;text-transform:none;white-space:normal;word-spacing:0px;background-color:rgb(34,34,34);text-decoration-thickness:initial;text-decoration-style:initial;text-decoration-color:initial;">![embedded-image-rfjlxt0q.png](https://bookstack-support-u7942.vm.elestio.app/uploads/images/gallery/2026-03/embedded-image-rfjlxt0q.png)</figure>
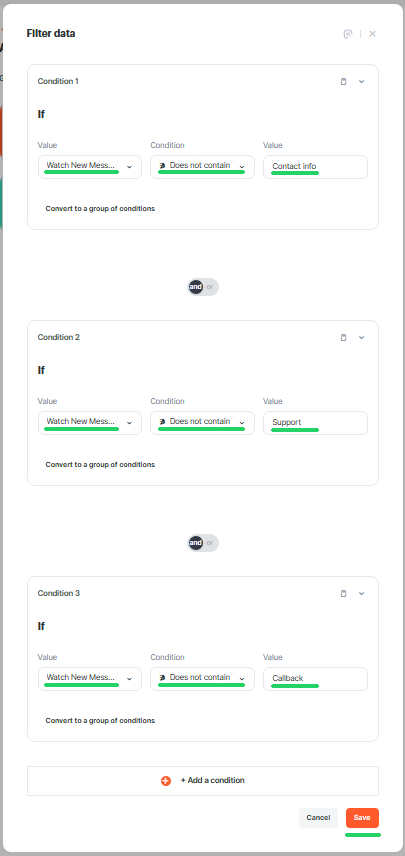
2.9 Add a filter for keywords, at the meeting of which the template will not be sent by default. In our case, these words are Contact info, Callback and Support.

<figure id="bkmrk--16" style="display:block;margin:0px 0px 1em;padding:0px;clear:both;color:rgb(213,214,215);font-family:Roboto, Helvetica, Arial, sans-serif;font-size:14px;font-style:normal;font-weight:400;letter-spacing:normal;text-indent:0px;text-transform:none;white-space:normal;word-spacing:0px;background-color:rgb(34,34,34);text-decoration-thickness:initial;text-decoration-style:initial;text-decoration-color:initial;">![embedded-image-w80vbope.png](https://bookstack-support-u7942.vm.elestio.app/uploads/images/gallery/2026-03/embedded-image-w80vbope.png)</figure>2.10 Just do the same as in the screenshot

<figure id="bkmrk--17" style="display:block;margin:0px 0px 1em;padding:0px;clear:both;color:rgb(213,214,215);font-family:Roboto, Helvetica, Arial, sans-serif;font-size:14px;font-style:normal;font-weight:400;letter-spacing:normal;text-indent:0px;text-transform:none;white-space:normal;word-spacing:0px;background-color:rgb(34,34,34);text-decoration-thickness:initial;text-decoration-style:initial;text-decoration-color:initial;">![embedded-image-pn3np1cq.png](https://bookstack-support-u7942.vm.elestio.app/uploads/images/gallery/2026-03/embedded-image-pn3np1cq.png)</figure>2.11 Add automation to send help messages according to the buttons pressed by customers. In the example, we will create a rule for the phrase "Contact info" (clicking the \[Contact info\] button by the client), the principle is the same for other key phrases / buttons.

Repeat steps 2.3 - 2.8. Only in paragraph 2.8 we add another text with contact information  
  
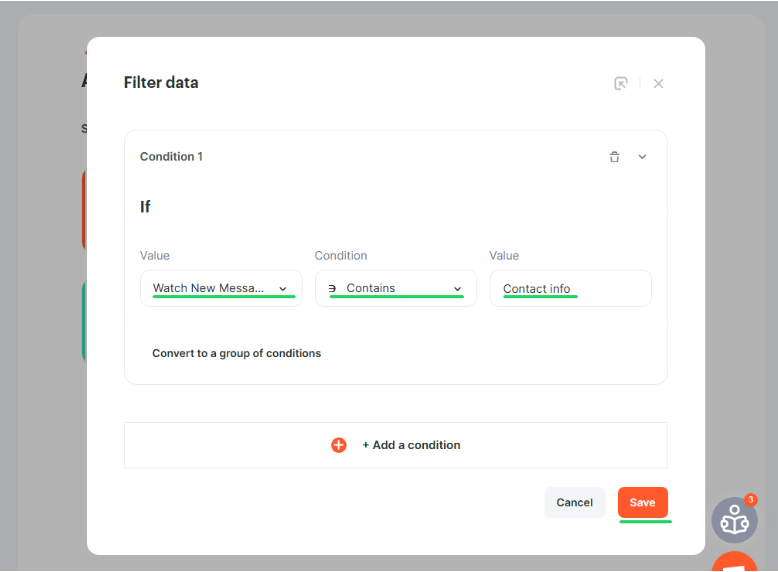
2.12 Click the filter button<figure id="bkmrk--21" style="display:block;margin:0px 0px 1em;padding:0px;clear:both;color:rgb(213,214,215);font-family:Roboto, Helvetica, Arial, sans-serif;font-size:14px;font-style:normal;font-weight:400;letter-spacing:normal;text-indent:0px;text-transform:none;white-space:normal;word-spacing:0px;background-color:rgb(34,34,34);text-decoration-thickness:initial;text-decoration-style:initial;text-decoration-color:initial;">![embedded-image-kdp5q1xg.png](https://bookstack-support-u7942.vm.elestio.app/uploads/images/gallery/2026-03/embedded-image-kdp5q1xg.png)</figure>
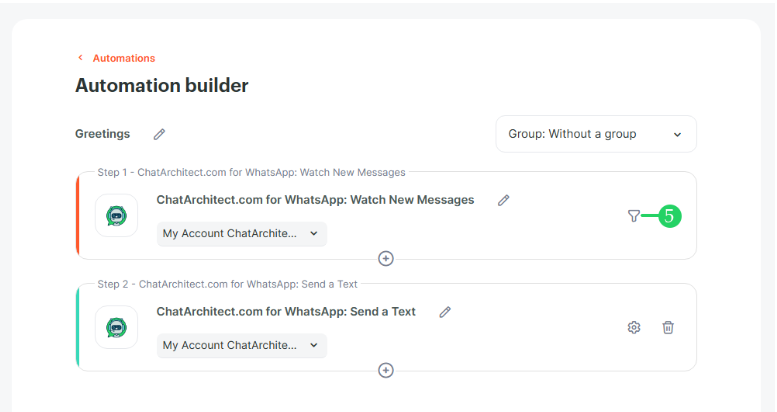
2.13 Set up a filter for our keyword "Contact info"

<figure id="bkmrk--22" style="display:block;margin:0px 0px 1em;padding:0px;clear:both;color:rgb(213,214,215);font-family:Roboto, Helvetica, Arial, sans-serif;font-size:14px;font-style:normal;font-weight:400;letter-spacing:normal;text-indent:0px;text-transform:none;white-space:normal;word-spacing:0px;background-color:rgb(34,34,34);text-decoration-thickness:initial;text-decoration-style:initial;text-decoration-color:initial;">![embedded-image-vfadlt9f.png](https://bookstack-support-u7942.vm.elestio.app/uploads/images/gallery/2026-03/embedded-image-vfadlt9f.png)</figure>  
We return to point 2.2 and do the same for the keywords \[Callback\] and \[Support\]

  
As a result, we will get such a bot:

<figure id="bkmrk--23">![embedded-image-mypcnoga.png](https://bookstack-support-u7942.vm.elestio.app/uploads/images/gallery/2026-03/embedded-image-mypcnoga.png)</figure>